Topic: Learn how to process incoming returns in the Sendcloud returns overview.
Returns overview
What does Sendcloud offer to optimize your return process?
Different Ways to Create Returns:
In the Helpcenter article How to create a return, we explain the various options for creating return labels via Sendcloud.
Optimize Your Return Policy and Increase the Conversion Rate:
Check out our article about return rules:
- Charge different fees per country with custom return rules.
- Prevent specific items or orders from being returned based on country.
- Choose specific return shipping methods per country.
- Clearly communicate return options on your website to increase conversion.
Improve Customer Experience:
Customizable Tracking emails will inform your customers about the status of their return and increase brand awareness.
Manage All Your Incoming Returns Efficiently:
Filter returns by status, date, country of origin, refund type, carrier, reason, or whether they include images. You can also cancel a return or mark it as refunded.
Detailed Returns Overview:

When you create a return, it will appear in the Returns Overview, which includes:
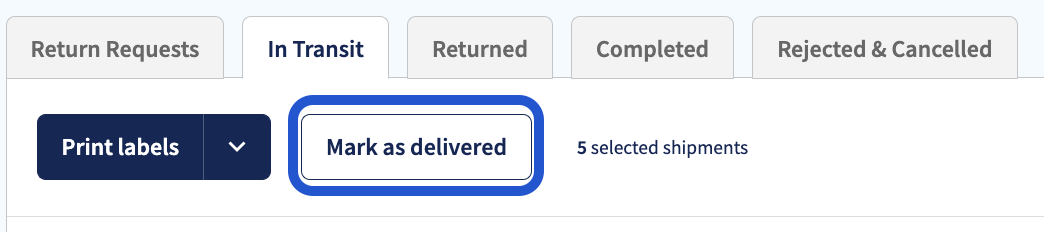
- Return Requests: Pending requests that have not been processed (if enabled).
- In Transit: Approved returns on their way back, including those with announcement errors.
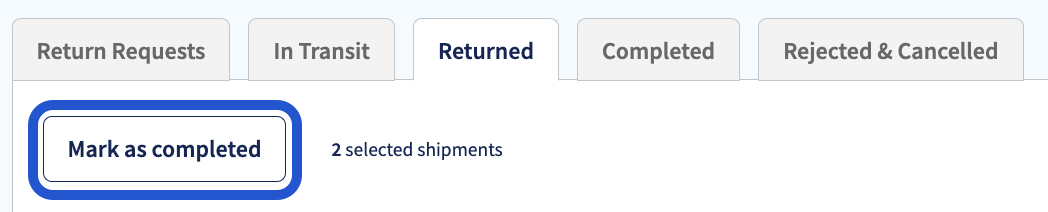
- Returned: Returns that have arrived at the warehouse but are not yet processed.
- Completed: Returns that have been processed and refunded.
- Rejected/Cancelled: All rejected return requests and/or canceled returns.
Actions:
-
Mark as Delivered (In Transit Tab): Select your returns and Bulk-mark them as delivered and move them to the Returned tab. This is useful if carrier tracking is stuck or for in-store returns without tracking numbers.
Important: Parcels marked as delivered will be invoiced.
- Mark as Completed (Returned Tab): Select your returns and Bulk-mark them as completed and move them to the Completed tab.
In-store Returns:
If you have enabled in-store returns in your return portal, no shipping label will be created, and the return will have the status "No label."

Return details and parcel tracking
-
Order details
Information regarding the original order and the tracking number, plus the customer details. -
Return details
The new tracking number for the return parcel, the date the return was created and the selected return shipping method, plus the chosen brand when creating the return. -
Delivery Status
The current delivery status of the parcel is shown under status, so you can keep an eye on when your parcel is going to arrive back with you. The customer will also receive Tracking notifications for their return parcel when you enable return Tracking emails, so they know their parcel has arrived safely and when they can expect to receive a refund. If the customer chooses the option to return a parcel in-store, no tracking statuses will be shown as a return label is not necessary. -
Returned items
This section shows the products the customer has chosen to return and the quantity, plus the reason for the return. -
Refund method
This section details the refund option your customer has chosen from the methods you have enabled (refund, exchange or store credit), the shipping cost the customer paid (so you can refund it alongside the product/s they are returning) and the return fee if you enabled one.
How do I refund my customer or charge my customer for their return?
Once your customer has returned their products, you will need to refund them while taking into account the costs of their return parcel.
In the example below, you can see that the amount you should refund your customer is estimated (total order value + original shipping costs - return fee) / (€700 + €6.00 - €5.00 = €701.00):
Note that shipping costs do not have to be reimbursed if only part of the order is returned. If you ship an order with free shipping, you will refund the returned item minus the return fee.
Once you have refunded a return, you can mark it as refunded in your Returns overview.
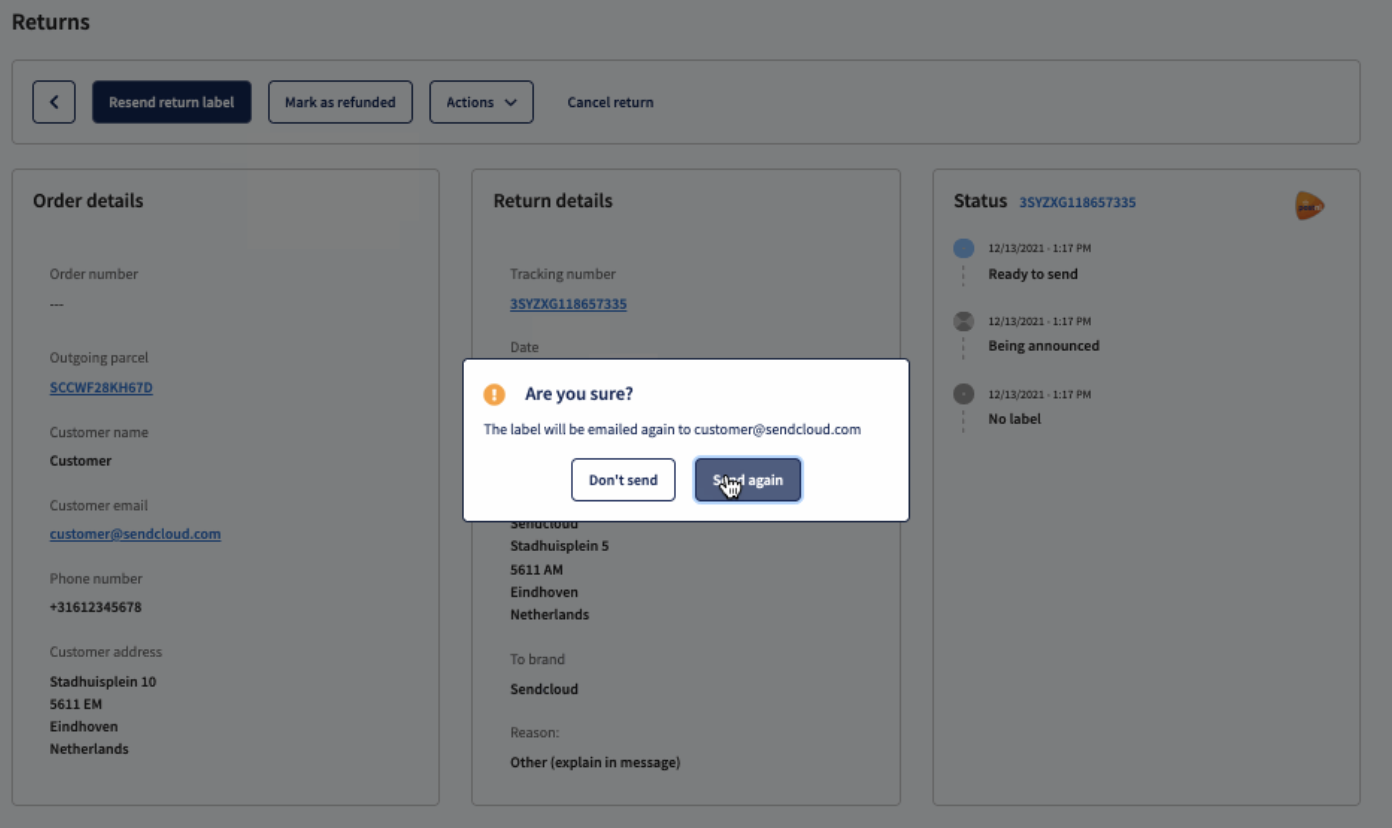
The customer created a return but didn't receive the label, what now?
The customer will be prompted to download their return label as soon as they have created a return using the return portal, provided they have not chosen to return in-store. It will also be sent to them in an email.
However, if for some reason they are unable to print the return label when initially prompted, or if they can no longer locate it, you might want to resend it to your customer. To do so, simply navigate to the particular return in your Returns overview, click the eye icon to enter the return details, and click the "Resend return label" button to send the label again to the customer via their email address.
The return label is not being used. Why am I not able to cancel the label?
Related articles:
→ No carrier within 10 km? ERS will allow you to drop off at the national carrier