
The Sendcloud Dynamic Checkout plugin for WooCommerce allows you to display the delivery options configured in your Sendcloud account directly in your WooCommerce checkout.
With Dynamic Checkout, most of the configuration takes place in Sendcloud. You create and publish your checkout configuration in the Sendcloud panel, then connect it to your WooCommerce store.
Standard delivery, Service point delivery, Nominated day delivery, Same-day delivery.
The delivery options available to your customers depend on your configuration, carriers, and destination.
Before you start
Before setting up Dynamic Checkout for WooCommerce, make sure that:
- Your WooCommerce store is connected to Sendcloud.
- You are using the supported WooCommerce V2 integration.
- You have access to Dynamic Checkout in your Sendcloud account.
- You can create and publish a Dynamic Checkout configuration for your WooCommerce integration.
Set up Dynamic Checkout for WooCommerce
Step 1: Install and activate the Dynamic Checkout plugin
Install the Sendcloud | Shipping & Dynamic Checkout Automation for WooCommerce plugin in your WooCommerce environment.
Once the plugin is installed, activate it in WooCommerce.
When the plugin is installed and activated, it appears in the Plugins list in WooCommerce, as shown below.
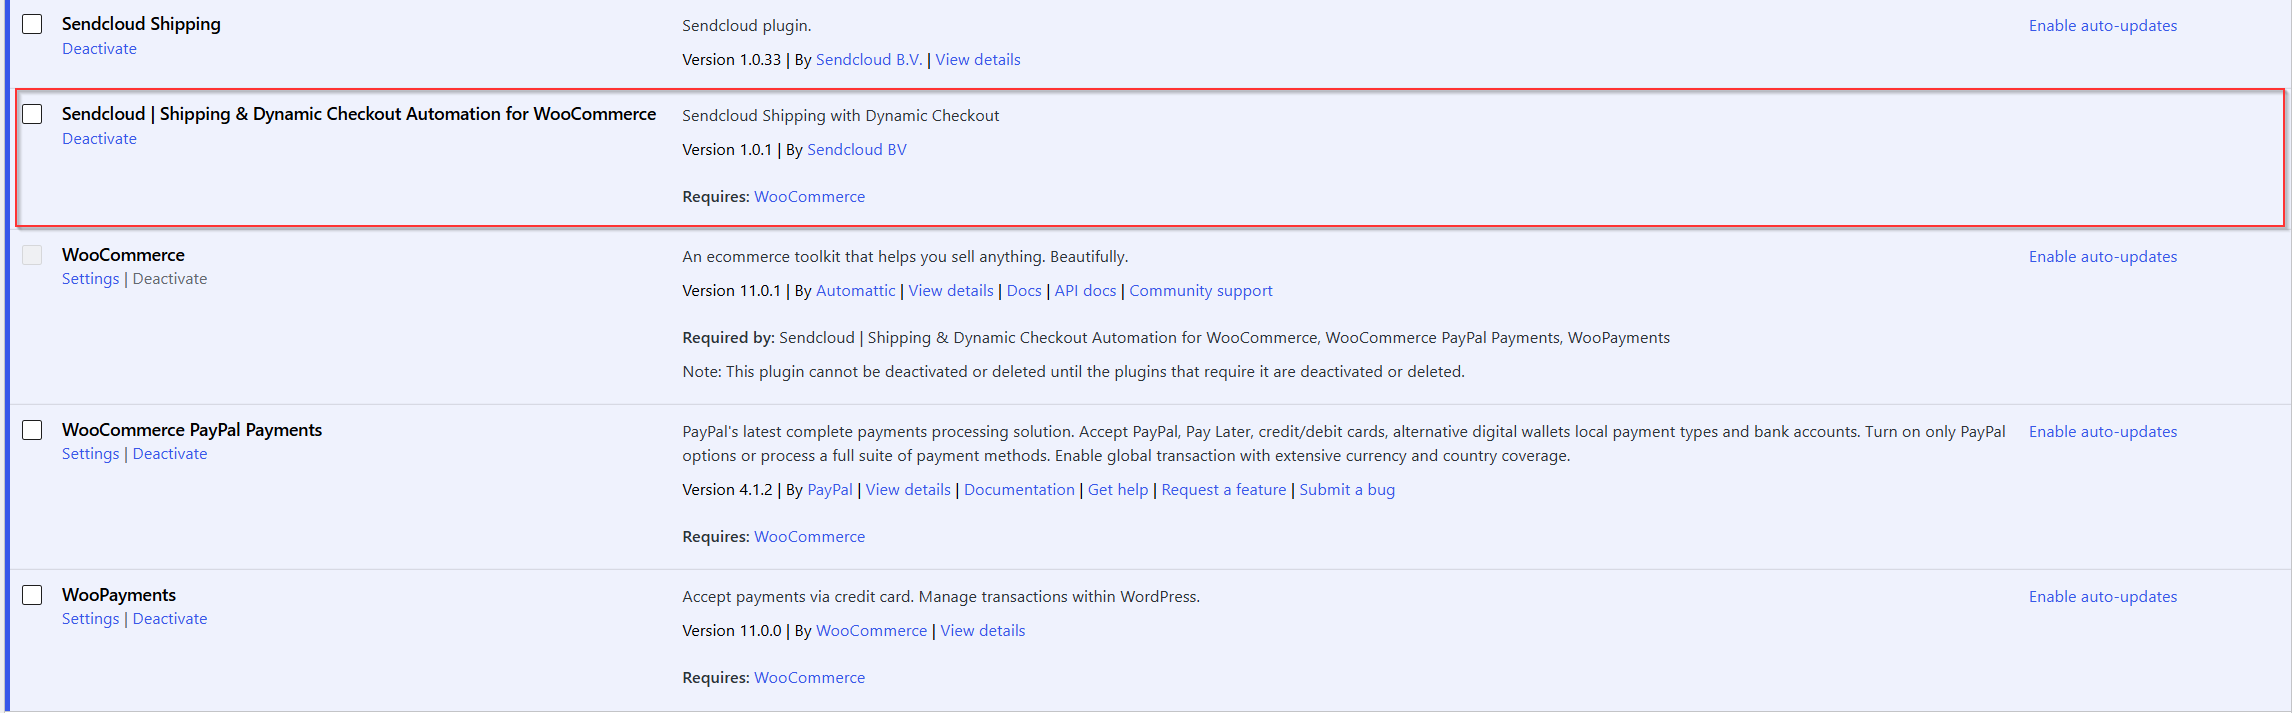
Activating the plugin also adds a Sendcloud tab to your WooCommerce settings. You will use this tab later to connect WooCommerce to Sendcloud using API credentials.
Step 2: Create an API integration for Dynamic Checkout
Next, create a separate API integration in Sendcloud. This API integration will connect your Dynamic Checkout configuration to the Dynamic Checkout plugin in WooCommerce.
In your Sendcloud account, go to Settings > Integrations and create a new API integration.
Give the integration a clear and recognizable name, for example WooCommerce Dynamic Checkout. A clear name makes it easier to identify the correct integration when you create your Dynamic Checkout configuration in the next step.
After creating the integration, Sendcloud provides a Public Key and a Secret Key.
Copy and securely store both credentials. You will need them later when connecting the plugin in WooCommerce.
Step 3: Create and publish your Dynamic Checkout configuration
Now create the delivery experience that you want to offer in your WooCommerce checkout.
In your Sendcloud account, go to Dynamic Checkout.
Locate the API integration that you created in Step 2 and create a Dynamic Checkout configuration for that integration.
If you have multiple API integrations, make sure that you select the correct one. Using a clear integration name such as WooCommerce Dynamic Checkout can help you identify it.
Your Dynamic Checkout configuration can include:
- Delivery zones
- Delivery methods
- Carrier selections
- Shipping rates
- Handover settings
- Checkout Rules that determine when particular delivery options should be shown or hidden
Follow our Dynamic Checkout: Setup & Configuration Guide to configure your checkout.
When the configuration is ready, publish it in Sendcloud.
Step 4: Connect the Dynamic Checkout plugin to Sendcloud
After publishing your Dynamic Checkout configuration, return to WooCommerce.
Go to WooCommerce > Settings > Sendcloud.
Enter the Public Key and Secret Key from the API integration that you created in Step 2.
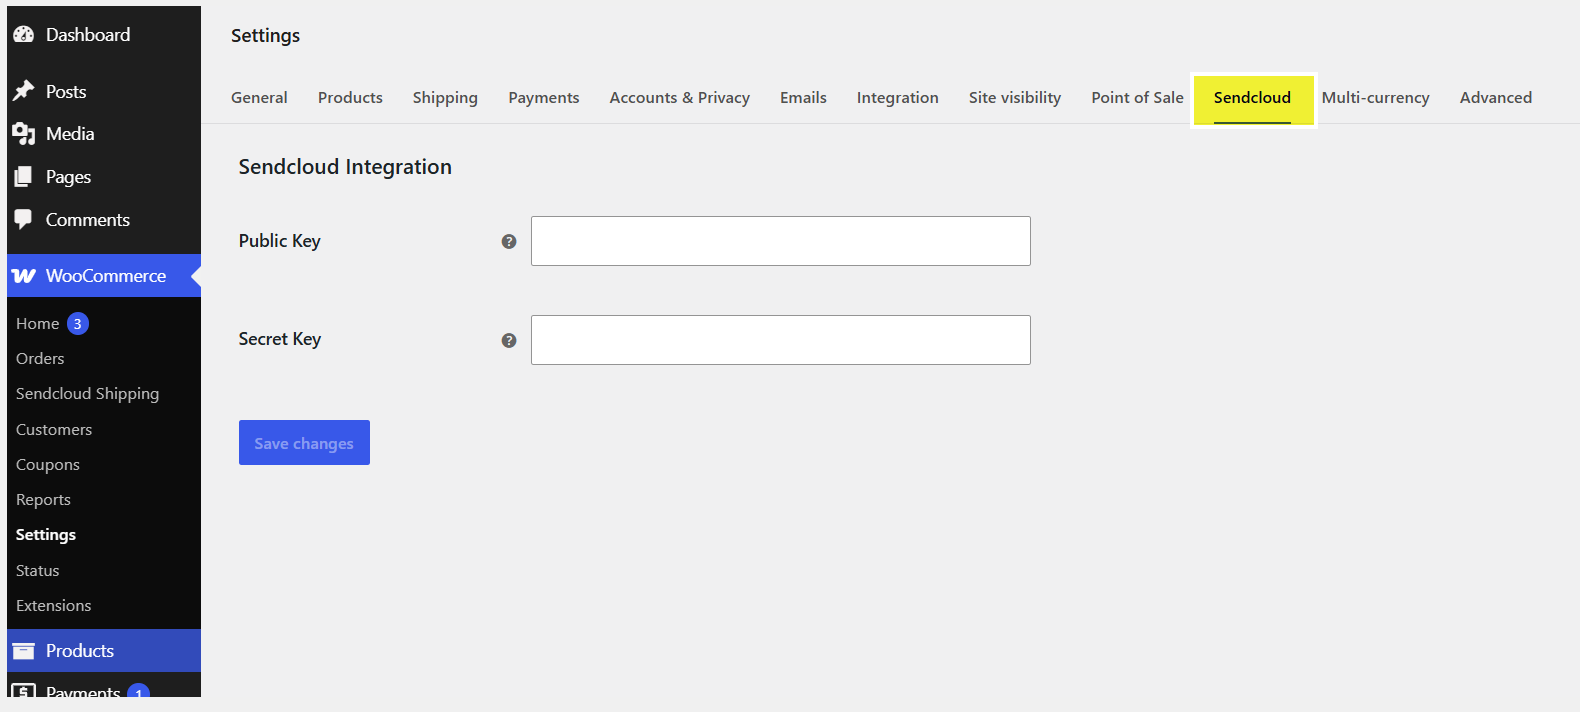
Click Save changes.
These API credentials connect your WooCommerce shop to the API integration in Sendcloud. Because your published Dynamic Checkout configuration is associated with that same API integration, WooCommerce can retrieve the corresponding Dynamic Checkout delivery options.

Step 5: Add Sendcloud Dynamic Checkout to your shipping zone
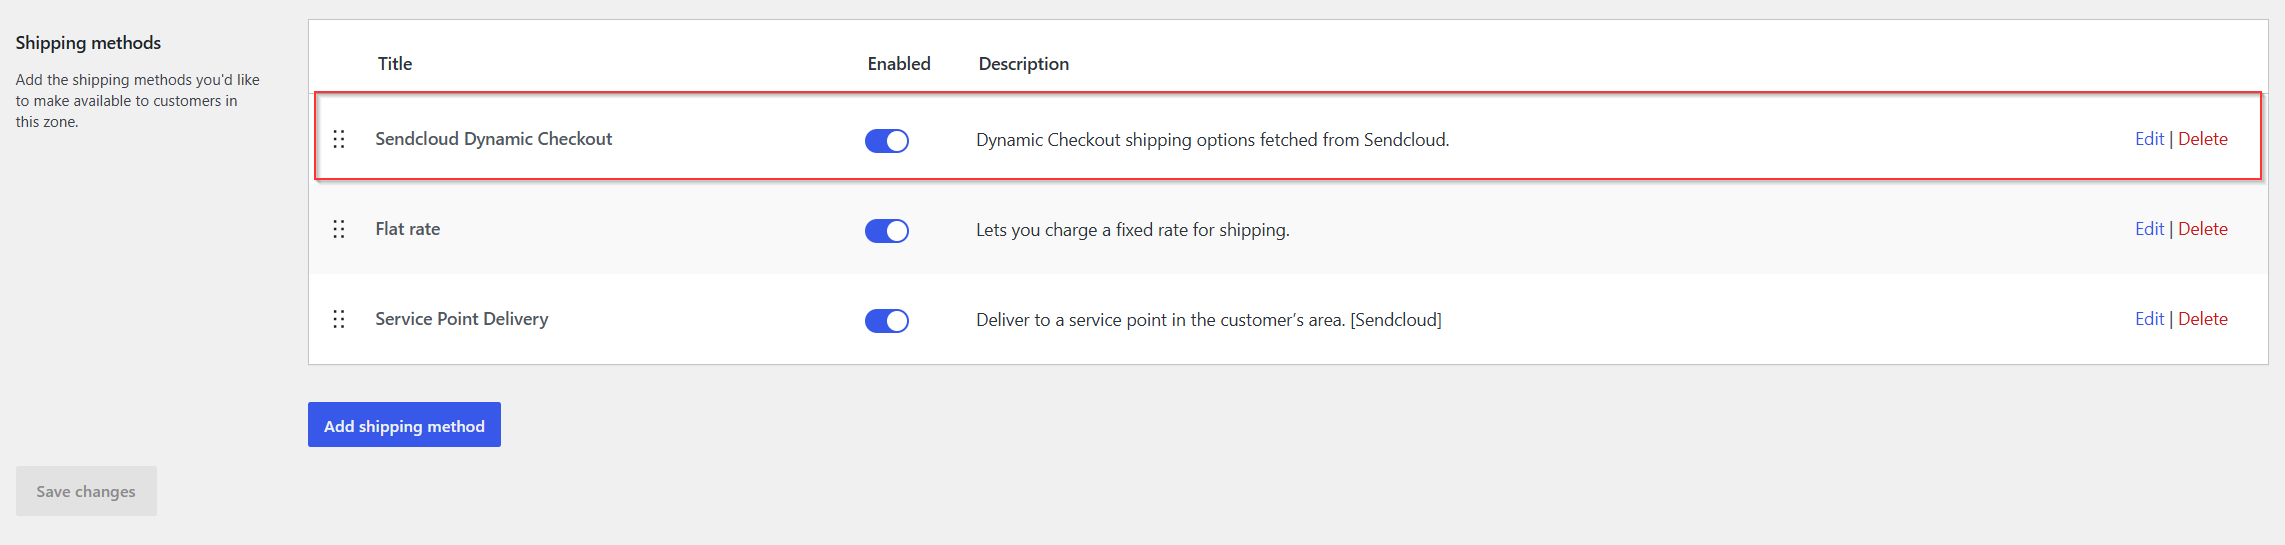
Once the plugin is connected to Sendcloud, add Sendcloud Dynamic Checkout as a shipping method to each WooCommerce shipping zone where you want to offer your Dynamic Checkout delivery options.
In WooCommerce, go to WooCommerce > Settings > Shipping.
Open the shipping zone where you want to use Dynamic Checkout.
Click Add shipping method.
Select Sendcloud Dynamic Checkout. When it is selected, click Continue.
On the setup screen, configure the WooCommerce settings for this shipping method.
Enter the name that you want to use for the shipping method and configure the available Free Shipping options where applicable.
Click Create and save.
Sendcloud Dynamic Checkout now appears in the list of shipping methods for that shipping zone.
Make sure that the shipping method is enabled.
Step 6: Check your delivery options in the webshop checkout
Open your webshop checkout and enter a delivery address that matches one of the delivery zones configured in your published Dynamic Checkout configuration.
Verify that the expected delivery options appear.
WooCommerce retrieves the available delivery options from the published Dynamic Checkout configuration associated with the API integration that you connected in Step 4.
Depending on your Dynamic Checkout configuration, customers can see:
- The delivery option name
- The shipping rate
- The carrier
- The delivery method type
- A service point selector when Service Point Delivery is available
- Available delivery dates for date-based delivery options
When a customer selects a delivery option, the corresponding shipping rate is included in the checkout total.
Step 7: Place a test order
Place at least one test order for each delivery option that you plan to offer.
After placing the order, check that:
- The order is imported into Sendcloud.
- The correct delivery option is shown on the order.
- The expected shipping method is assigned.
- A selected service point is imported correctly.
- The relevant delivery or parcel handover date is available for Nominated Day or Same Day orders.
Migrating from the legacy Dynamic Checkout plugin
If you are still using the older, deprecated Dynamic Checkout plugin for WooCommerce, you should migrate to the new Dynamic Checkout solution for WooCommerce V2.
The legacy plugin is no longer the current solution being developed for the WooCommerce checkout. The new plugin provides the supported path for offering Sendcloud Dynamic Checkout delivery options with WooCommerce V2.
Recommended migration process
- Keep your existing Dynamic Checkout setup active while preparing the new setup.
- Make sure your shop is connected to the supported WooCommerce V2 integration.
- Review the delivery configuration that you currently use in your legacy Dynamic Checkout setup.
- Create a Dynamic Checkout configuration in Sendcloud containing the delivery zones, delivery options, carriers, shipping rates, and Checkout Rules that you need.
- Publish your new Dynamic Checkout configuration.
- Install and connect the new Dynamic Checkout plugin.
- Test each delivery option in your webshop checkout.
- Place test orders and verify that the selected delivery information is imported correctly into Sendcloud.
- Only after successful testing, disable or remove the legacy Dynamic Checkout setup.
What can I configure with Dynamic Checkout?
Dynamic Checkout supports different types of delivery experiences. The options available to you depend on your carriers, destination, and Dynamic Checkout configuration.
Standard delivery
Standard delivery allows customers to select a regular home delivery option. No additional customer input is required beyond their shipping details.
Service point delivery
Service point delivery allows customers to select a pickup location during checkout.
When this option is selected, the service point selected by the customer is included with the order and imported into Sendcloud.
Nominated day delivery
Nominated Day Delivery lets your customer select an available delivery date.
The selected delivery date and corresponding parcel handover information are included with the order so that the order can be processed accordingly in Sendcloud.
Same-day delivery
Same Day Delivery can be offered when supported by your configured carrier and checkout setup. The Dynamic Checkout configuration determines the applicable delivery and handover dates.
For detailed setup instructions for each delivery type, see the relevant Dynamic Checkout articles.
FAQs
What is different about the new Dynamic Checkout plugin?
The new Dynamic Checkout plugin is the supported solution for offering Sendcloud Dynamic Checkout delivery options with WooCommerce V2.
Instead of keeping most checkout logic inside WooCommerce, the new plugin retrieves the delivery options from the Dynamic Checkout configuration that you manage and publish in Sendcloud.
| Feature | New Dynamic Checkout for WooCommerce V2 | Legacy Dynamic Checkout plugin |
|---|---|---|
| Status | Supported solution | Deprecated |
| WooCommerce integration | Works alongside WooCommerce V2 | Legacy implementation |
| Checkout configuration | Managed primarily in the Sendcloud panel | Uses the legacy Dynamic Checkout implementation |
| Delivery options | Retrieved from your published Sendcloud Dynamic Checkout configuration | Uses the legacy checkout functionality |
| Delivery functionality | Supports the current Dynamic Checkout configuration, including Standard, Service Point, Nominated Day and Same Day delivery where available | Depends on the legacy implementation and configuration |
| Checkout Rules and rates | Managed through your current Dynamic Checkout configuration in Sendcloud | Uses the legacy implementation |
| Future development | Current solution | No longer developed as the current WooCommerce Dynamic Checkout solution |
Do I configure my delivery methods in WooCommerce or Sendcloud?
Your Dynamic Checkout configuration is primarily managed in Sendcloud. This includes your delivery zones, delivery options, carriers, shipping rates, and Checkout Rules.
WooCommerce uses the published configuration to display the available options to your customers.
Why can't I see my Dynamic Checkout configuration in WooCommerce?
Check that:
- The configuration has been created for the correct WooCommerce integration.
- The configuration has been published in Sendcloud.
- Your WooCommerce store is correctly connected to Sendcloud.
Why are no delivery options appearing at checkout?
Check your Dynamic Checkout configuration and make sure that:
- The customer's destination is covered by one of your delivery zones.
- A suitable delivery option is configured for that zone.
- The required carrier is enabled.
- Your Checkout Rules are not hiding the delivery option.
- The Dynamic Checkout configuration is published.
Can I offer different shipping prices?
Yes. Shipping rates are configured as part of your Dynamic Checkout delivery configuration and are displayed to your customer during checkout.
Can customers choose a service point?
Yes. When service point delivery is available, the customer can select a service point as part of the checkout flow. The selected service point is then included with the order imported into Sendcloud.
Can I use weight-based delivery options?
You can use Dynamic Checkout rules and configuration options to control which delivery methods are offered depending on the conditions available in your checkout configuration.
Can I use nominated day delivery?
Yes. The new Dynamic Checkout solution supports nominated day delivery. When available, customers can choose an eligible delivery date during checkout.
Do I need to migrate if I use the old Dynamic Checkout plugin?
Yes. The older Dynamic Checkout plugin is deprecated. We recommend setting up and testing the new Dynamic Checkout plugin before disabling the legacy version.
Will my old Dynamic Checkout configuration be migrated automatically?
Do not assume that an existing legacy configuration will be transferred automatically. Review your current setup and make sure the required delivery zones, methods, rates, and rules have been configured and published in the new Dynamic Checkout setup.
Should I uninstall the old plugin before installing the new one?
We recommend first configuring and testing the new checkout setup. Only disable or remove your legacy checkout solution after you have confirmed that the new checkout works correctly and that test orders are imported into Sendcloud as expected.
Troubleshooting
The checkout shows no shipping methods
Verify that your Dynamic Checkout configuration is published and that at least one configured delivery option applies to the customer's destination and checkout conditions.
Also check that:
- The customer's destination is included in one of your delivery zones.
- A suitable delivery option is configured for that zone.
- The required carrier is enabled.
- Your Checkout Rules are not hiding the delivery option.
A service point is not imported with the order
Place another test order and confirm that a service point was selected before the order was completed.
If the service point selection is visible in WooCommerce but is not imported into Sendcloud, contact Sendcloud Support with the affected order number.
The wrong shipping method is assigned in Sendcloud
Check which delivery option the customer selected during checkout and review any shipping rules that may affect the order after it is imported into Sendcloud.
My checkout works, but an order is missing delivery information
Some delivery options require additional information to be passed to Sendcloud with the order.
For example:
- Service point delivery: the selected service point should be included with the order.
- Nominated day delivery: the selected delivery date and relevant parcel handover information should be included.
- Same-day delivery: the relevant delivery and parcel handover dates should be included.
If this information is missing after the order is imported, contact Sendcloud Support and provide an example WooCommerce order.