Purpose: In this article, we explain how you can add rates for your Dynamic Checkout shipping methods.
What can I do with Dynamic Checkout rates?
Dynamic Checkout lets you fully customize the shipping rates you offer to your customers.
- Decide whether you want to set your rates based on the default weight class of your chosen shipping method, or define your own custom weight classes.
- Add shipping rates directly in Sendcloud for any of the available Dynamic Checkout delivery options: Nominated Day, Same Day, Standard Delivery and Service Point Delivery.
- Enable free shipping above a certain amount.
How to set your shop currency in Sendcloud
- In Sendcloud, go to Settings > Dynamic Checkout > click on Edit next to your integration
-
From the dropdown menu, select the currency of your webshop (you can search the list via currency code, e.g. USD) and click on Change currency
- Rates will now be displayed in Sendcloud in your selected currency.
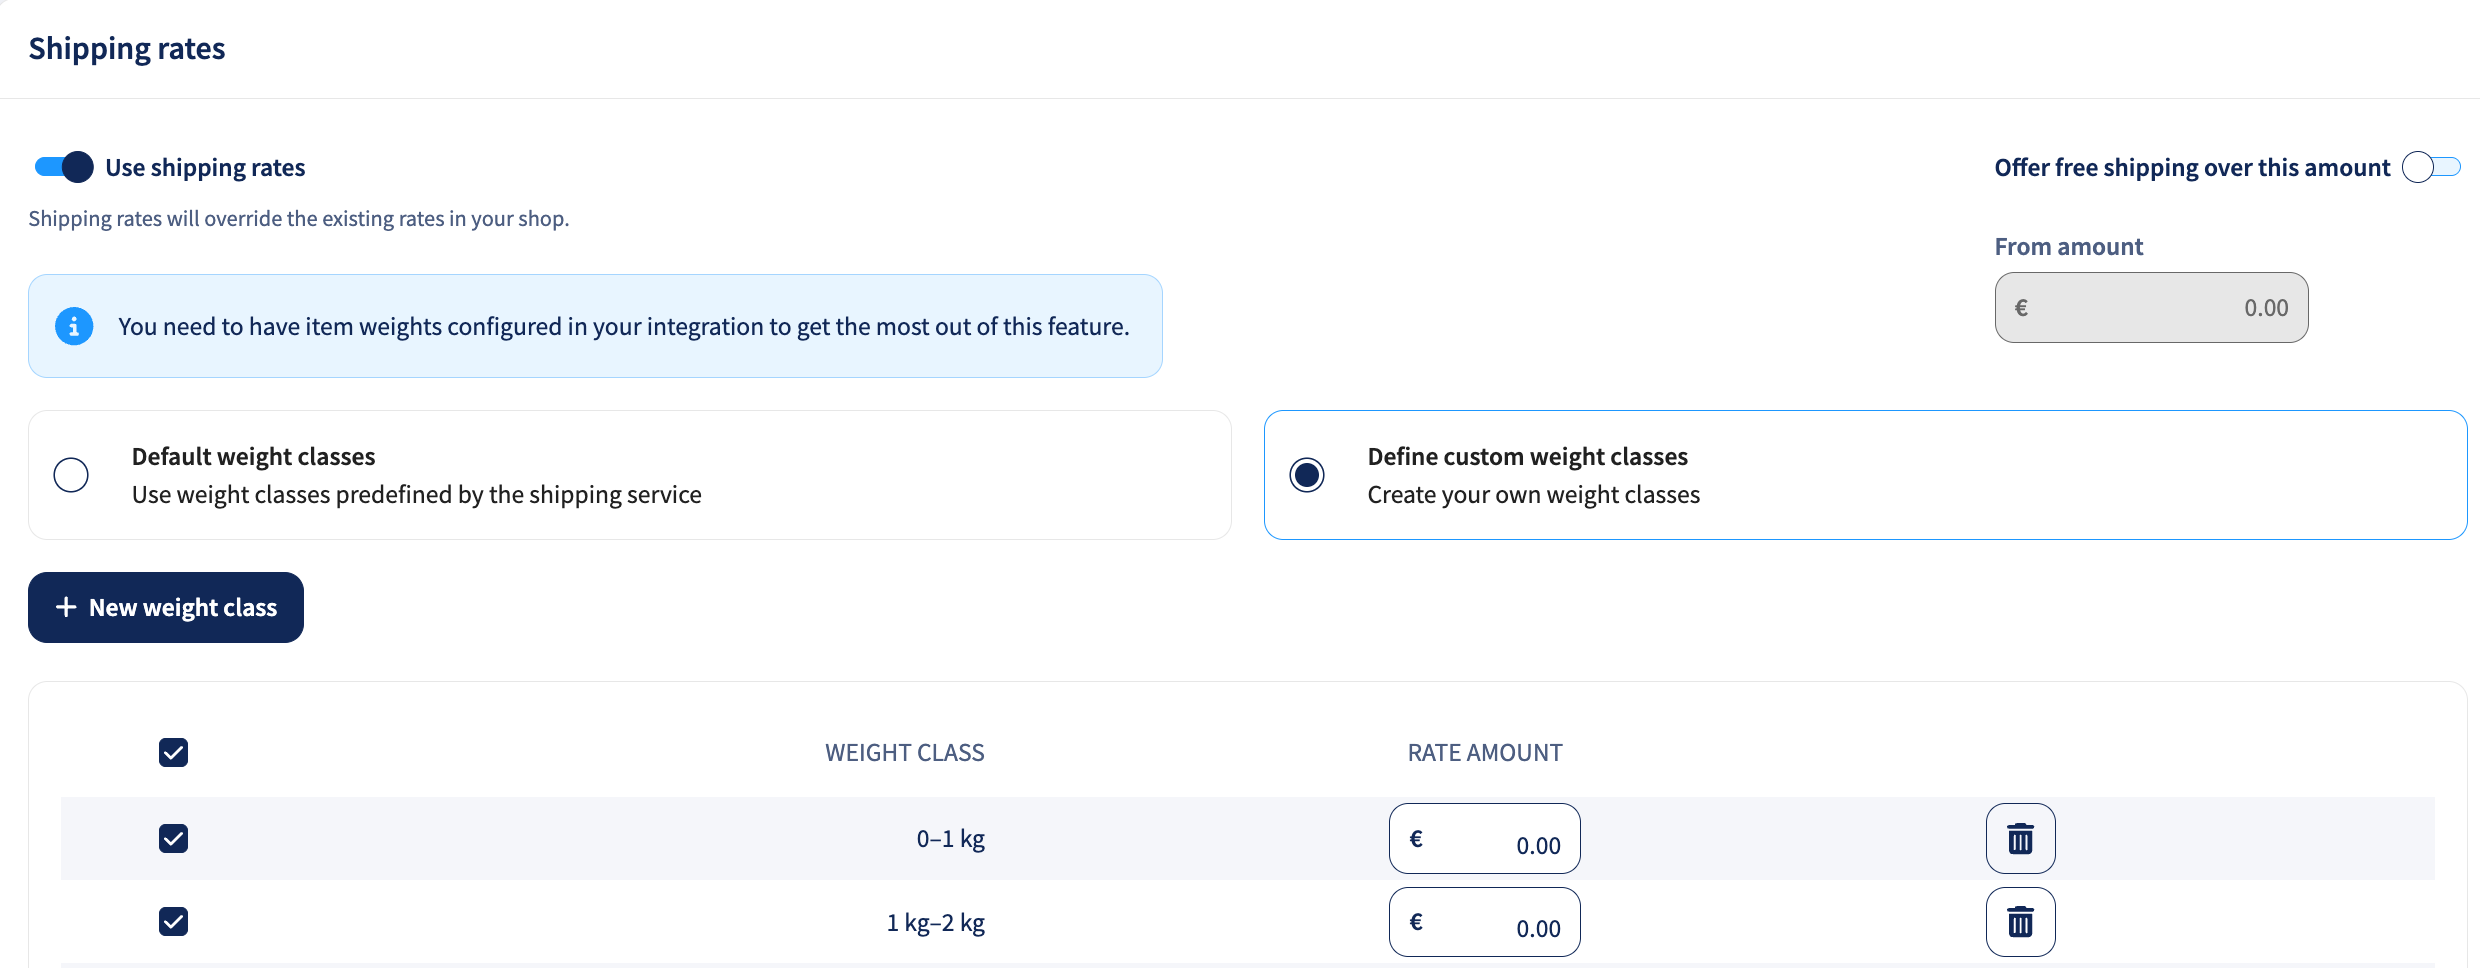
Step 1: Enable shipping rates in Sendcloud
- To add rates for existing shipping methods, go to Settings > Dynamic Checkout > Edit > click a Delivery Zone > select
Edit next to the method you want to configure
- Scroll down until you see the section Shipping rates
-
Click
Use shipping rates to enable shipping rate configuration via Sendcloud
Once you've enabled shipping rates in Sendcloud, the option to add a rate per available weight class will become available.
Step 2a: Add rates per default weight classes
You can easily add rates for your chosen shipping method based on the default weight classes included in the selected shipping service. This is the easiest and quickest method of configuring rates.
- Select Default weight classes to use the weight classes that are incorporated into your selected shipping service
- Enter the price you want to charge per weight class into the rate amount fields.
- All available weight classes are enabled by default, but you can
untick a class to disable it from appearing on your checkout page.
- For example, if you want to offer shipping with UPS but only for parcels weighing up to 30 kg, you can disable the UPS weight class 30-70 kg to prevent your customers from being able to select this shipping option at checkout.
- At least one rate must be enabled as default. This is the rate that will be displayed if a product in the cart does not have an item weight associated to it.
How do weight classes work?
You can set different shipping rates based on the total weight of the order when all the items are packaged into the same box.
- The shipping price shown to your customers at checkout will be based on the total order weight.
- E.g. In the example above, if the order weight is 6 kg, your customer will be charged 3.00 EUR.
- If the order weight is 6.01 kg, the customer will be charged 5.00 EUR.
- If the order weight falls within a weight class that you have disabled, this delivery method won't be displayed at checkout.
- E.g. In the example above, if the order weight is above 20 kg, this delivery method won't be displayed.
- If the customer removes some items from the cart, and the weight is now 19 kg, the method will appear on the checkout page with a delivery cost of 9.00 EUR.
For rates to be applied to parcels based on total order weight, you need to have configured item weights for all of your products. If no parcel weight can be determined because a product weight is not configured, then the weight class set as default will be displayed.
Step 2b: Define rates based on custom weight classes
This feature is currently only available for beta users.
If you want more flexibility over your shipping rates, or if the shipping service you select has very broad weight classes (e.g. 0-31.5 kg), you can choose to define your own custom weight classes.
- Select Define custom weight classes
- Click +New weight class
- Enter a minimum and maximum weight to define the range of your custom class (e.g. Min: 2 kg Max: 4 kg). Note that the maximum weight must not exceed the limit defined in the shipping service.
- Enter a rate and click Save class
- At least one rate must be enabled as default. This is the rate that will be displayed if a product in the cart does not have an item weight associated to it.
Step 3: Enable free shipping above an order value
You can offer free shipping to your customers over a specified cart value by editing a shipping method and enabling the Offer free shipping... option. Enter a value into the From amount field to have free shipping apply for orders with a total value above this amount:
Step 4: Continue configuring your Dynamic Checkout methods
Return to the set-up guide for your shipping method to continue adding Holidays, specify your Cut-off times, and to save and publish your configuration.