Purpose: Learn how you can send personalised, automated Tracking emails to your clients to inform them about the delivery status of their parcels.
Did you know? Tracking emails have an open rate of 90-100 % - this makes them an unmissable opportunity to market your brand and offer promotions and calls to action to your online buyers.
Custom branding for Evri tracking pages and emails depends on the Evri service used.
• Evri (UK): Custom branding may be available in specific cases. To check if this is possible for your account, please contact Sendcloud Support (manual setup required).
• Evri dropoff: Custom branding is not supported. The sender name and “Sendcloud” branding cannot be changed.
More information: Evri & Evri dropoff – Tracking page branding
Step 1Enable automated Tracking emails
Tracking emails need to be enabled in both the Settings of your Sendcloud account and your webshop Integration settings before they will be triggered.
- Go to Tracking > Email notifications and toggle the "Send Tracking emails to customers" switch to Active.

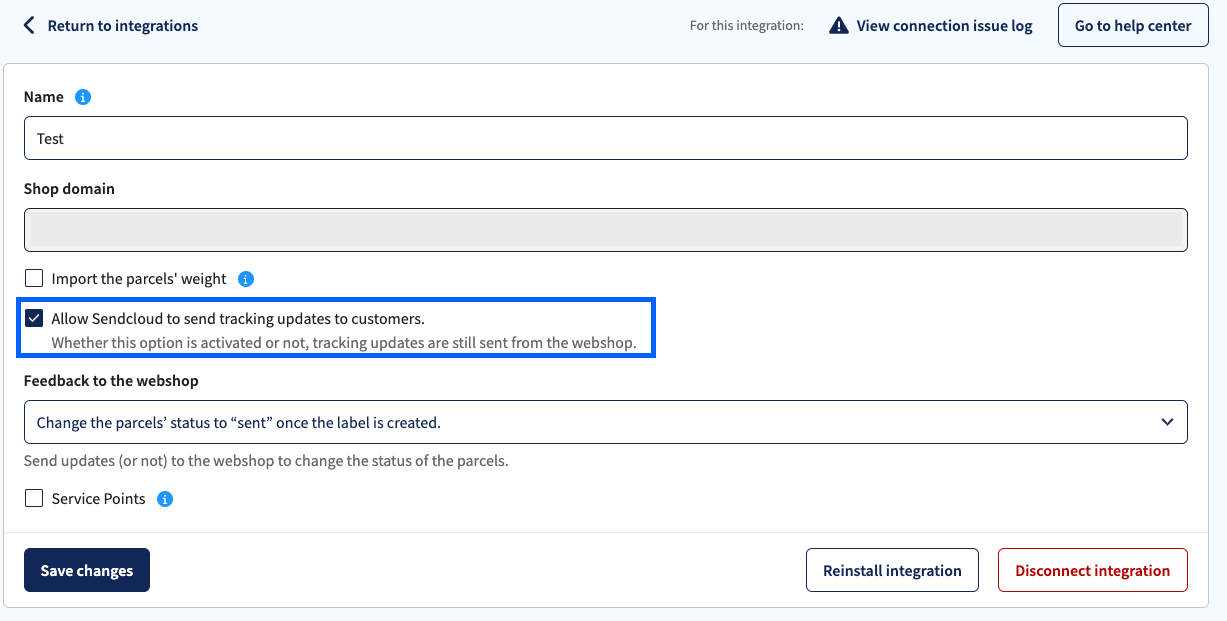
- Go to Settings > Integrations, select your integration, and click Configure. Make sure to tick the option "Allow Sendcloud to send tracking updates to customers" to enable the branded emails.
Step 2Decide if you want to show order content and product images in your emails
You can decide whether to show purchased products in the tracking emails that are sent to your customers. This feature is inactive by default.
To activate it, go to Tracking > Email notifications > Settings and toggle the option Show purchased products in tracking emails. You will see a placeholder in the email drafts and if you click Preview.
![]()
Purchased products can be toggled on or off for all shipping emails. This cannot be done separately per country or per template. This means that if you activate order content, it will be visible for all shipping emails that you send to your customers.
If you activate purchased products, you will see a list of items with product images (unless images are not supported for your integration). The list of purchased products and the product images can only be activated or deactivated together. It is not possible to activate or deactivate them separately.
Step 3Choose when to send a Tracking email
You can send notification emails that will be triggered at seven different stages of the delivery journey. All notification emails are available for Lite subscription and higher. When you use our Free subscription, you are only able to activate the Packing your order email.
They are not enabled by default, so you have full control over what kinds of notifications your customers will receive.
To activate an email type, go to Tracking > Email notifications, open the relevant tab, and click Edit message on the right. From there, you can enable the email for each country.
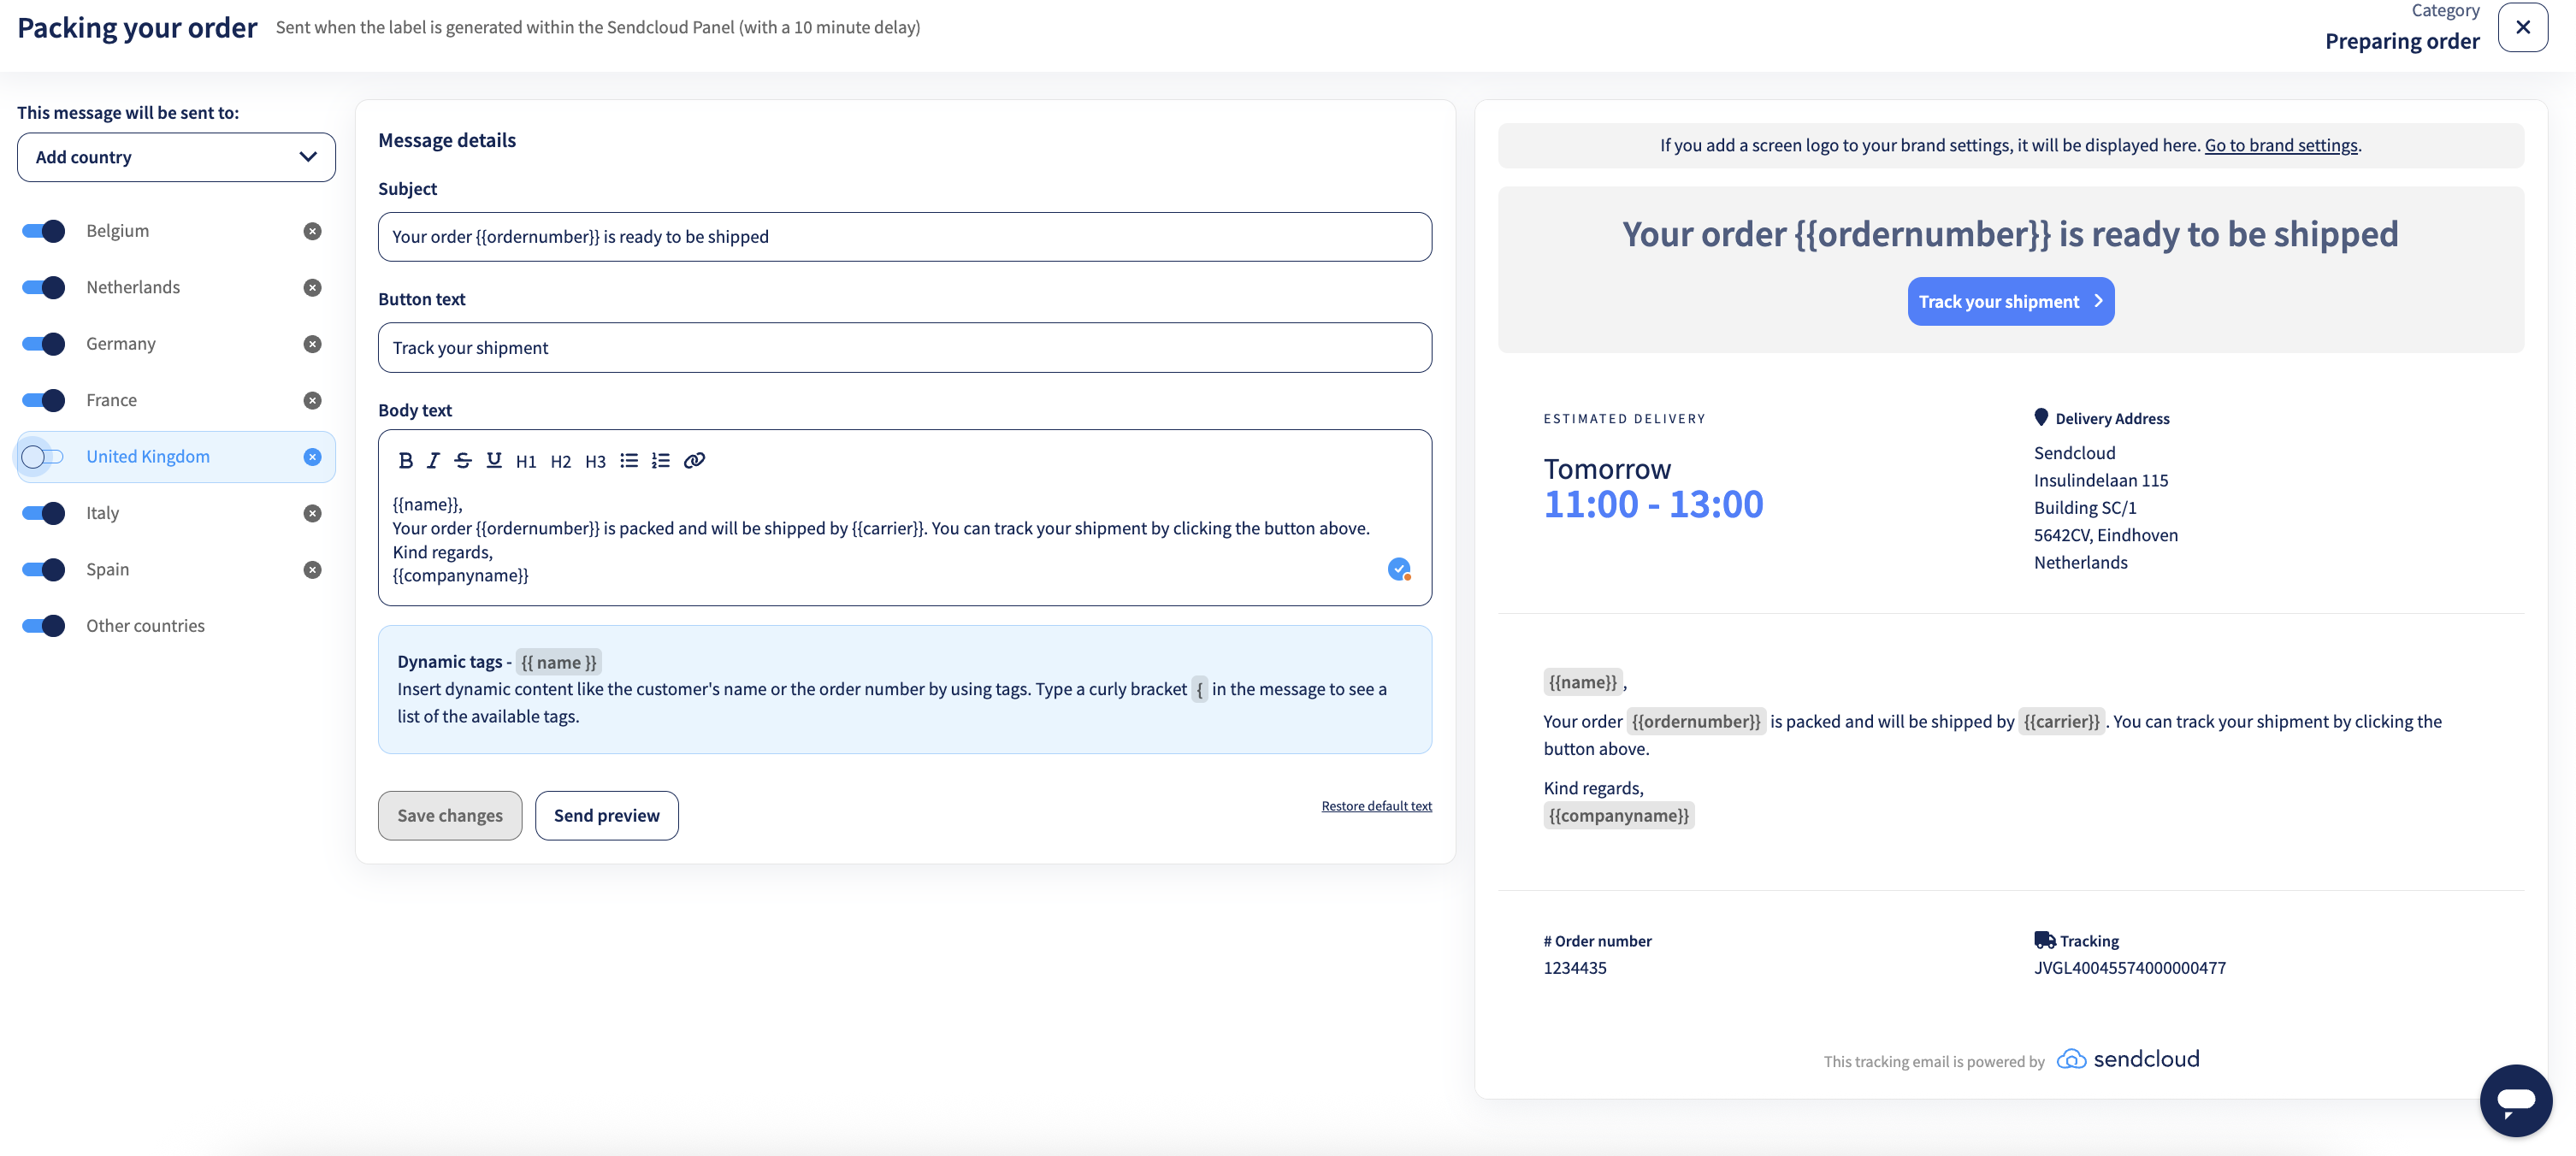
- Packing your order: Sent when the label is generated within the Sendcloud panel, with a 10 minute delay.
- Order shipped: Sent when the carrier receives the shipment.
- Out for delivery: Sent when the shipment is out for delivery
- Delayed: Sent when the shipment is delayed by the carrier.
- At pick-up point: Sent when the shipment is available at a pick-up point.
- Pick-up reminder: Sent when the shipment has been awaiting pick-up for too long
- Delivered: Sent when the carrier successfully delivered the shipment.
- Post-purchase: Sent with the chosen delay after the shipment has been delivered. Sent only if the parcel hasn’t been delayed.
- Trustpilot review: Sent with the chosen delay after shipment has been delivered. Sent only if the parcel hasn’t been delayed.
- Return emails follow...
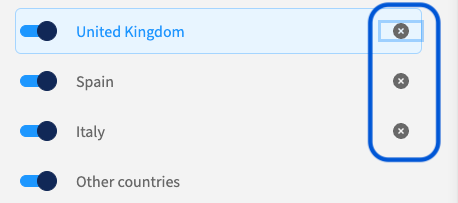
Activate/Deactivate Toggle vs. Delete Button for country destinations
When you use the Activate/Deactivate Toggle to deactivate a country template, the messages won't be sent to this specific country. In the example below, you won't send this email to the United Kingdom.

When you use the Delete Button to remove a country template, then you will still send messages to this country if the template of Other Countries is active.
Step 4 Configure the appearance and sender settings of your tracking emails
Now that your tracking emails are enabled, it's possible to adjust both the appearance of the email itself and also the text that will be included in the body of the email.
What can you adjust?
-
Your brand
When you create a brand in your Sendcloud account, your shop logo and brand color will be displayed on your tracking emails. If you have multiple brands and webshops, you can send unique tracking emails for each of them.
If you have not installed a brand yet, we recommend doing this first via Settings > Brands to get the most out of your Tracking emails. Click here to see how to set up your brand. -
'Reply to' email address
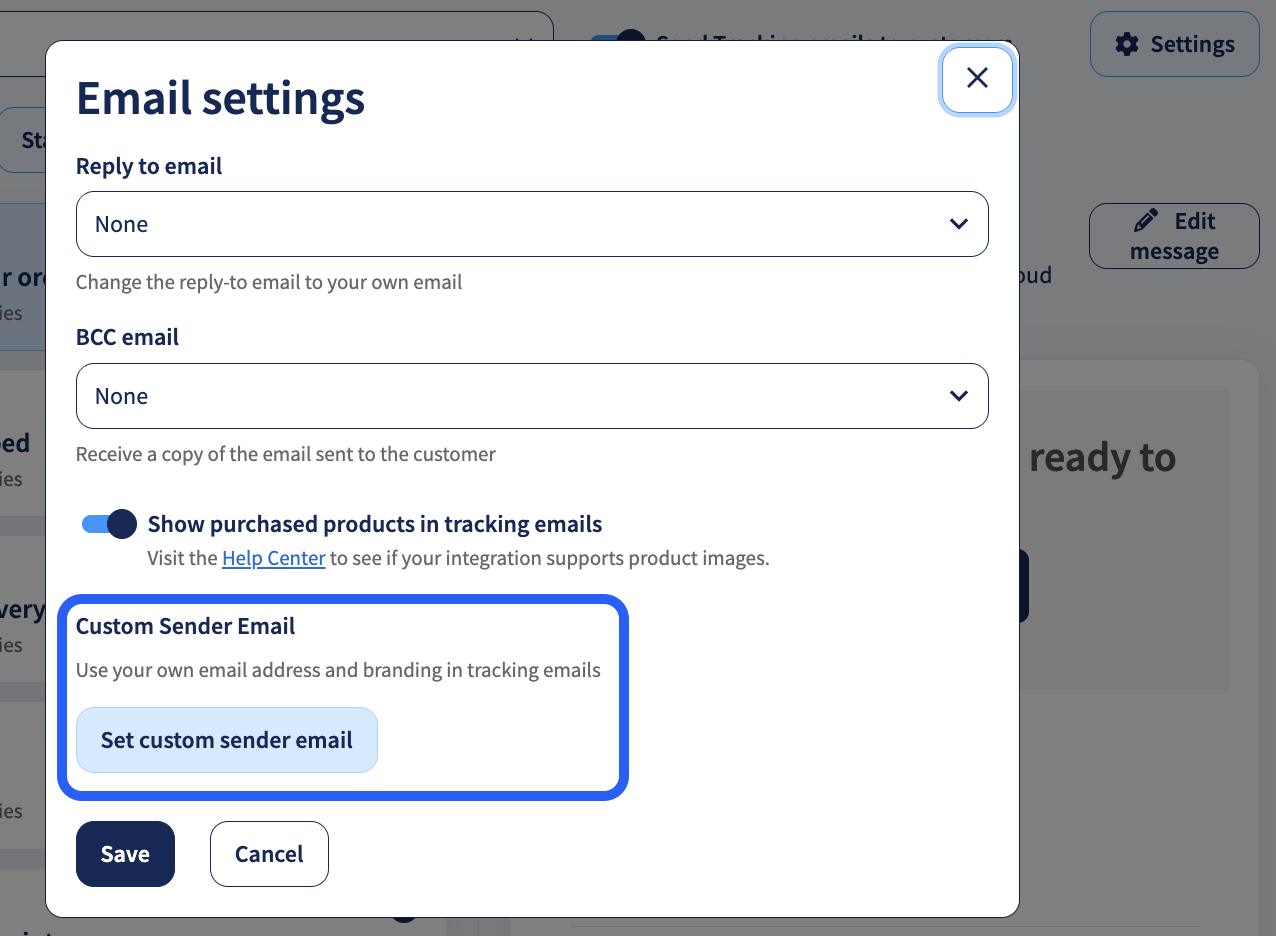
In Email notifications > Settings > Reply to email, you can add an email address that the customer can respond to directly from the Tracking email. -
BCC email
Do you want to receive a copy of the tracking messages in your own mailbox? Add an email address in BCC (blind copy) here. -
Are you sending a lot of packages abroad?
It is also possible to add templates for countries you regularly ship to and adjust the messages accordingly. When you add any other country, the default language will be English.
By default, Tracking emails are available in English, Dutch, German, and French. You can edit the text that is displayed in the email, as shown in Step 5. -
Custom sender address (Premium plans)
Merchants on Premium plans and above can send tracking emails from their own email address instead of a Sendcloud email address.
Your customers will then receive tracking updates directly from your brand, creating a more consistent post-purchase experience.
To configure a custom sender address (Premium plans and above):
- Go to Tracking → Email notifications.
- Click Settings in the top-right corner → Set custom sender email:
- Enter the email address you want to use as the sender.
- Follow the instructions to add the required DNS records to your domain.
- Once the DNS records are verified, Sendcloud will start sending tracking emails from your address.
⚠️ Important: Domain verification required
To protect email deliverability and prevent sender reputation issues, Sendcloud checks whether the required DNS records have been correctly configured before sending emails from your custom address.
If the verification is incomplete, tracking emails will not be sent from your custom sender address until the setup is finalized.
Step 5 Personalize the content of your emails
We have provided some generic text for your Tracking emails, but you can edit the content of your emails however you like. You can use dynamic tags to automatically send personalized information per email, such as the tracking number and customer name.
The following labels are available for your Tracking emails:
-
{{tracktrace}}- Shows the generated tracking link. -
{{name}}- Shows the name of the recipient. -
{{email}}- Shows the email address of the recipient. -
{{companyname}}- Shows your company name. -
{{ordernumber}}- Shows the order number of the shipment. -
{{carrier}}- Shows the name of the carrier that belongs to the shipping method. -
{{parcelstatus}}- Shows the status of the package. -
{{parcelshop}}- Parcel shop location where the parcel can be collected or dropped off for return. -
{{returnLabelType}}- Shows type of return label, for example QR code.
Step 6 Set up Tracking messages for return shipments (optional)
These messages will only be sent when you have selected a brand for the return shipment. You can either create a manual return or create a return with the return portal to process your returns. You can enable them the same way as shown in Step 1.
- Return label created: Sent when a customer successfully creates a label in the return portal.
- Return handed in at drop-off: Sent when the customer successfully gave the shipment to the carrier.
- Return received: Sent when the return is successfully delivered to the return address.
- and more...
Step 7 Post-purchase emails (Trustpilot, Google Review, REVIEWS.io)
The post-purchase emails are only available from a Lite subscription or higher.
Sendcloud allows you to send post-purchase emails to your customers. You can choose to use a Standard Template to request reviews, share product advice and resources, offer discount codes, and more, or set up Automatic Feedback Service provided by Trustpilot.
How to set up post-purchase emails (Standard Template)
Just like setting up your Shipping and Returns emails, you can also set up your Post-purchase emails through Tracking > Tracking emails.
- Select Post-purchase.
- Click on Post-purchase email.
- Fill in the Subject of your email, the Button text, and the Button link.
- Next, you can add and edit the body of the text, change the style of the text, and add dynamic tags like
{{companyname}}. - Choose a time frame for sending the post-purchase email, ranging from immediately to one month later.

- Make sure to set the toggle to Active to enable the Post-purchase email.
![]()
Automated Feedback Service (AFS) provided by Trustpilot
Trustpilot's Automatic Feedback Service (AFS) streamlines the process of collecting customer reviews. By automating this task, AFS helps businesses enhance their online reputation, improve customer satisfaction, and gain valuable insights. Reviews gathered through AFS are labeled as verified on Trustpilot, adding credibility to your customer feedback.
- Select Trustpilot.
- Click on Automated feedback service.
- Fill in the Trustpilot BCC email.
- Choose a time frame for sending the Trustpilot email, ranging from immediately to one month later.
- Make sure to set the toggle to Active to enable the Trustpilot email.
Where can I find my Trustpilot BCC email?
In Trustpilot Business, navigate to Get Reviews > Invitation methods > Trustpilot Automatic Invitations (AFS). There, you'll find your unique Trustpilot email address. To copy it, simply click on Copy email address.
Once you set up either the Standard Template or AFS, your Trustpilot email will be sent to your customer within the timeframe you selected. If the parcel is marked as delayed during shipping, the Trustpilot email will not be sent. This helps prevent negative reviews resulting from carrier-related issues.
Step 8 Carrier ratings
The carrier ratings are turned on by default. It's a five-star system at the bottom of the Delivered tracking email. Your customers can use this feature to rate their experience with the carrier (e.g. DHL).

What is the purpose of the rating system?
We want to offer you more insights about how your customers experience different carriers. To start this process, we have implemented a carrier rating system within our Tracking emails. As we are at the beginning of data collection, the analytics insights remain inaccessible to the public eye. We will keep you posted.
Where can I find analytics from the rating?
We are still at the beginning of gathering data insights, so the data is not available yet. We will keep you posted.
Troubleshooting
If your customers report that they are not correctly receiving tracking emails, here are some steps you can take to check that everything's running smoothly.
- Check that notifications are being sent. In the Shipped Labels overview, click the eye icon to view the Label Details and then look under the heading Notification History to see which emails the recipient of this particular label received.
- Check that Tracking emails are enabled in all three areas of the Sendcloud panel: at the top of the Tracking page, in your Integration settings, and for each individual email type you want to send.
- Do you have the Tracking Page enabled? Are the dates in your emails not refreshing? Then go to Tracking > Tracking Page and deactivate and then publish your page again. Note that you will have to do this for every brand you have enabled the Tracking page for.
FAQ
Why didn't my customer receive a tracking email?
Tracking emails must be enabled in three places: in your Tracking settings, in your webshop integration settings, and for the specific tracking event you want to send. You can also check the Notification History in the label details to see whether an email was sent.
How does Sendcloud determine the language of tracking emails?
Sendcloud automatically selects the tracking email language based on the destination country. You can customise the language used for specific countries in Email Notifications. Dynamic language selection based on individual customer preferences is not currently supported.
Can I customise the sender email address for tracking emails?
Yes. Premium plans and above can configure a custom sender email address so tracking emails are sent from their own brand instead of a Sendcloud email address.
Can I disable specific tracking emails?
Yes. You can enable or disable individual tracking email notifications, such as "Order shipped", "Delayed", or "Delivered", depending on which updates you want your customers to receive.
Can I send tracking emails in different languages based on my customer's preference?
No. Sendcloud does not currently support dynamic language selection based on individual customer preferences. Tracking email languages are determined by the destination country, though you can customise the language used for specific countries in Email Notifications.
Why are tracking emails for shipments to Belgium sent in Dutch or French?
Belgium has multiple official languages. By default, tracking emails for shipments to Belgium are sent in both Dutch and French to ensure recipients can view the information in their preferred language. Dynamic language selection based on individual customer preferences is not currently supported.
Can I personalise tracking emails with customer or order information?
Yes. You can use dynamic tags to automatically insert information such as the customer's name, order details, and tracking information into your tracking emails.
Can I send tracking emails for return shipments?
Yes. Sendcloud supports tracking emails for returns, including notifications when a return label is created, handed over to the carrier, and received at the return address.