
Purpose: This guide walks you through setting up service points in your Shopify checkout using Sendcloud. The setup depends on your Shopify plan, so start with the overview, then open the tab for your plan.
Shopify service points overview
Sendcloud lets you offer service point delivery in your Shopify store, so customers can have their orders delivered to a nearby pickup point, parcel shop, or locker instead of their home address.
How you set this up depends on two things: your Shopify plan, and when you want customers to choose their service point; either before payment during checkout, or after payment on the Thank You page.
For after-payment setup, see the Shopify service points: selection after payment (Thank You page).
Using accelerated checkout methods? Some accelerated checkout methods, such as Apple Pay, Google Pay, PayPal Express and Shop Pay, can bypass the checkout steps required for service point selection.
For more information, see Shopify service points: accelerated checkout compatibility.
Before payment vs. after payment
On the Grow and Advanced plans, offering service points before or after payment is your choice. Each option gives customers a different experience:
| Before payment (during checkout) | After payment (Thank You page) | |
|---|---|---|
| When the customer chooses | At the same time they choose delivery, before paying. | After they pay, on the order confirmation (Thank You) page. |
| How points are shown | A list of up to five nearby points. No map. | A map and a list — you choose what to display. |
| Best for | A faster, single-step checkout. Most shoppers prefer choosing their pickup point before paying. | Giving customers a richer view to locate the most convenient point. |
What applies to your Shopify plan
| Shopify plan | Choose before payment | Choose after payment |
|---|---|---|
| Basic | Not available — Shopify limitation. The required checkout functionality isn't available on Basic. | Available — map or list, on the Thank You page. |
| Grow | Available — list of up to five points. Requires CCS: included on annual billing; requested on monthly billing. | Available — map or list, on the Thank You page. |
| Advanced | Available — list of up to five points. CCS is included by default. | Available — map or list, on the Thank You page. |
| Plus | Service point selection during checkout, using the dedicated Shopify Plus checkout integration. | |
Select your Shopify plan to see the setup steps that apply to your store.
Service points on the Basic plan
On the Basic plan, customers choose their service point after payment, on the Thank You page.
Selection before payment isn't available on Basic.
Service points on the Grow plan
On the Grow plan, you can offer service points before payment (during checkout) or after payment (on the Thank You page). Choose the flow you want to set up below.
Before payment (during checkout)
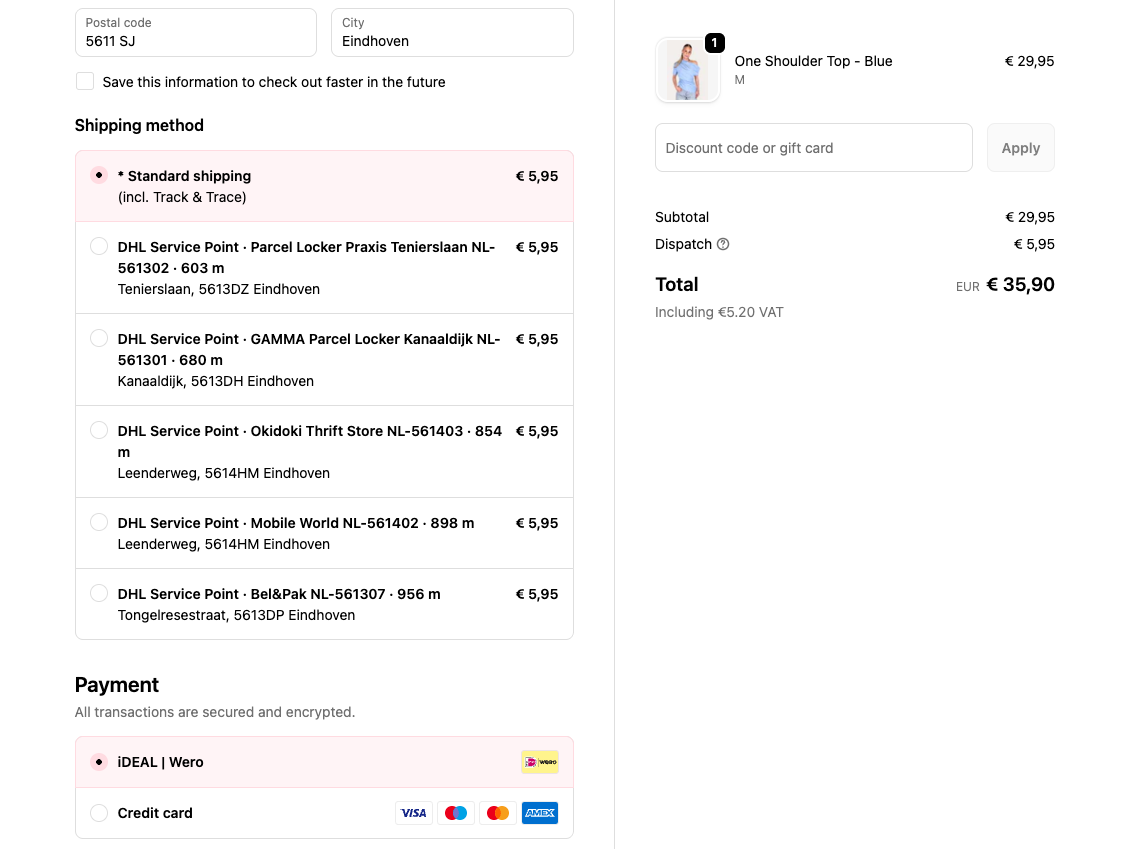
Recommended for most stores. Customers choose their pickup point while they choose delivery, before paying. They see a list of up to five nearby points (no map).
Availability
- Grow, annual billing: supported. Carrier Calculated Shipping (CCS) is included.
- Grow, monthly billing: supported after CCS has been enabled by Shopify (see Step 4).
Step 1: Enable service point delivery in Sendcloud
- Go to Settings > Integrations.
- Click Configure under your Shopify shop integration.
- Enable Service point delivery.
- Enable Service point selection before payment.
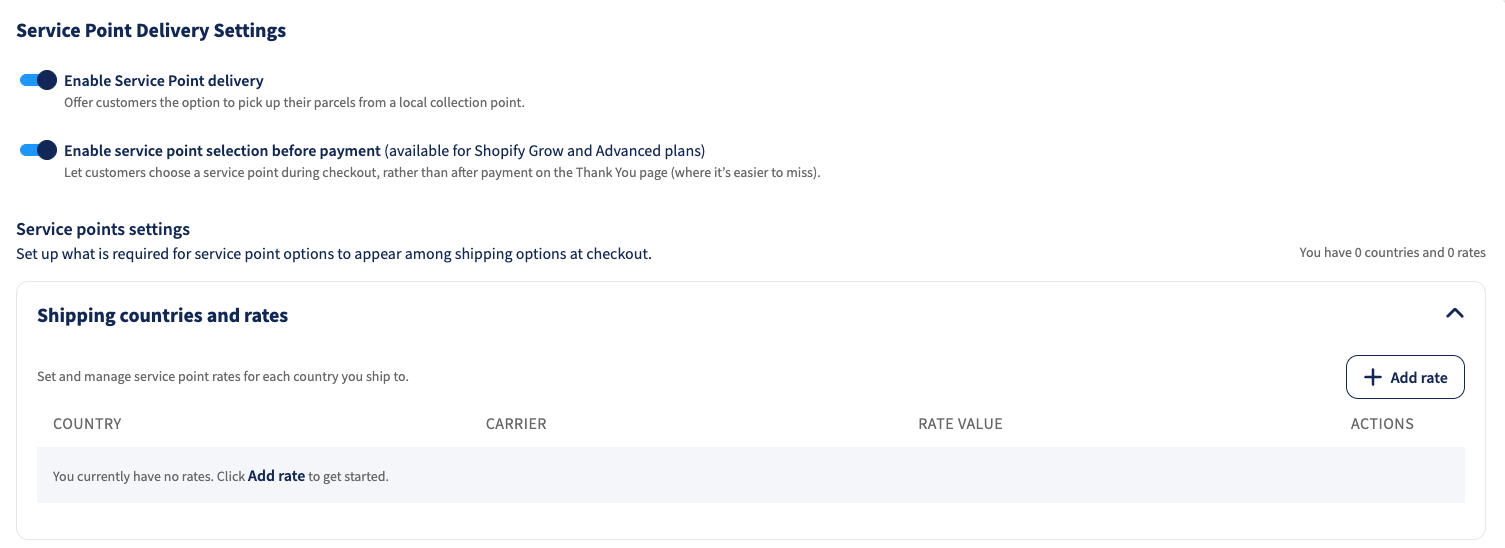
Step 2: Configure service point delivery rates
Add the country, carrier, and fixed delivery price for each combination you want to offer.
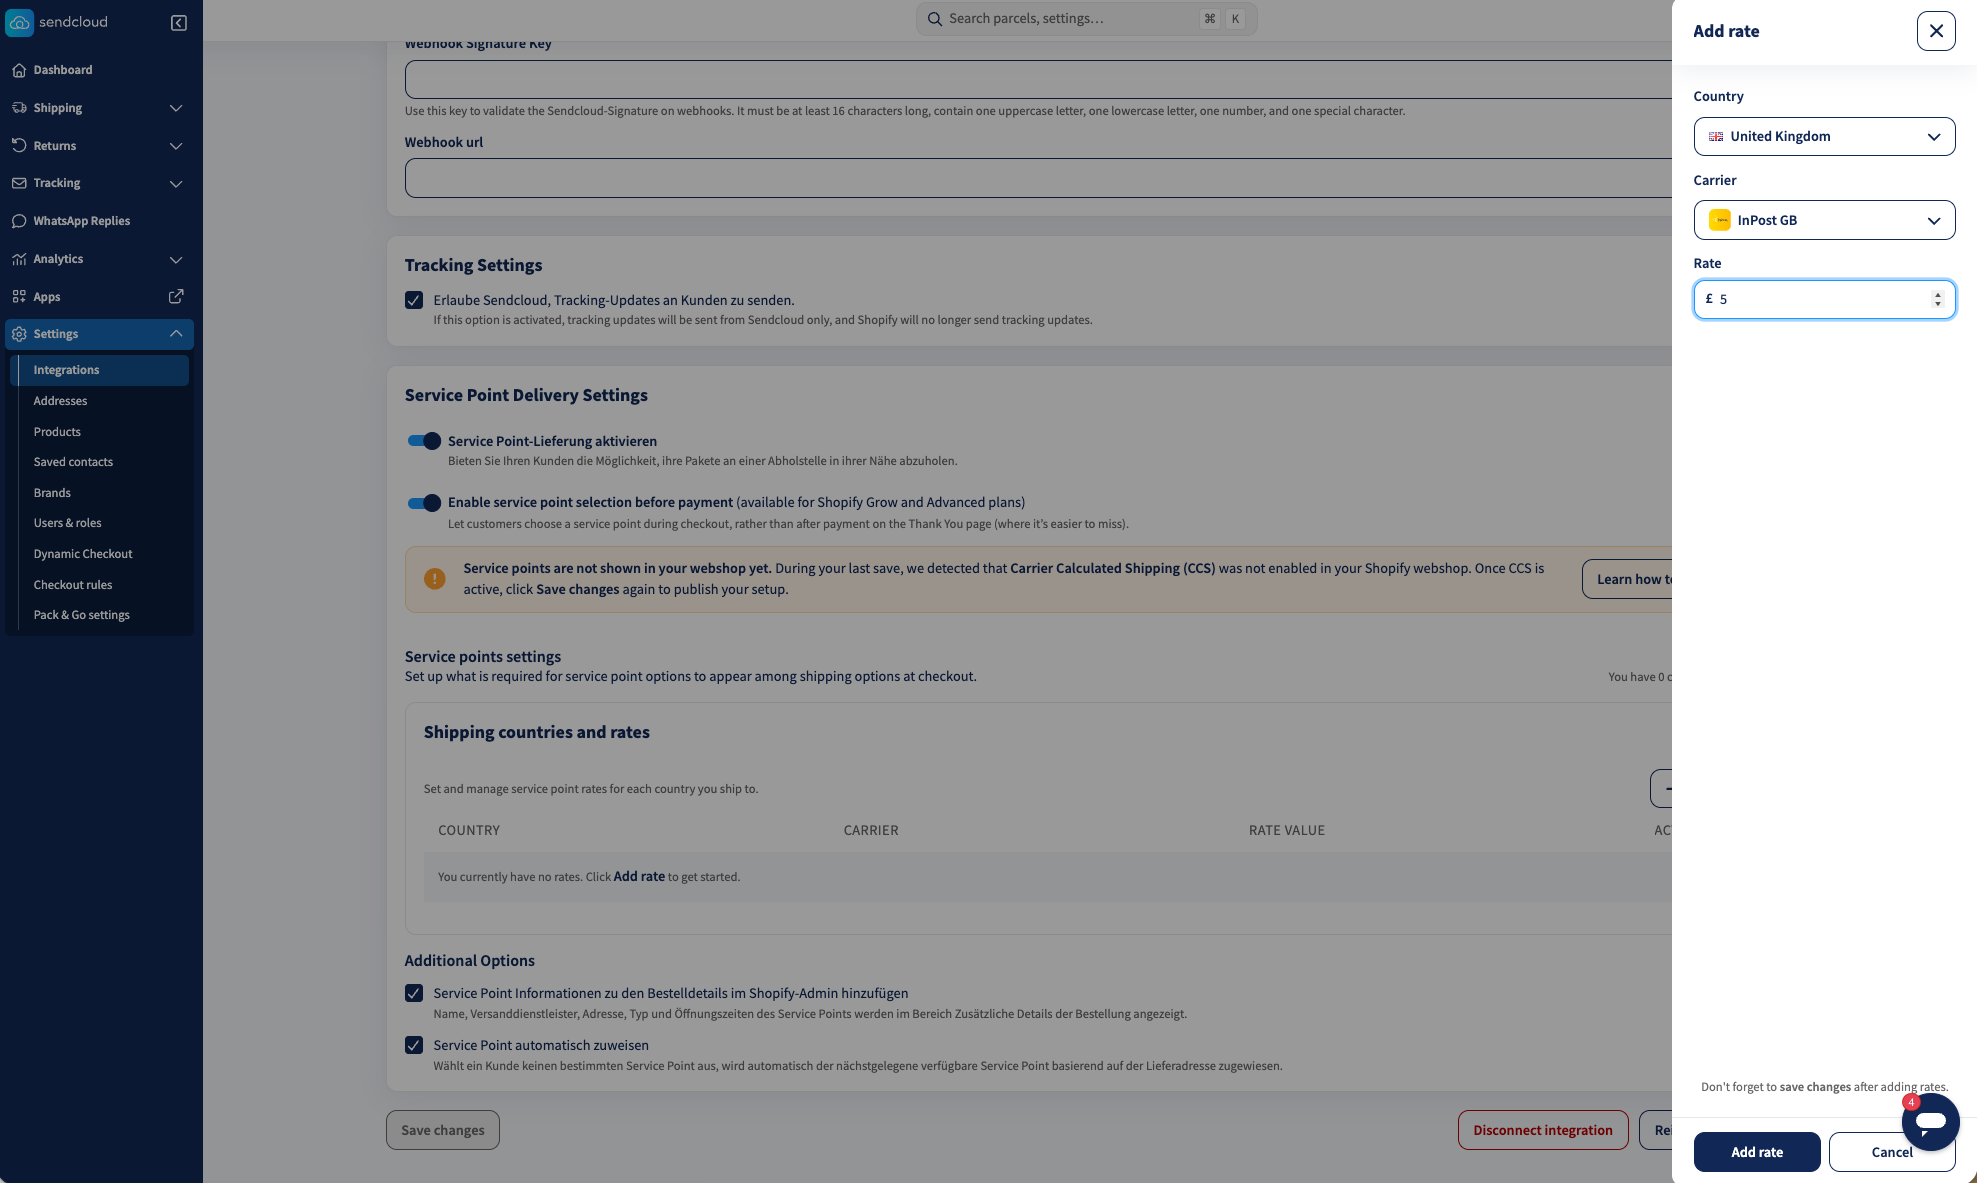
- Click Add rate.
- Select a country.
- Select a carrier.
- Enter a fixed delivery price.
- Repeat for every country and carrier you want to support.
Important
You must create at least one rate. If you enable service point selection before payment but configure zero rates, Shopify receives no locations and no service points will appear during checkout. Because the before-payment flow replaces the old Thank You page selection, customers will not be able to choose a service point at all. Create at least one rate for every country and carrier combination you want to offer.
Step 3: Save your configuration
Click Save changes. Sendcloud automatically checks whether Carrier Calculated Shipping (CCS) is available for your store.
Step 4: Enable CCS (Grow monthly billing only)
Before-payment selection requires Carrier Calculated Shipping (CCS). On Grow annual billing, it is already included, so you can skip this step. On Grow monthly billing, Shopify must activate it first.
If CCS is not enabled, here's how to activate it:
When you save your Shopify integration settings in Sendcloud, a banner appears if CCS is not enabled. The banner includes a message you can copy and paste directly to Shopify Support:

- Go to your Shopify Admin and contact Shopify Support.
- Request that Carrier Calculated Shipping (CCS) be enabled for your store.
- Once Shopify confirms CCS is active, return to Sendcloud.
- Go to Settings > Integrations, open your Shopify integration, and click Reinstall.
- Approve the requested permissions.
Before-payment selection will not work until CCS has been enabled by Shopify and the Shopify integration has been reconnected in Sendcloud.
Step 5: Configure additional options
Add service point information to Shopify orders; enable this to write the selected service point's name, carrier, address, type, and opening hours into the Shopify order details.
Step 6: Verify your Shopify shipping setup
We recommend keeping at least one standard shipping method in Shopify (Settings > Shipping and delivery). It acts as a fallback so customers can still check out when no eligible service points are near their address.
Step 7: Test checkout
- Add a product to your cart and proceed to checkout.
- Enter a shipping address.
- Verify that service point delivery options appear.
Step 8: Remove the legacy setup
If testing succeeds and you previously offered selection on the Thank You page, remove the old setup to avoid duplicate options:
- In Settings > Shipping and delivery, remove legacy service point methods (e.g. Service Point Delivery DHL, DPD, PostNL).
- Remove the Service Point Picker block from the Thank You page.
After payment (Thank You page)
With after-payment selection, customers pay first and then choose their service point on the Thank You page, where you can show a map and a list. The setup is the same across plans, so we keep it in one place.
For after-payment setup, see the Shopify service points: selection after payment (Thank You page).
Service points on the Advanced plan
On the Advanced plan, you can offer service points before payment (during checkout) or after payment (on the Thank You page). Choose the flow you want to set up below.
Before payment (during checkout)
Recommended for most stores. Customers choose their pickup point while they choose delivery, before paying. They see a list of up to five nearby points (no map).
Step 1: Enable service point delivery in Sendcloud
- Go to Settings > Integrations.
- Click Configure under your Shopify shop integration.
- Enable Service point delivery.
- Enable Service point selection before payment.
Step 2: Configure service point delivery rates
- Click Add rate.
- Select a country, then a carrier, then enter a fixed delivery price.
- Repeat for every country and carrier you want to support.
Important
You must create at least one rate. If before-payment selection is enabled but zero rates are configured, Shopify receives no locations and no service points appear during checkout, leaving customers unable to choose one. Create at least one rate for every country and carrier combination you want to offer.
Step 3: Save your configuration
Click Save changes. Sendcloud may request additional Shopify permissions needed to show service point options during checkout; approve them to complete setup.
Step 4: Configure additional options
Add service point information to Shopify orders — enable this to write the selected point's name, carrier, address, type, and opening hours into the Shopify order details.
Step 5: Verify your Shopify shipping setup
Keep at least one standard shipping method in Shopify (Settings > Shipping and delivery) as a fallback for addresses with no nearby service points.
Step 6: Test checkout
- Add a product to your cart and proceed to checkout.
- Enter a shipping address and verify that service point delivery options appear.
Step 7: Remove the legacy setup
If you previously offered selection on the Thank You page, remove the legacy service point methods and the Thank You page picker block to avoid duplicate options.
After payment (Thank You page)
With after-payment selection, customers pay first and then choose their service point on the Thank You page, where you can show a map and a list. The setup is the same across plans, so we keep it in one place.
For after-payment setup, see the Shopify service points: selection after payment (Thank You page).
Service points on Shopify Plus
Shopify Plus merchants offer service point selection directly during checkout, using the dedicated Sendcloud checkout extension.
Step 1: Set Up Service Points in Sendcloud
- Go to your Sendcloud panel.
- Navigate to Settings > Integrations.
- Click Configure under your Shopify shop integration.
- Enable the Service Points option.
- Choose carriers from the Carriers list
- Click Save.
✅ Sendcloud is now ready to handle service point delivery.
Step 2: Add the Service Point Picker to checkout
Watch the video
Note: If the video appears blurry, change the quality to 1080p.
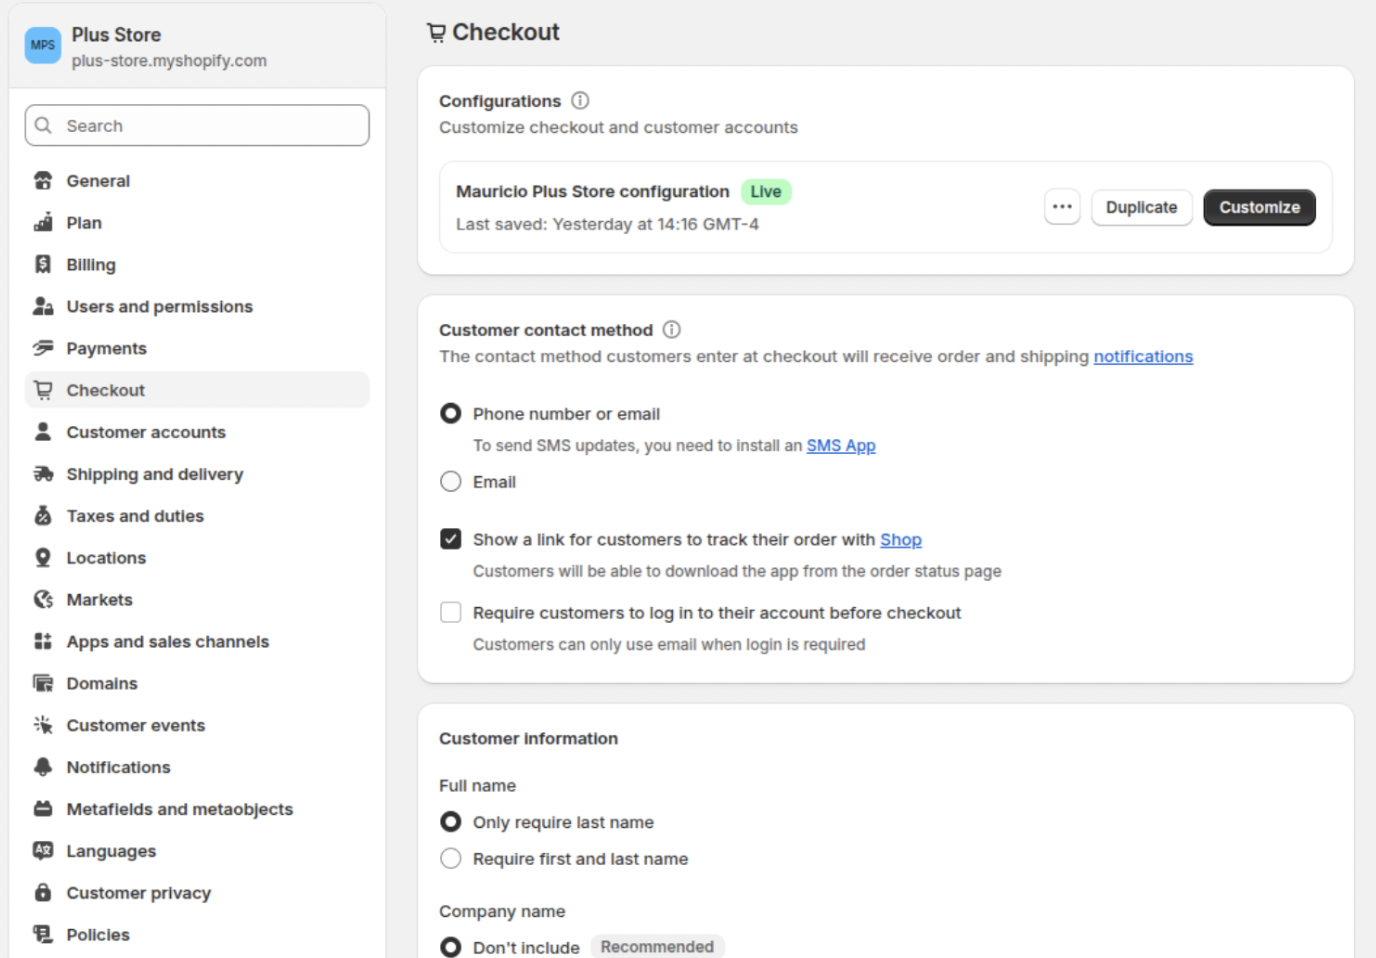
- In your Shopify Admin, go to Settings > Checkout.
- Under Checkout configuration, click Customize.
- In the theme editor, select Checkout from the dropdown menu.
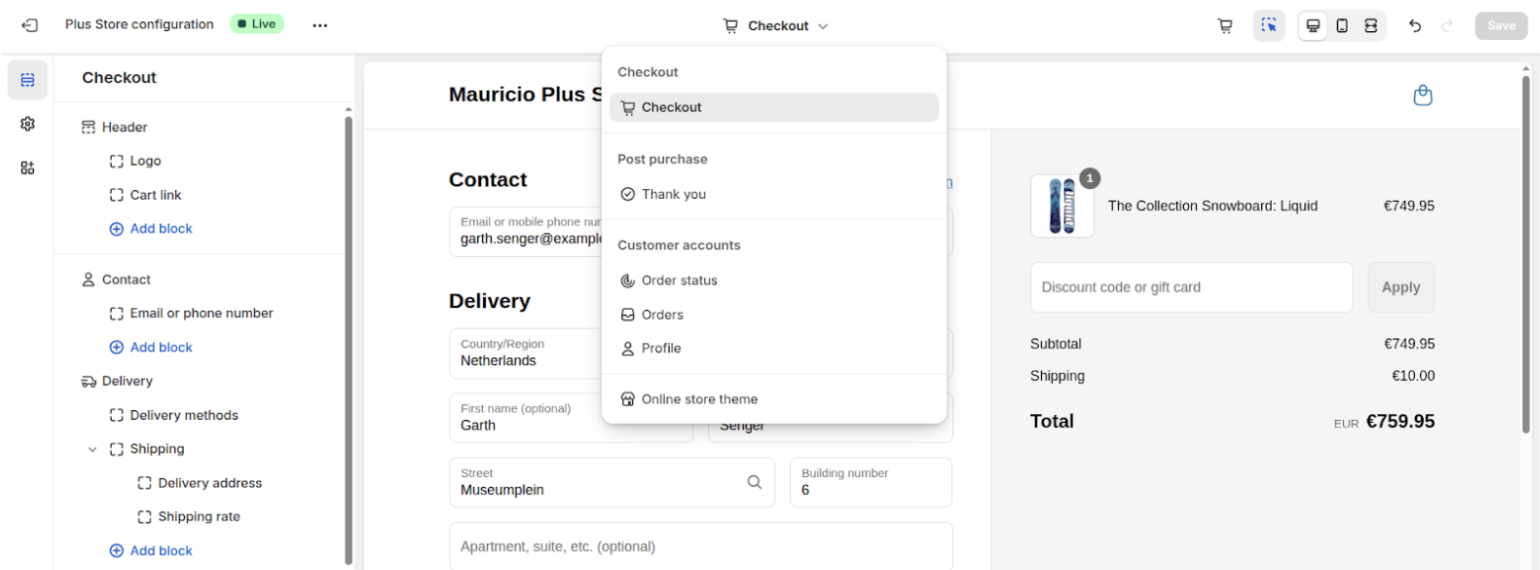
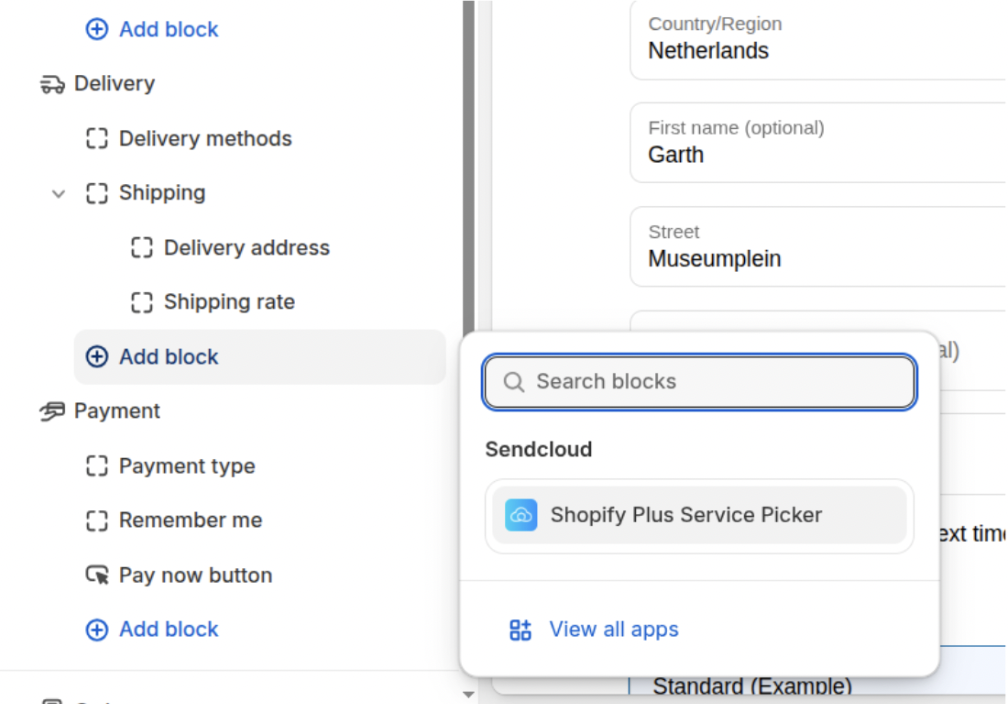
- At the bottom-left, click + Add app block.
- Choose Shopify Plus Service Picker
- Click Save (top-right).
Your customers can now choose a pickup point at checkout.
Enforce service point selection with Express Payment
Shopify offers two different ways for customers to pay quickly: Express payment methods and Express checkout buttons. These behave differently when it comes to selecting and validating a service point.
Express payment methods
These are express payment options selected during the regular checkout flow, after the customer has entered their shipping details — such as PayPal, Apple Pay, Google Pay, and Shop Pay.
When these payment methods are used, Shopify still processes the cart through its standard checkout flow, so we recommend enabling the Cart validation function to ensure a service point is selected before checkout is completed.
How to enable cart validation:
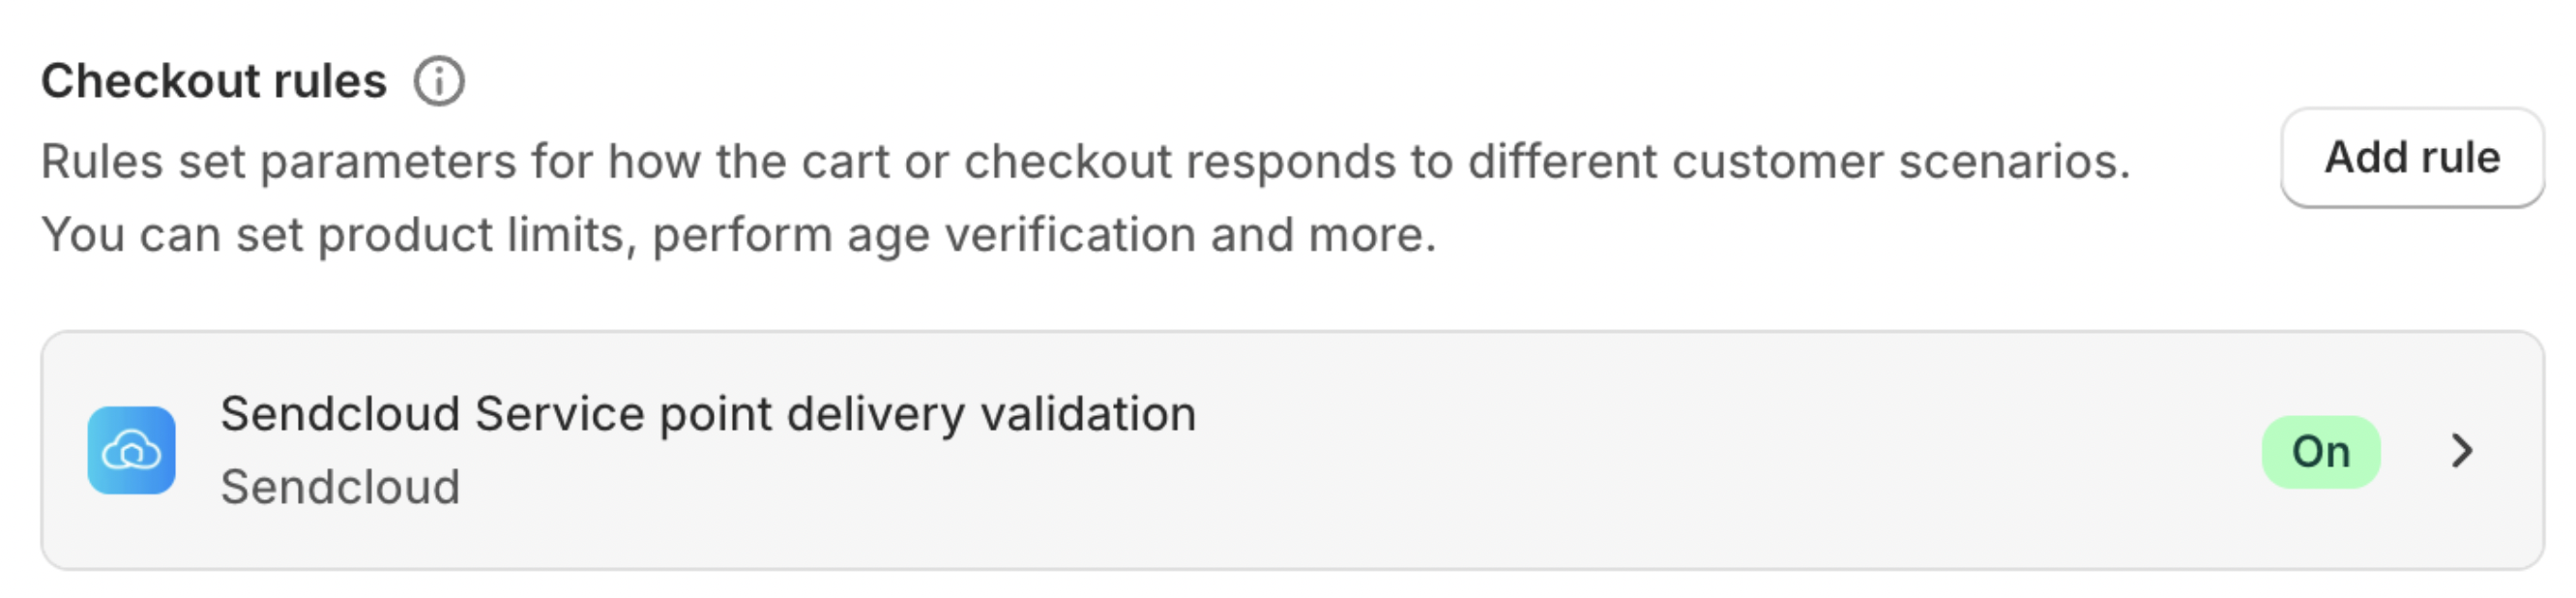
- In your Shopify Admin, go to Settings > Checkout > Checkout rules.
- Click Add rule.
- Select Sendcloud Service point delivery validation from the list.
-
Click Save, then Turn on.
Express checkout buttons
These are payment buttons shown at the top of the Shopify checkout page that let customers pay immediately, without completing the regular checkout flow — for example PayPal, Apple Pay, and Google Pay. Because these buttons bypass Shopify’s regular checkout flow, cart validation is not applied, so customers cannot select or validate a service point when using them.
For more on Shopify Plus dynamic/express checkout buttons, see Shopify Plus Dynamic checkout app.
Step 3: Test checkout
- Add a product to your cart and proceed to checkout.
- Select a service point delivery method and choose a service point.
- Complete the order.
Settings that apply to all plans
Auto-assign service points
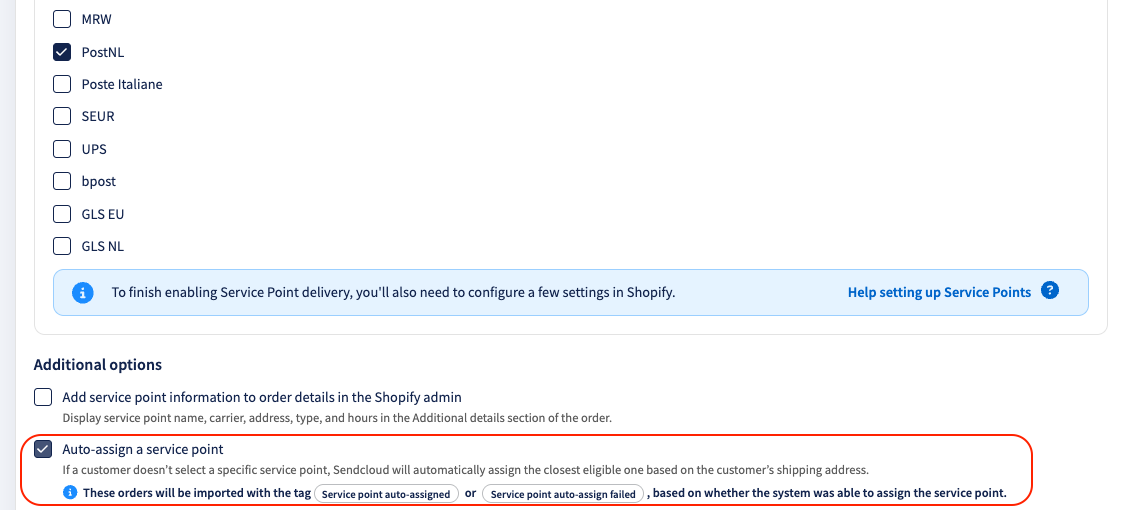
Auto-assign is enabled by default for Shopify integrations. If a customer completes checkout without selecting a service point, Sendcloud automatically assigns the nearest available service point based on the shipping address, carrier, and delivery method. This keeps service point orders valid even when the selection step is skipped.
In the before-payment flow, this rarely happens because customers choose their pickup point before they pay. It is most useful for the after-payment flow, where a customer might leave the Thank You page without selecting; in that case, Sendcloud assigns the nearest point, and the customer sees a notification on the Thank You page, where they can still review or change it.
Manage auto-assign settings:
- Go to Settings > Integrations in your Sendcloud panel.
- Open your Shopify integration.
- Enable or disable Auto-assign a service point.
- Save your changes.
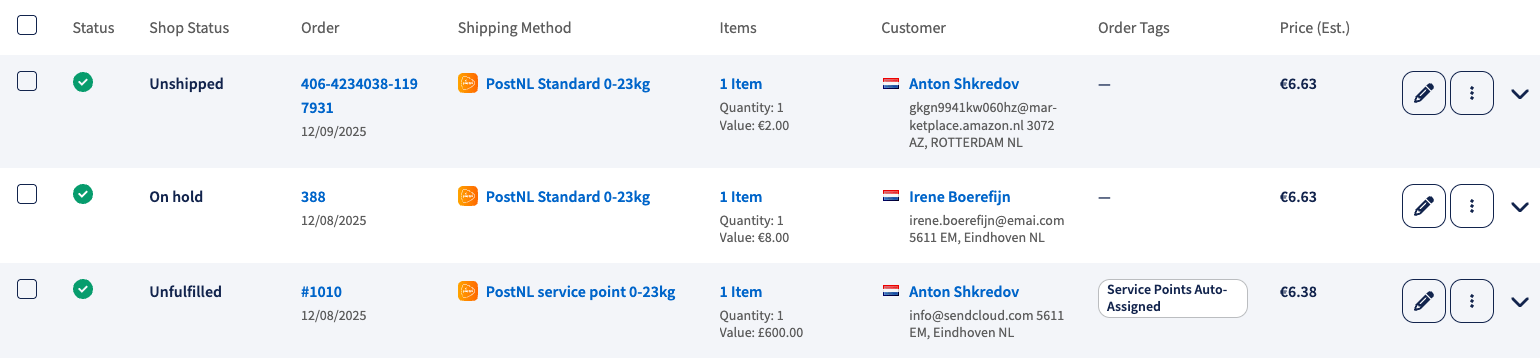
Order tags in Sendcloud
When a service point is auto-assigned, the order is tagged in Sendcloud as "Service point auto-assigned", or "Service point auto-assign failed" if no suitable point was found. These tags make the orders easy to identify in Sendcloud. They are not visible in Shopify.
💡 Tip: In the Incoming Orders View (IOV), make sure the Order tag column is enabled so you can easily see whether a service point was auto-assigned.
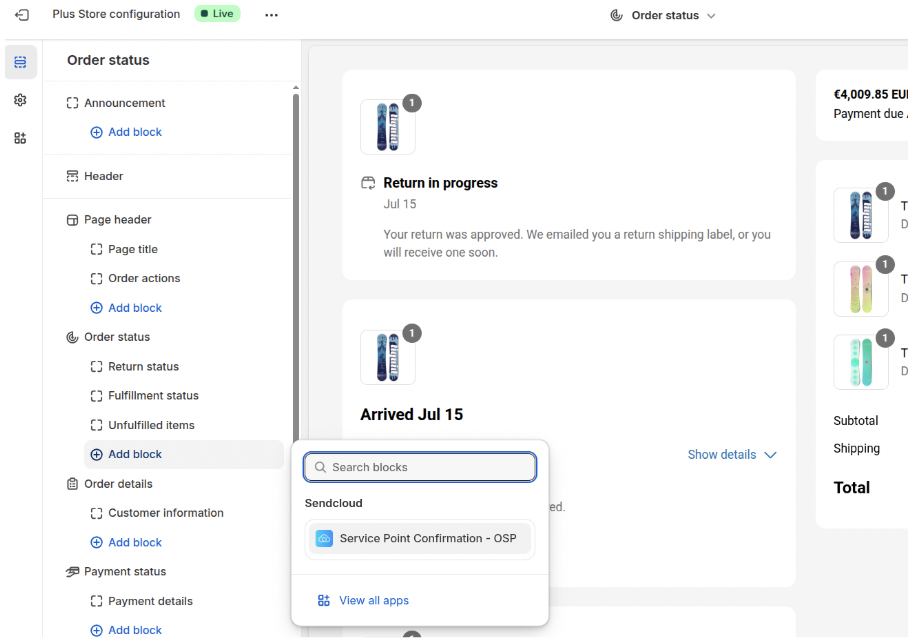
Optional: Show the selected point on the Order Status page
Let customers view their selected point (with map and opening hours) after placing their order.
- Go to Settings > Checkout > Customize.
- From the dropdown, select Order Status.
- Add the app block: Service Point Confirmation.
- Drag it into position.
-
Click Save.
How customers access it: they receive an order confirmation email with a "View my order" button that opens the Order Status page with the map and opening hours.

FAQ
Why don't service point delivery options appear during checkout?
Check each of the following:
- Service point delivery is enabled: go to Settings > Integrations > Shopify > Configure and verify the toggle is on.
- Before-payment selection is enabled: in the same integration settings, verify Service point selection before payment is on.
- At least one rate exists: in the integration settings, verify at least one country/carrier combination is added under shipping rates.
- CCS is enabled (Grow only): required for Grow stores. Without it, before-payment options cannot be displayed.
- A fallback method exists: go to Shopify Admin > Settings > Shipping and delivery and verify at least one standard shipping method is available.
- The carrier supports the destination address.
Why should I keep a standard shipping method in Shopify?
If no eligible service points are near the customer's address, Shopify won't display any service point options. A standard shipping method ensures the customer can still complete checkout.
Can I offer free service point delivery above a certain order value?
No. Free shipping thresholds are not currently supported for service point delivery rates.
Can I create weight-based service point delivery rates?
No. Service point delivery rates currently support fixed prices only.
How many service points are shown during checkout?
Customers can choose from up to five nearby service points.
Can customers select a service point from a map?
In the before-payment flow, points are shown as a list only — there is no map. If you want to offer a map view, use the after-payment (Thank You page) flow.
What happens if I downgrade my Shopify plan?
Your service point setup will stop working if you downgrade from Advanced to Basic, or from Grow annual billing to Grow monthly billing, because the before-payment functionality depends on the higher plan or on CCS being included.
What if a selected service point becomes unavailable after checkout?
In rare cases a chosen point may become unavailable after an order is placed — for example, if the carrier removes the location. If this happens, you may need to select an alternative service point before a shipping label can be created.
DHL Packstation deliveries (Germany)
Customers collecting from a DHL Packstation must provide their DHL Postnummer during checkout. In the before-payment flow, the Postnummer is entered in Shopify's Address line 2 field (normally used for apartment or unit numbers).
To make this clear, relabel the Address line 2 field in Shopify:
- In Shopify Admin > Online Store, click the ⋯ menu and select Edit default theme content.
- Open the Checkout and system section.
- Scroll to Checkout contact and locate Optional address 2 label.
- Replace the text with a clear label, for example: Apartment, suite or DHL Postnummer.
- Save your changes.