
Purpose: Learn how to configure printer settings in the Sendcloud Print Client and troubleshoot common label printing issues, such as incorrect size, alignment, or unreadable barcodes.
The Sendcloud Print Client is only supported on Windows and macOS.
It is not supported on iOS, Android, or Linux.
This means phones and most tablets cannot be used for printing labels via the Print Client. The exception is tablets running a full Windows operating system, such as some Microsoft Surface Pro devices.
Configure printing in the Print Client App
Use this section if your labels are printed too small, too large, cut off, misaligned, or if barcodes look blurry or unreadable.
Most label printing issues can be fixed directly in the Print Client App.
Open the Print Client App from the Sendcloud icon in your system tray (Windows) or menu bar (macOS):
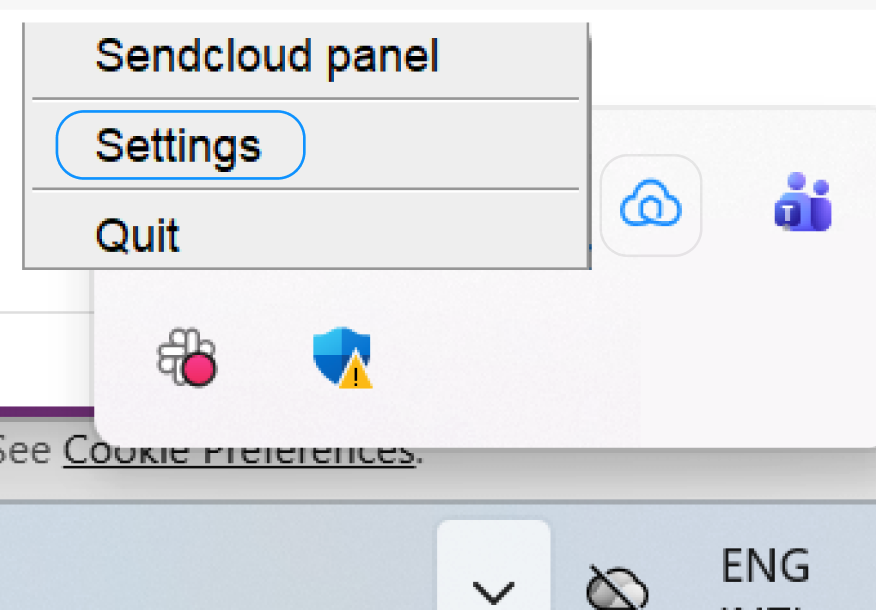
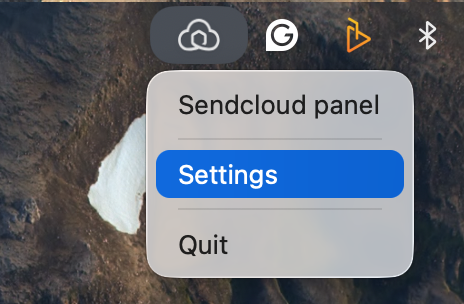
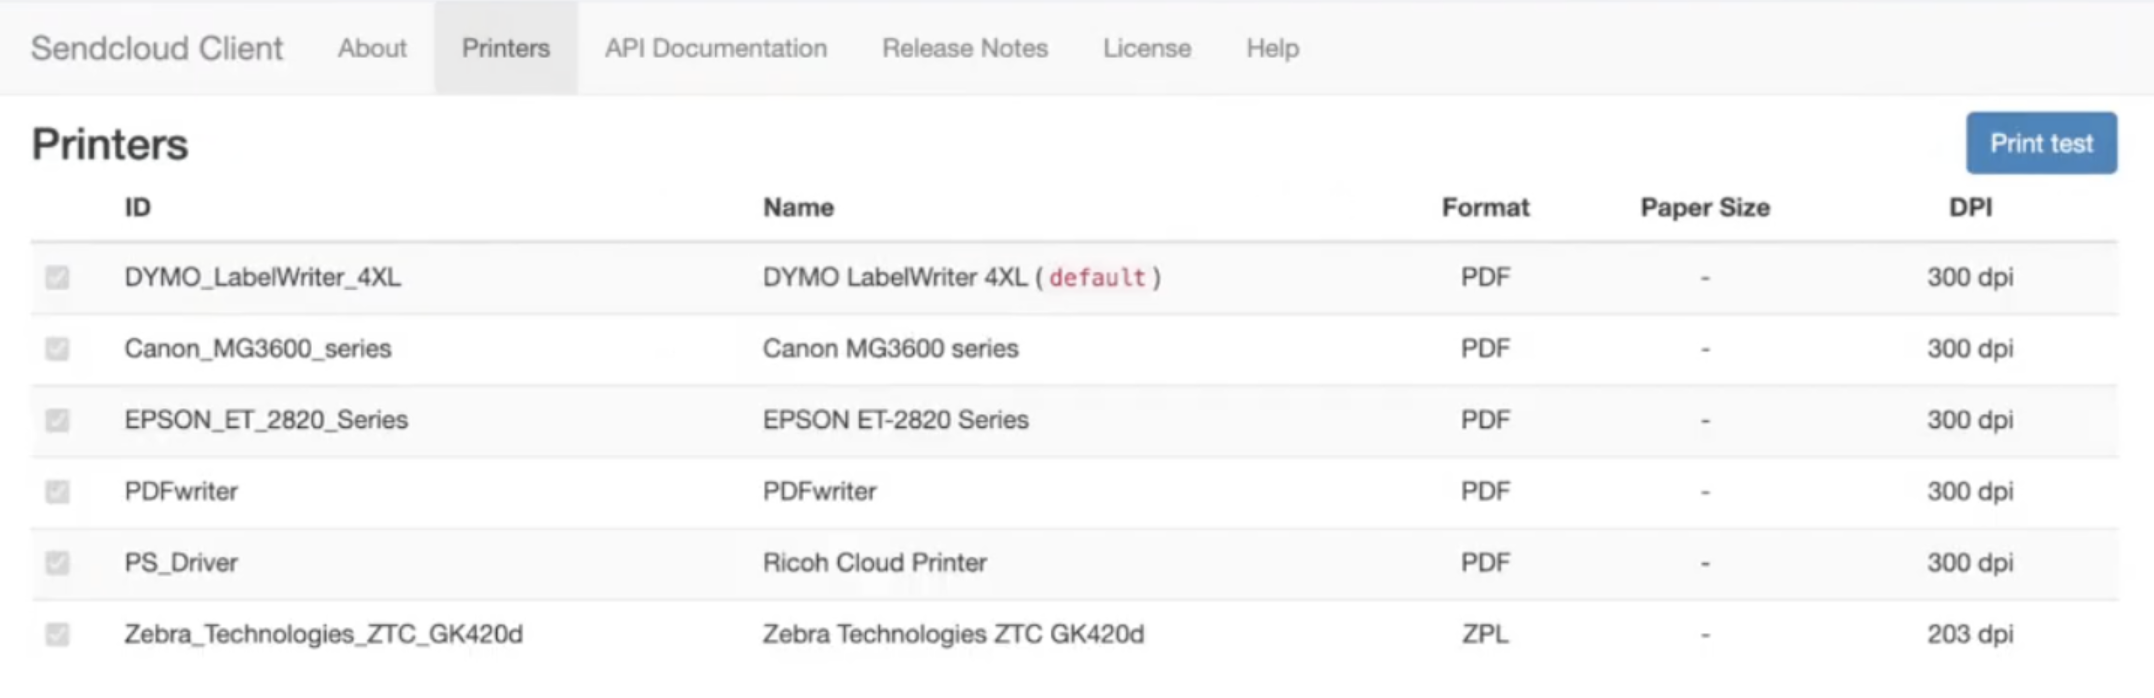
Click on Settings → Printers; here, you will see a list of all the detected printers.
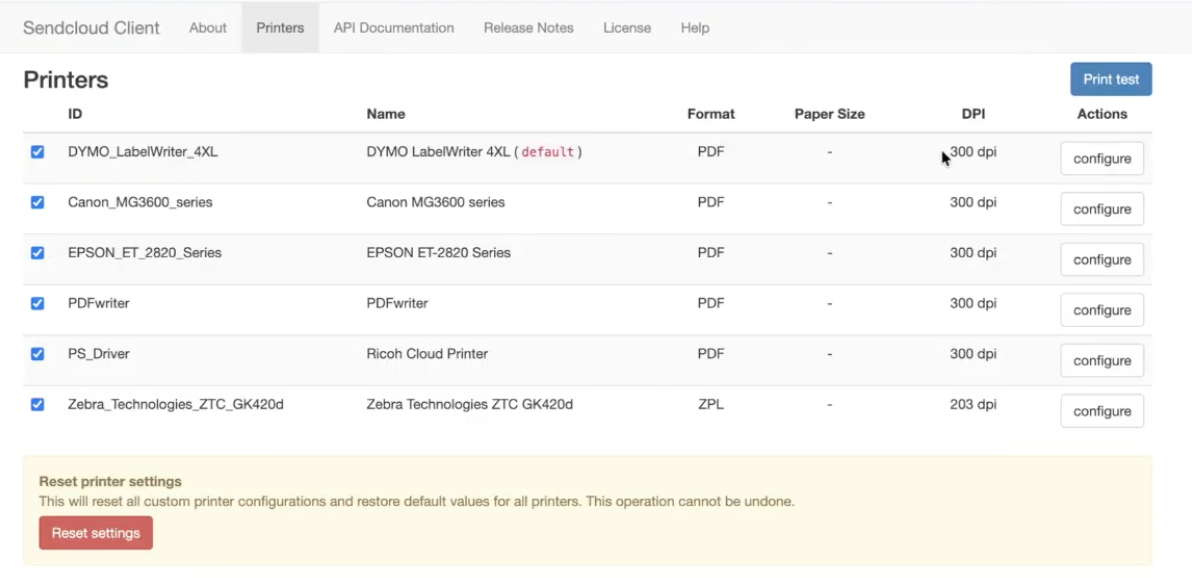
If you click on "Configure" next to the printer you want to adjust, it will open the printer configuration settings, where you can change how labels and documents are printed.
💡 Tip: If you use multiple computers (for example, in a warehouse), your IT team can configure the Print Client once and reuse the same setup on other devices.
Quick troubleshooting
Label is cut off → adjust margins or orientation
Label too small/large → check DPI and disable scaling
Barcode unreadable → correct DPI, avoid resizing
Wrong format (A4 / A6) → check paper size
Label rotated → check orientation
Printing from phone/tablet not possible → Print Client only works on Windows/macOS.
Sendcloud Panel not recognizing the Print App: enable Local network access
If your Sendcloud Print App is installed and running, but the Sendcloud Panel still shows it as “Not connected”, the issue may be caused by your browser blocking communication with the app.
This happens when the browser does not allow access to the localhost network, which is required for the Sendcloud Panel to communicate with the Print App.
Solution: Enable Local network access
To fix this issue, you need to allow Local network access for the Sendcloud website in your browser’s site permissions. This will allow the panel to detect the Print App installed on your computer.
Follow these steps:
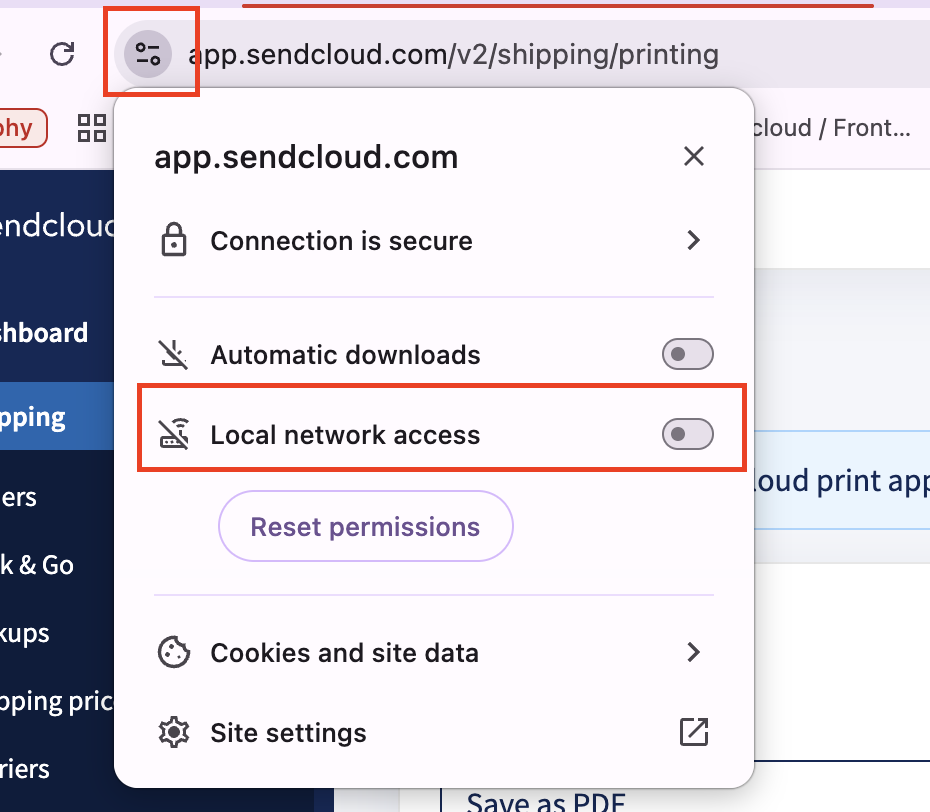
- Click the Site controls icon next to the address bar (as shown in the screenshot below).
- Find the option Local network access and toggle it ON.
- If prompted, click Reset permissions to re-enable access.
- Refresh the page.
After enabling Local network access
- Refresh the Sendcloud Panel: the Print App should now appear as Connected.
- If it still shows as disconnected, quit and restart the Print App, then refresh the page again.
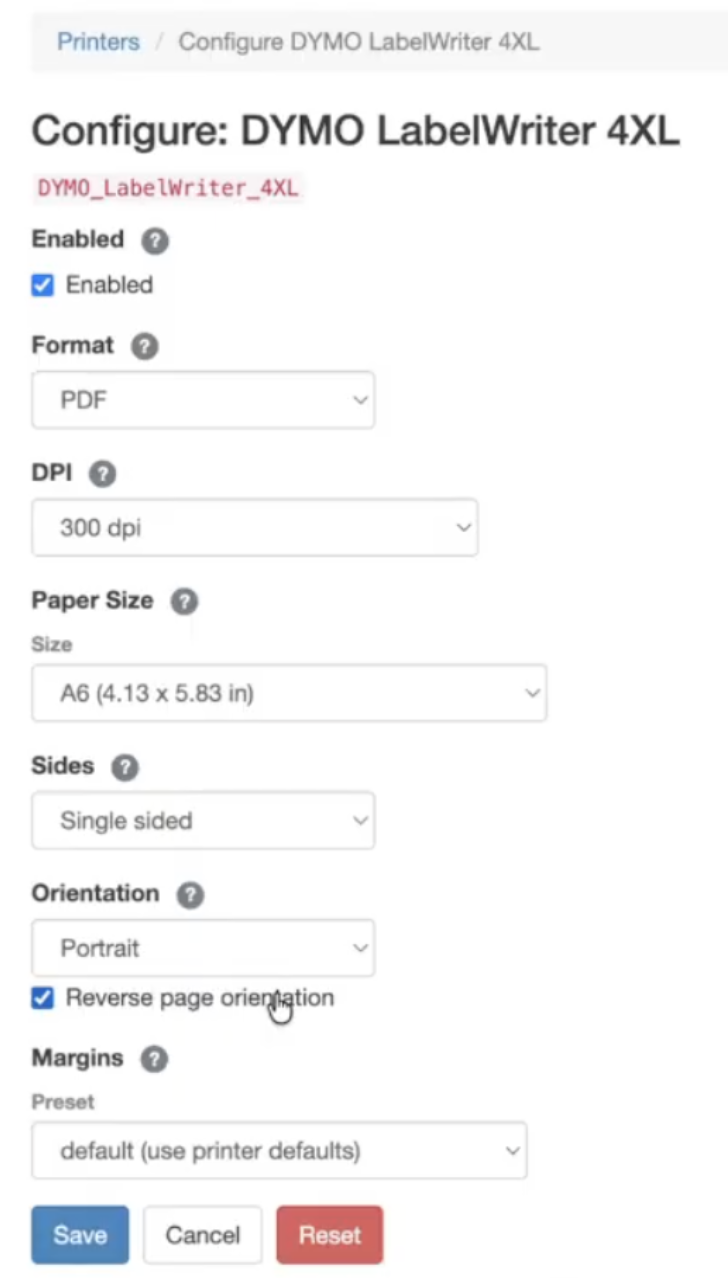
Printer configuration settings: explained
These settings appear after clicking Configure on a printer in the print client settings; change these configurations only if your labels do not print correctly.
What you should check first
Before changing any advanced settings, check that the following values are correct for your printer:
- Format (PDF or ZPL*)
- DPI (usually 203 or 300 for label printers)
- Paper size (A4 or A6)
- Orientation (portrait or landscape)
- Margins (to slightly move the label)
If one of these settings is wrong, your label will look wrong.
* ZPL (Zebra Programming Language) is a label format for Zebra thermal printers. It’s intended for direct printing and cannot be opened as a PDF.
Enabled
Enables or disables this printer in the Print Client. If disabled, Sendcloud will not use it.
Format (PDF or ZPL)
Sendcloud always sends labels as PDF. The Print Client can either:
- Send the PDF directly to the printer, or
- Convert it to a printer language like ZPL before printing
ZPL is used only for Zebra thermal printers. It cannot be opened as a PDF and is meant for direct printing.
DPI (Dots Per Inch)
DPI controls the size and sharpness of the label.
- 203 DPI – most Zebra and thermal label printers
- 300 DPI – higher detail, often used by laser printers
Paper size
By default, the Print Client uses the paper size from the document. You can force a paper size to:
- Scale up (for example A6 → A4)
- Scale down (for example A4 → A6)
Sides (single/double)
Used mainly for PDF documents, such as picking lists. If supported by your printer, you can enable double-sided (duplex) printing.
Orientation
Labels are normally printed in portrait. If your label is rotated or cut off, try landscape.
Reverse orientation can help if labels are cut off at the top. This prints starting from the bottom instead.
Margins
Margins let you move the label without resizing it.
- Top/bottom – move label up or down
- Left/right – move label sideways
Reset
You can reset settings at any time:
-
Reset one printer
Click Reset on the printer’s Configure page to restore only that printer to its default settings. -
Reset all printers
Click Reset settings at the bottom of the Printers list to remove all custom settings for every printer.
💡 Tip: After changing settings, run a test print to confirm alignment and barcode quality before printing in bulk.
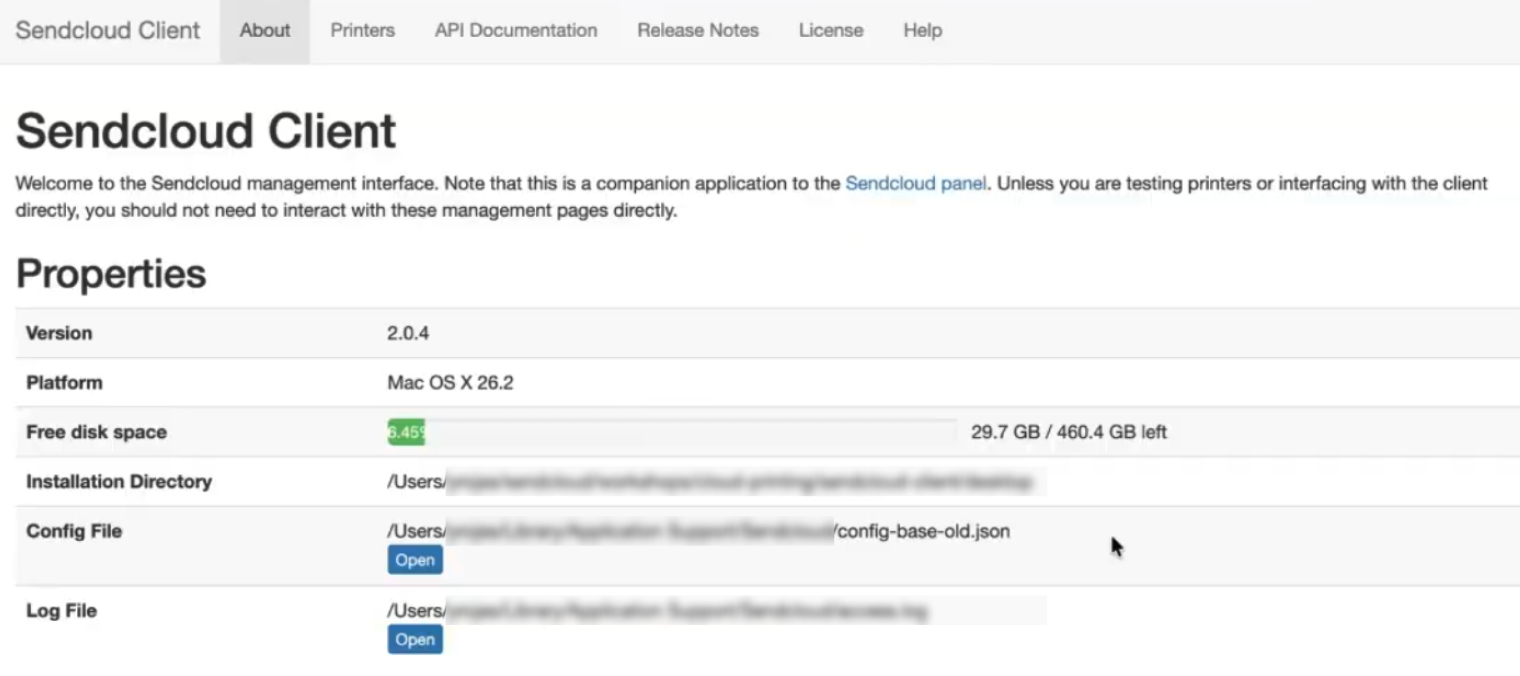
Advanced: use environment variables for configuration files
By default, the Print Client stores its configuration in a file on the computer.
This configuration file contains settings such as configured printers, printer options, and printing preferences.
You can see which configuration file is currently being used in Print Client → About → Config file.
This section is informational and helps you verify where the Print Client is reading its settings from.
The configuration path is defined outside the Print Client.
In environments where many users work on the same machines (for example, warehouses or shared workstations), you may want to avoid reconfiguring printers every time a user logs in.
To support these advanced setups, the Print Client can be configured using environment variables. These variables must be set on the computer before starting the Print Client.
Install the Print Client in managed Windows environments (MSIX / SCCM)
The Sendcloud Print Client is not available as an MSI installer. Instead, it is distributed as an MSIX package, which can be deployed in managed Windows environments (for example using SCCM / Microsoft Configuration Manager).
See how to install it
This method installs the Print Client system-wide and makes it available to all users on the machine.
Installation and configuration steps
-
Download the MSIX package
- Go to the Sendcloud Print Client download page: https://dl.sendcloud.sc/sendcloud-client/stable/download.html
- In the Windows section, download the .msix file (for example
sendcloud-2.0.4.x64.msix). - Save the file to a local folder such as
C:\Temp\.
-
Add the Print Client as a provisioned package
- Open PowerShell as Administrator.
- Run:
Add-AppProvisionedPackage -Online -SkipLicense -PackagePath "C:\Temp\sendcloud-2.0.4.x64.msix"
-
Verify the installation
- Run:
Get-AppProvisionedPackage -Online - Confirm the package appears, for example:
Sendcloud_2.0.4.0_x64__vxpr43b7nd8t
- Run:
- Configure global system environment variables
These variables must be set before starting the Print Client.
- Open System Properties → Advanced → Environment Variables.
- Under System variables, add:
-
SC_CONFIG_PATH– path to the configuration file - (Optional)
SC_INITIAL_CONFIG_PATH– initial template configuration
-
See the sections below for details on shared and per-user configuration behaviour.
Uninstallation
- Remove the provisioned package:
Remove-AppProvisionedPackage -Online -PackageName Sendcloud_2.0.4.0_x64__vxpr43b7nd8t - Remove
SC_CONFIG_PATHandSC_INITIAL_CONFIG_PATHfrom system environment variables.
Choose the option below that best matches your setup.
Option A: use a shared configuration file (recommended for shared stations)
Use this option when multiple users log in on the same computer, and all users should use the same printer configuration.
The Print Client will always read its settings from a single configuration file stored in a shared location on that computer.
- Set
SC_CONFIG_PATHto the absolute path of the configuration file you want the Print Client to use.
If the file at this path does not exist, the Print Client will create it automatically. If SC_INITIAL_CONFIG_PATH is also set, that file will be used as the starting content.
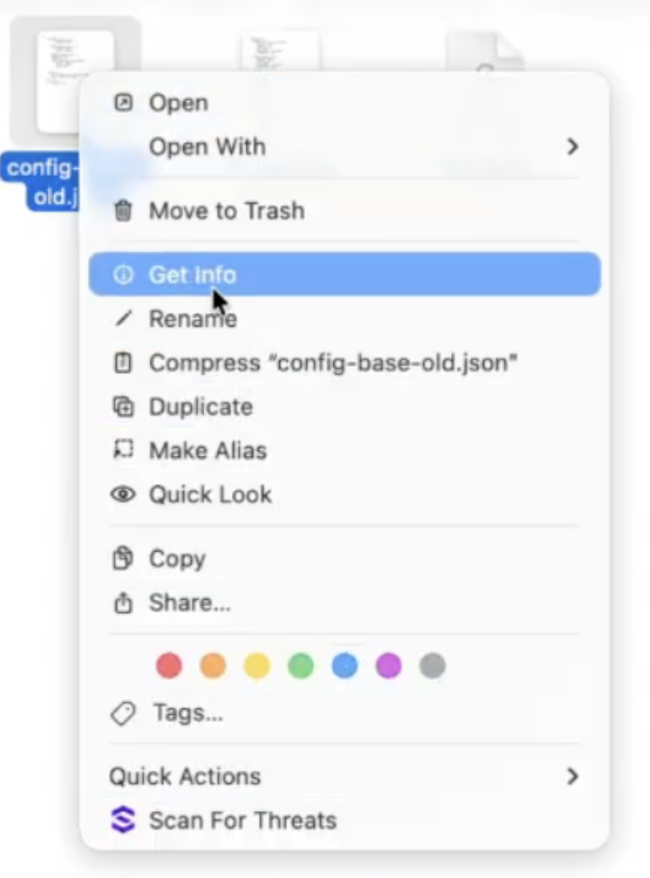
Read-only behavior: If this configuration file is read-only (for example, locked on macOS or stored in a location where users do not have write access), users will be able to view printers and settings but cannot change them. Printing will still be possible.
Example (macOS): You can make a configuration file read-only by locking it:

💡 Tip: This setup is ideal for shared warehouse stations: one configuration per computer, consistent printer settings for all users, and fewer support requests.
Option B: use an initial template configuration (users can still customize)
Use this option when you want users to start with a predefined printer setup, but still allow them to make their own changes.
Set SC_INITIAL_CONFIG_PATH to the absolute path of a configuration file that should be used as an initial template.
When the Print Client starts:
- If a configuration file already exists for the user, the Print Client will continue using that file.
- If no configuration file exists yet, the Print Client will copy the template from
SC_INITIAL_CONFIG_PATHto the user’s configuration location and use it from then on.
This option is useful when you want to roll out a default configuration across many devices, while still allowing local adjustments when needed.