Purpose: This article is for troubleshooting common Sendcloud integration issues for PrestaShop
Service Points appear at checkout when at least one compatible carrier is fully configured (zones, prices, weights). It is currently not possible to display multiple carriers on one Service Point map. This is expected behavior and does not indicate an error.
My customers receive multiple emails about order status updates
Some of PrestaShop's order statuses send e-mails about status updates by default. For example, when an order changes its status to Shipped, PrestaShop will send e-mails to the customer including tracking information.
Sendcloud also provides a built-in tracking e-mail communication feature, and if you have it enabled alongside the default settings of PrestaShop, your customer may receive messages with duplicated information.
Please refer to our automatic tracking e-mail communication and combine it with the following instructions to avoid sending multiple e-mail messages to your customers.
How to disable email communication of PrestaShop
Go to your PrestaShop back office, then go to Shop Parameters > Order Settings > Statuses (in the top tab)
From the status list, find and edit Processing in Progress or Shipped statuses
From the editing screen, uncheck Send an email to the customer when his/her order status has changed. option.
My orders are set to Paid whenever a shipment is on route or delivered.
PrestaShop's default behavior is to set an order as Paid whenever it is transitioned to Processing in progress and Shipped statuses.
Online store owners have different workflows, and sometimes you start processing items even before customers confirm their payment (e.g, regular customers may benefit from this workflow), but do not set the status of an order to paid.
While editing a status, you can uncheck the Set order as paid option. This will prevent your order from being set as paid whenever it is processed by Sendcloud (e.g, updating tracking info and/or changing order statuses to Shipped).
The "Service Point" button appears, but it doesn't do anything
You may try to reinstall Service Points from your Sendcloud panel account. Go to your integration settings page, uncheck the Service Point option, and enable it again.
This problem may also be due to an option of your web host. It is advisable to add the IP to the whitelist of your server. Some web hosts like Planet Hoster have an option to disable the "mod_security" option.
This can also be related to incompatibility with third-party One Page Checkout modules. PrestaShop already comes with a built-in One Page Checkout, and the Sendcloud module only supports that for now. If you have any third-party module for One Page Checkout, we advise you to disable it. For more information about how to enable the built-in One Page Checkout on PrestaShop, please refer to the PrestaShop official documentation and change the Order Process type from Standard (Five steps) to One Page Checkout.
I am unable to integrate your Prestashop shop, and my shop returns an error "500"
The error type "500" represents a server problem on the side of your e-shop. One of the most common causes is an incompatibility between PHP 7.2 and Prestashop versions 1.6. and 1.7. As a result, many modules are not compatible in turn including SendCloud. A solution is to upgrade Prestashop to a newer version; we recommend 1.7.8 or 8.1 for a more stable integration with Sendcloud. If Prestashop upgrade is not possible, an alternative solution is to downgrade to an earlier version of PHP (7.0, for example, much more stable) if your host allows you to do so; otherwise, turn to another type of hosting. We invite you to perform compatibility tests in your PrestaShop back office. Then you can start integrating your shop to Sendcloud again.
"The message "chevron_right" appears at the checkout when I select the delivery in service point"
This message appears when you use a specific theme chosen for your store that overrides display style rules in our code. This is not related to Sendcloud. The material-icons class could be responsible for the style of the icons in general.
Even though this message does not disrupt how Sendcloud is applied to your website, we understand that it is unpleasant for you and your customers to see this appear.
Hence, in order for this message to disappear, you need to change your store theme code to have this line of code again: <i class="material-icons" aria hidden="true">chevron_right</i> or change the whole store theme.
I have an issue with connecting/importing orders
If you are experiencing an issue with connecting integration or importing orders that was not covered here check our basic troubleshooting guide.
https://support.sendcloud.com/hc/en-us/articles/360027055411-Basic-integration-troubleshooter
I get the “No shop full URL” error
This error appears when PrestaShop can’t detect your shop’s full URL. It usually happens because of URL rewriting or .htaccess issues.
Here’s how to fix it:
-
Enable URL rewriting (mod_rewrite)
PrestaShop uses friendly URLs, which require themod_rewritemodule. If it’s not enabled, API routes may not work properly, which can cause this error.- Check your server settings and make sure
mod_rewriteis enabled. - It’s normally on by default, but some hosting setups may have it turned off.
- Check your server settings and make sure
-
Disable and re-enable Friendly URLs
Sometimes the.htaccessfile needs to be regenerated.- Go to Shop Parameters > Traffic & SEO.
- Disable Friendly URLs and save.
- Re-enable Friendly URLs and save again.
-
Check your
.htaccessfile if the error persists
Even withmod_rewriteenabled, certain.htaccessrules can override URL behavior. Depending on your setup, try one of these:-
If the SetEnv module is enabled:
SetEnvIf Authorization "(.*)" HTTP_AUTHORIZATION=$1 -
For mod_rewrite rules:
RewriteCond %{HTTP:Authorization} ^(.*) RewriteRule .* - [E=HTTP_AUTHORIZATION:%1] -
If you use a custom front controller:
RewriteRule .* /index.php [L,QSA]
RewriteRule .* - [E=HTTP_AUTHORIZATION:%{HTTP:AUTHORIZATION}]
-
After following these steps, PrestaShop should be able to detect your shop’s full URL, and the error should disappear.
How can I resolve the error “Service Points were enabled but are not configured properly. Activate Service Points from the SendCloud Panel before using this feature”?
This error appears when Service Points are enabled in Sendcloud but not correctly configured in PrestaShop.
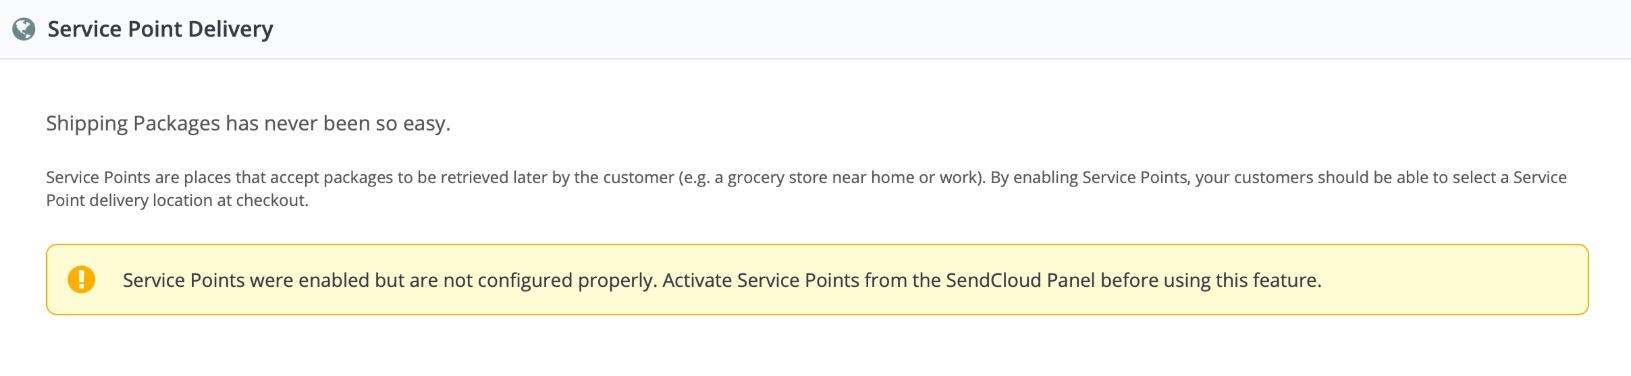
Even though the error message suggests that the setup should be done in Sendcloud, if you’ve already activated Service Points there, the remaining configuration needs to be completed in your PrestaShop.
To fix it:
- In your PrestaShop back office, go to Shipping → Carriers and make sure the carriers that support Service Points are enabled.
- In your Sendcloud panel → Settings → Integrations → PrestaShop, confirm that Service Points are activated.
- Save the integration again to re-sync your configuration between PrestaShop and Sendcloud.
If the error still appears, clear your PrestaShop cache and refresh the checkout page. The Service Point option should now display correctly.