
Purpose: With Sendcloud you can also manually create labels for orders that have not been imported from your online store or an Excel file.
Step 1: Open the new shipment creation form and select the sender address
From your Sendcloud account, go to Shipping > Orders. You will see the Incoming orders tab. Click the +New shipment button to manually create a new shipment.
Select the sender address from which you will be shipping the parcel. To select a sender address, click the arrow to view the drop-down menu with all your shipping addresses. To add a new shipping address, go to Settings > Addresses > Shipping address.

Shipping defaults
Sendcloud will already pre-fill some fields with your shipping defaults. You can add your preferences, like a default weight, a preferred shipping option and a default insurance coverage, among others, in Shipping > Shipping defaults. Read more about it here: How to set up your default shipping settings.
Step 2: Enter your customer's information
Fill in the Customer Information. The required fields depend on the carrier, but in general the following fields are mandatory:
- Name
- Street name
- Postcode
- City
- Phone number
- Destination country

Search saved contacts
If you have already saved your customer's address, you can find it directly by clicking the arrow to display a drop-down menu with all saved contacts. Select the relevant contact and you will see that the customer information is already pre-filled for you. You can still modify it.

To save a new contact, enter the customer's information and check the box "Save this contact" under the City field.
Step 3: Add shipment details
Next, go to the Shipment details section. Here you can enter the number of parcels that you are shipping and the weight of each parcel in kg.
There are also some optional fields for you to fill in if it's relevant: dimensions of the parcel (this is mandatory for some carriers), order number and the type of box that you will be shipping your products in. For more information about the boxes field, read our article Boxes feature.

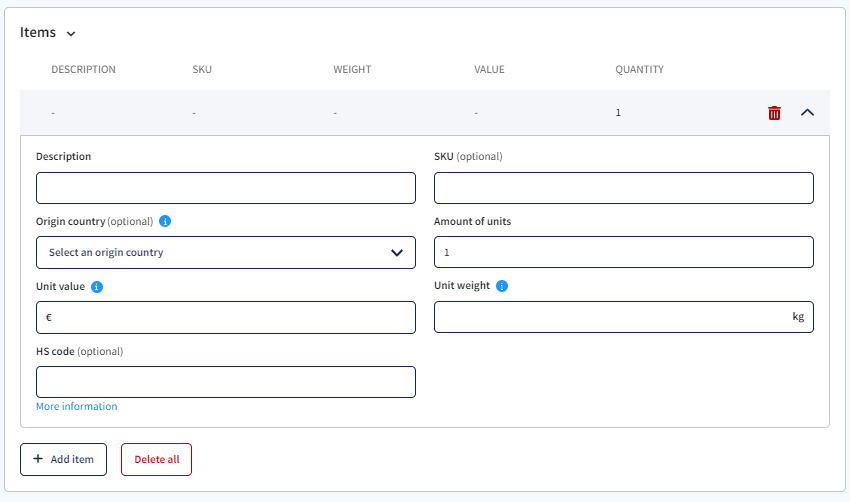
Step 4: Add the description of your items
This is particularly important if you are shipping internationally, as the description of your items, together with their value, weight, HS code and origin country are required for customs clearance. Read more about that here: How to ship internationally with Sendcloud.
You can also enter other details, like the SKU of the product and how many units of each product you are shipping.
To add the description of a new item click the button + Add item.
If you wish to delete an item, you can click the trash can icon in red. You can also delete all items at once by clicking Delete all.
HS Code
You can use our HS Code Recommender to identify the HS Code that best matches your items. Enter the item description in the HS Code section and select the most suitable code from the list of recommendations provided.

Step 5: Select the shipping option
In the next step you can add further shipping details:
-
shipping option: our Shipping recommendation feature will already recommend the best shipping option for you, based on your historical shipment data. This means that the recommendation will become better over time! Choose the shipping option that you want to use.
 You can see the indicative price in the Summary on the right. Click the arrow to see all the options in the drop-down menu. If you are not sure about which shipping option or carrier to use, you can use our Price list to compare options and rates.
 -
Insurance: here you can add Sendcloud's Shipping Protection (optional) and see whether the shipping option already includes one from the carrier.

- Cash on delivery: check the case "Cash on delivery" if you wish to offer this type of delivery to your customer. Please note that this feature is only available to users with their own carrier contract and only if the carrier supports it. Read our article Cash on delivery for more details.
- Total order value: the total value of the order, i.e. of all the items together.
Step 6: Create the label
Once you have entered all the information, you can check the Summary and click Create label to create and print your label.
For more information on how to process orders and print labels please refer to the following Help Center resources: