

Purpose: Learn how to connect your own SEUR carrier contract with your Sendcloud account in three easy steps.
Step 1: Activate your Sendcloud subscription
Sendcloud offers three subscriptions with which you are able to use your own transport contract: Lite, Growth and Premium.
For more information regarding which plan is best for you and the needs of your business, you can always contact us via the support section of your Sendcloud account or visit our website.
Step 2: Enable your carrier contract
Once you have activated a Sendcloud subscription, you can connect your carrier contract.
In your Sendcloud panel navigate to Shipping > Carriers > My contracts and click Add your own contract. Find SEUR in the list and click Add contract. Here you can add the credentials needed to validate the connection to the carrier.
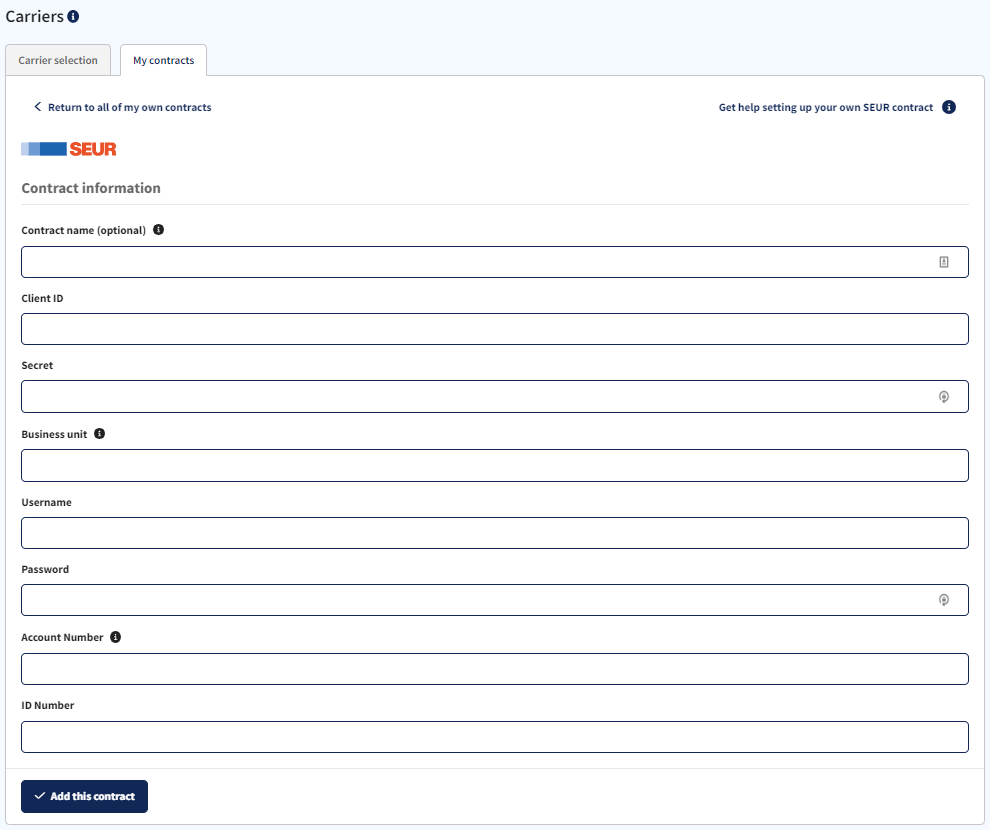
Step 3: Enter your SEUR contract information
In order to activate your SEUR contract, fill in the following fields and do not forget to click Add this contract:
- Contract name: This field is optional. You can give a name to the contract in Sendcloud, for example "My SEUR contract".
- Client ID
- Secret
- Business unit: Only the last two digits of the account number.
- Username
- Password
- Account number: 4 or 5 digit number without hyphen. Example: 12345.
- ID number (contract) --> Spanish Tax Identification Number (NIF).
Tracking
To activate tracking via Sendcloud, contact SEUR directly to ask them to enable SFTP tracking with Sendcloud and request your tracking credentials. The credentials have to be correct and up to date in order for Sendcloud to provide the accurate tracking. If the tracking statuses of your parcels aren't being updated, please contact SEUR so that their IT team can solve the issue.
Shipping address
The address listed on your SEUR contract as your sender address will be the one that appears on your shipping labels, and NOT your default sender address as stored in Sendcloud. To make any changes to your sender address, please contact your SEUR account manager directly.
List of postal codes
SEUR uses its own postal address validation system. To make sure you enter the correct delivery address, as accepted by SEUR, when creating the label, download the list of all postal codes in which SEUR operates.
Direct contract shipping methods
Find below a complete overview of the shipping methods you can use in Sendcloud.
Direct contract shipping methods
| Shipping method | Shipping method ID |
| SEUR 10:00 0-30kg | 7326 |
| SEUR 10:00 COD 0-30kg | 7327 |
| SEUR 13:30 0-30kg | 7328 |
| SEUR 13:30 COD 0-30kg | 7329 |
| SEUR 24 2Shop 0-1kg | 7362 |
| SEUR 24 2Shop 10-15kg | 7372 |
| SEUR 24 2Shop 1-2kg | 7363 |
| SEUR 24 2Shop 15-20kg | 7373 |
| SEUR 24 2Shop 2-3kg | 7364 |
| SEUR 24 2Shop 3-4kg | 7365 |
| SEUR 24 2Shop 4-5kg | 7366 |
| SEUR 24 2Shop 5-6kg | 7367 |
| SEUR 24 2Shop 6-7kg | 7368 |
| SEUR 24 2Shop 7-8kg | 7369 |
| SEUR 24 2Shop 8-9kg | 7370 |
| SEUR 24 2Shop 9-10kg | 7371 |
| SEUR 24 0-1kg | 7330 |
| SEUR 24 Market Plus 0-1kg | 7345 |
| SEUR 24 COD 0-30kg | 7344 |
| SEUR 24 Market Plus COD 0-30kg | 7359 |
| SEUR 24 10-15kg | 7340 |
| SEUR 24 Market Plus 10-15kg | 7355 |
| SEUR 24 1-2kg | 7331 |
| SEUR 24 Market Plus 1-2kg | 7346 |
| SEUR 24 15-20kg | 7341 |
| SEUR 24 Market Plus 15-20kg | 7356 |
| SEUR 24 20-25kg | 7342 |
| SEUR 24 Market Plus 20-25kg | 7357 |
| SEUR 24 2-3kg | 7332 |
| SEUR 24 Market Plus 2-3kg | 7347 |
| SEUR 24 25-30kg | 7343 |
| SEUR 24 Market Plus 25-30kg | 7358 |
| SEUR 24 3-4kg | 7333 |
| SEUR 24 Market Plus 3-4kg | 7348 |
| SEUR 24 4-5kg | 7334 |
| SEUR 24 Market Plus 4-5kg | 7349 |
| SEUR 24 5-6kg | 7335 |
| SEUR 24 Market Plus 5-6kg | 7350 |
| SEUR 24 6-7kg | 7336 |
| SEUR 24 Market Plus 6-7kg | 7351 |
| SEUR 24 7-8kg | 7337 |
| SEUR 24 Market Plus 7-8kg | 7352 |
| SEUR 24 8-9kg | 7338 |
| SEUR 24 Market Plus 8-9kg | 7353 |
| SEUR 24 9-10kg | 7339 |
| SEUR 24 Market Plus 9-10kg | 7354 |
| SEUR 48 0-1kg | 7374 |
| SEUR 48 COD 0-30kg | 7388 |
| SEUR 48 10-15kg | 7384 |
| SEUR 48 1-2kg | 7375 |
| SEUR 48 15-20kg | 7385 |
| SEUR 48 20-25kg | 7386 |
| SEUR 48 2-3kg | 7376 |
| SEUR 48 25-30kg | 7387 |
| SEUR 48 3-4kg | 7377 |
| SEUR 48 4-5kg | 7378 |
| SEUR 48 5-6kg | 7379 |
| SEUR 48 6-7kg | 7380 |
| SEUR 48 7-8kg | 7381 |
| SEUR 48 8-9kg | 7382 |
| SEUR 48 9-10kg | 7383 |
| SEUR 48 2Shop 0-1kg | 7389 |
| SEUR 48 2Shop 10-15kg | 7399 |
| SEUR 48 2Shop 1-2kg | 7390 |
| SEUR 48 2Shop 15-20kg | 7400 |
| SEUR 48 2Shop 2-3kg | 7391 |
| SEUR 48 2Shop 3-4kg | 7392 |
| SEUR 48 2Shop 4-5kg | 7393 |
| SEUR 48 2Shop 5-6kg | 7394 |
| SEUR 48 2Shop 6-7kg | 7395 |
| SEUR 48 2Shop 7-8kg | 7396 |
| SEUR 48 2Shop 8-9kg | 7397 |
| SEUR 48 2Shop 9-10kg | 7398 |
| SEUR 72 0-1kg | 7401 |
| SEUR 72 COD 0-30kg | 7415 |
| SEUR 72 10-15kg | 7411 |
| SEUR 72 1-2kg | 7402 |
| SEUR 72 15-20kg | 7412 |
| SEUR 72 20-25kg | 7413 |
| SEUR 72 2-3kg | 7403 |
| SEUR 72 25-30kg | 7414 |
| SEUR 72 3-4kg | 7404 |
| SEUR 72 4-5kg | 7405 |
| SEUR 72 5-6kg | 7406 |
| SEUR 72 6-7kg | 7407 |
| SEUR 72 7-8kg | 7408 |
| SEUR 72 8-9kg | 7409 |
| SEUR 72 9-10kg | 7410 |
| SEUR 72 2Shop 0-1kg | 7416 |
| SEUR 72 2Shop 10-15kg | 7426 |
| SEUR 72 2Shop 1-2kg | 7417 |
| SEUR 72 2Shop 15-20kg | 7427 |
| SEUR 72 2Shop 2-3kg | 7418 |
| SEUR 72 2Shop 3-4kg | 7419 |
| SEUR 72 2Shop 4-5kg | 7420 |
| SEUR 72 2Shop 5-6kg | 7421 |
| SEUR 72 2Shop 6-7kg | 7422 |
| SEUR 72 2Shop 7-8kg | 7423 |
| SEUR 72 2Shop 8-9kg | 7424 |
| SEUR 72 2Shop 9-10kg | 7425 |
| SEUR Classic Economy 0-31.5kg | 7664 |
| SEUR Classic Economy 0-31.5kg - DAP | 7665 |
| SEUR Classic Economy 0-31.5kg - DDP | 7666 |
| SEUR Classic Multiparcel 0-1kg - DAP | 7540 |
| SEUR Classic Multiparcel 0-31.5kg - DAP | 7554 |
| SEUR Classic Multiparcel 10-15kg - DAP | 7550 |
| SEUR Classic Multiparcel 1-2kg - DAP | 7541 |
| SEUR Classic Multiparcel 15-20kg - DAP | 7551 |
| SEUR Classic Multiparcel 20-25kg - DAP | 7552 |
| SEUR Classic Multiparcel 2-3kg - DAP | 7542 |
| SEUR Classic Multiparcel 25-31.5kg - DAP | 7553 |
| SEUR Classic Multiparcel 3-4kg - DAP | 7543 |
| SEUR Classic Multiparcel 4-5kg - DAP | 7544 |
| SEUR Classic Multiparcel 5-6kg - DAP | 7545 |
| SEUR Classic Multiparcel 6-7kg - DAP | 7546 |
| SEUR Classic Multiparcel 7-8kg - DAP | 7547 |
| SEUR Classic Multiparcel 8-9kg - DAP | 7548 |
| SEUR Classic Multiparcel 9-10kg - DAP | 7549 |
| SEUR Classic 2Shop 0-1kg | 7515 |
| SEUR Classic 2Shop 0-1kg - DAP | 7527 |
| SEUR Classic 2Shop 0-20kg DDP | 7539 |
| SEUR Classic 2Shop 10-15kg | 7525 |
| SEUR Classic 2Shop 10-15kg - DAP | 7537 |
| SEUR Classic 2Shop 1-2kg | 7516 |
| SEUR Classic 2Shop 1-2kg - DAP | 7528 |
| SEUR Classic 2Shop 15-20kg | 7526 |
| SEUR Classic 2Shop 15-20kg - DAP | 7538 |
| SEUR Classic 2Shop 2-3kg | 7517 |
| SEUR Classic 2Shop 2-3kg - DAP | 7529 |
| SEUR Classic 2Shop 3-4kg | 7518 |
| SEUR Classic 2Shop 3-4kg - DAP | 7530 |
| SEUR Classic 2Shop 4-5kg | 7519 |
| SEUR Classic 2Shop 4-5kg - DAP | 7531 |
| SEUR Classic 2Shop 5-6kg | 7520 |
| SEUR Classic 2Shop 5-6kg - DAP | 7532 |
| SEUR Classic 2Shop 6-7kg | 7521 |
| SEUR Classic 2Shop 6-7kg - DAP | 7533 |
| SEUR Classic 2Shop 7-8kg | 7522 |
| SEUR Classic 2Shop 7-8kg - DAP | 7534 |
| SEUR Classic 2Shop 8-9kg | 7523 |
| SEUR Classic 2Shop 8-9kg - DAP | 7535 |
| SEUR Classic 2Shop 9-10kg | 7524 |
| SEUR Classic 2Shop 9-10kg - DAP | 7536 |
| SEUR Classic Int. Terrestre 0-31.5kg | 9053 |
| SEUR Classic Int. Terrestre DAP 0-31.5kg | 9054 |
| SEUR Classic Int. Terrestre DDP 0-31.5kg | 9055 |
| SEUR Classic 0-1kg | 7484 |
| SEUR Classic 0-1kg - DAP | 7499 |
| SEUR Classic 0-31.5kg | 7498 |
| SEUR Classic 0-31.5kg - DAP | 7513 |
| SEUR Classic 0-31.5kg - DDP | 7514 |
| SEUR Classic 10-15kg | 7494 |
| SEUR Classic 10-15kg - DAP | 7509 |
| SEUR Classic 1-2kg | 7485 |
| SEUR Classic 1-2kg - DAP | 7500 |
| SEUR Classic 15-20kg | 7495 |
| SEUR Classic 15-20kg - DAP | 7510 |
| SEUR Classic 20-25kg | 7496 |
| SEUR Classic 20-25kg - DAP | 7511 |
| SEUR Classic 2-3kg | 7486 |
| SEUR Classic 2-3kg - DAP | 7501 |
| SEUR Classic 25-31.5kg | 7497 |
| SEUR Classic 25-31.5kg - DAP | 7512 |
| SEUR Classic 3-4kg | 7487 |
| SEUR Classic 3-4kg - DAP | 7502 |
| SEUR Classic 4-5kg | 7488 |
| SEUR Classic 4-5kg - DAP | 7503 |
| SEUR Classic 5-6kg | 7489 |
| SEUR Classic 5-6kg - DAP | 7504 |
| SEUR Classic 6-7kg | 7490 |
| SEUR Classic 6-7kg - DAP | 7505 |
| SEUR Classic 7-8kg | 7491 |
| SEUR Classic 7-8kg - DAP | 7506 |
| SEUR Classic 8-9kg | 7492 |
| SEUR Classic 8-9kg - DAP | 7507 |
| SEUR Classic 9-10kg | 7493 |
| SEUR Classic 9-10kg - DAP | 7508 |
| SEUR Courier 0-31.5kg | 7606 |
| SEUR Entrega Particular Estandar 0-30kg | 9051 |
| SEUR Entrega Particular Estandar COD 0-30kg | 9052 |
| SEUR Entrega Particular Estandar Int. Terrestre 0-30kg | 10336 |
| SEUR Entrega Particular Estandar COD Int. Terrestre 0-30kg | 10337 |
| SEUR Shop2Home 0-1kg | 7455 |
| SEUR Shop2Home 10-15kg | 7465 |
| SEUR Shop2Home 1-2kg | 7456 |
| SEUR Shop2Home 15-20kg | 7466 |
| SEUR Shop2Home 2-3kg | 7457 |
| SEUR Shop2Home 3-4kg | 7458 |
| SEUR Shop2Home 4-5kg | 7459 |
| SEUR Shop2Home 5-6kg | 7460 |
| SEUR Shop2Home 6-7kg | 7461 |
| SEUR Shop2Home 7-8kg | 7462 |
| SEUR Shop2Home 8-9kg | 7463 |
| SEUR Shop2Home 9-10kg | 7464 |
| SEUR Shop2Shop 0-1kg | 7443 |
| SEUR Shop2Shop 10-15kg | 7453 |
| SEUR Shop2Shop 1-2kg | 7444 |
| SEUR Shop2Shop 15-20kg | 7454 |
| SEUR Shop2Shop 2-3kg | 7445 |
| SEUR Shop2Shop 3-4kg | 7446 |
| SEUR Shop2Shop 4-5kg | 7447 |
| SEUR Shop2Shop 5-6kg | 7448 |
| SEUR Shop2Shop 6-7kg | 7449 |
| SEUR Shop2Shop 7-8kg | 7450 |
| SEUR Shop2Shop 8-9kg | 7451 |
| SEUR Shop2Shop 9-10kg | 7452 |
| SEUR Classic (ShopReturn) 0-1kg | 7652 |
| SEUR Classic (ShopReturn) 10-15kg | 7662 |
| SEUR Classic (ShopReturn) 1-2kg | 7653 |
| SEUR Classic (ShopReturn) 15-20kg | 7663 |
| SEUR Classic (ShopReturn) 2-3kg | 7654 |
| SEUR Classic (ShopReturn) 3-4kg | 7655 |
| SEUR Classic (ShopReturn) 4-5kg | 7656 |
| SEUR Classic (ShopReturn) 5-6kg | 7657 |
| SEUR Classic (ShopReturn) 6-7kg | 7658 |
| SEUR Classic (ShopReturn) 7-8kg | 7659 |
| SEUR Classic (ShopReturn) 8-9kg | 7660 |
| SEUR Classic (ShopReturn) 9-10kg | 7661 |
| SEUR Retorno (ShopReturn) 0-1kg | 7610 |
| SEUR Retorno (ShopReturn) 10-15kg | 7620 |
| SEUR Retorno (ShopReturn) 1-2kg | 7611 |
| SEUR Retorno (ShopReturn) 15-20kg | 7621 |
| SEUR Retorno (ShopReturn) 2-3kg | 7612 |
| SEUR Retorno (ShopReturn) 3-4kg | 7613 |
| SEUR Retorno (ShopReturn) 4-5kg | 7614 |
| SEUR Retorno (ShopReturn) 5-6kg | 7615 |
| SEUR Retorno (ShopReturn) 6-7kg | 7616 |
| SEUR Retorno (ShopReturn) 7-8kg | 7617 |
| SEUR Retorno (ShopReturn) 8-9kg | 7618 |
| SEUR Retorno (ShopReturn) 9-10kg | 7619 |
| SEUR Cambio 24 0-30kg | 7650 |
| SEUR Cambio 48 0-30kg | 7651 |
| SEUR Classic Fresh 0-30kg | 9050 |
| SEUR Frio 48 0-1kg | 8671 |
| SEUR Frio 13:30 COD 0-30kg | 7482 |
| SEUR Frio 13:30 0-30kg | 8669 |
| SEUR Frio 10:00 0-30kg | 7467 |
| SEUR Frio 48 0-30kg | 7483 |
| SEUR Frio 48 COD 0-30kg | 8670 |
| SEUR Frio 13:30 10-15kg | 7478 |
| SEUR Frio 48 10-15kg | 8681 |
| SEUR Frio 13:30 1-2kg | 7469 |
| SEUR Frio 48 1-2kg | 8672 |
| SEUR Frio 13:30 15-20kg | 7479 |
| SEUR Frio 48 15-20kg | 8682 |
| SEUR Frio 13:30 20-25kg | 7480 |
| SEUR Frio 48 20-25kg | 8683 |
| SEUR Frio 13:30 2-3kg | 7470 |
| SEUR Frio 48 2-3kg | 8673 |
| SEUR Frio 13:30 25-30kg | 7481 |
| SEUR Frio 48 25-30kg | 8684 |
| SEUR Frio 13:30 3-4kg | 7471 |
| SEUR Frio 48 3-4kg | 8674 |
| SEUR Frio 13:30 4-5kg | 7472 |
| SEUR Frio 48 4-5kg | 8675 |
| SEUR Frio 13:30 5-6kg | 7473 |
| SEUR Frio 48 5-6kg | 8676 |
| SEUR Frio 13:30 6-7kg | 7474 |
| SEUR Frio 48 6-7kg | 8677 |
| SEUR Frio 13:30 7-8kg | 7475 |
| SEUR Frio 48 7-8kg | 8678 |
| SEUR Frio 13:30 8-9kg | 7476 |
| SEUR Frio 48 8-9kg | 8679 |
| SEUR Frio 13:30 9-10kg | 7477 |
| SEUR Frio 48 9-10kg | 8680 |
| SEUR Shop2Shop Internacional 0-1kg | 7581 |
| SEUR Shop2Shop Internacional 0-1kg - DAP | 7593 |
| SEUR Shop2Shop Internacional 0-20kg DDP | 7605 |
| SEUR Shop2Shop Internacional 10-15kg | 7591 |
| SEUR Shop2Shop Internacional 10-15kg - DAP | 7603 |
| SEUR Shop2Shop Internacional 1-2kg | 7582 |
| SEUR Shop2Shop Internacional 1-2kg - DAP | 7594 |
| SEUR Shop2Shop Internacional 15-20kg | 7592 |
| SEUR Shop2Shop Internacional 15-20kg - DAP | 7604 |
| SEUR Shop2Shop Internacional 2-3kg | 7583 |
| SEUR Shop2Shop Internacional 2-3kg - DAP | 7595 |
| SEUR Shop2Shop Internacional 3-4kg | 7584 |
| SEUR Shop2Shop Internacional 3-4kg - DAP | 7596 |
| SEUR Shop2Shop Internacional 4-5kg | 7585 |
| SEUR Shop2Shop Internacional 4-5kg - DAP | 7597 |
| SEUR Shop2Shop Internacional 5-6kg | 7586 |
| SEUR Shop2Shop Internacional 5-6kg - DAP | 7598 |
| SEUR Shop2Shop Internacional 6-7kg | 7587 |
| SEUR Shop2Shop Internacional 6-7kg - DAP | 7599 |
| SEUR Shop2Shop Internacional 7-8kg | 7588 |
| SEUR Shop2Shop Internacional 7-8kg - DAP | 7600 |
| SEUR Shop2Shop Internacional 8-9kg | 7589 |
| SEUR Shop2Shop Internacional 8-9kg - DAP | 7601 |
| SEUR Shop2Shop Internacional 9-10kg | 7590 |
| SEUR Shop2Shop Internacional 9-10kg - DAP | 7602 |
| SEUR Maritimo 0-1kg | 7428 |
| SEUR Maritimo COD 0-30kg | 7442 |
| SEUR Maritimo 10-15kg | 7438 |
| SEUR Maritimo 1-2kg | 7429 |
| SEUR Maritimo 15-20kg | 7439 |
| SEUR Maritimo 20-25kg | 7440 |
| SEUR Maritimo 2-3kg | 7430 |
| SEUR Maritimo 25-30kg | 7441 |
| SEUR Maritimo 3-4kg | 7431 |
| SEUR Maritimo 4-5kg | 7432 |
| SEUR Maritimo 5-6kg | 7433 |
| SEUR Maritimo 6-7kg | 7434 |
| SEUR Maritimo 7-8kg | 7435 |
| SEUR Maritimo 8-9kg | 7436 |
| SEUR Maritimo 9-10kg | 7437 |
| SEUR NetExpress 0-1000kg | 7607 |
| SEUR NetExpress 0-1000kg DAP | 7608 |
| SEUR NetExpress 0-1000kg DDP | 7609 |
| SEUR 24 Retorno + Recogida (Pick&Return) 0-1kg | 7622 |
| SEUR 24 Retorno + Recogida (Pick&Return) 10-15kg | 7632 |
| SEUR 24 Retorno + Recogida (Pick&Return) 1-2kg | 7623 |
| SEUR 24 Retorno + Recogida (Pick&Return) 15-20kg | 7633 |
| SEUR 24 Retorno + Recogida (Pick&Return) 20-25kg | 7634 |
| SEUR 24 Retorno + Recogida (Pick&Return) 2-3kg | 7624 |
| SEUR 24 Retorno + Recogida (Pick&Return) 25-30kg | 7635 |
| SEUR 24 Retorno + Recogida (Pick&Return) 3-4kg | 7625 |
| SEUR 24 Retorno + Recogida (Pick&Return) 4-5kg | 7626 |
| SEUR 24 Retorno + Recogida (Pick&Return) 5-6kg | 7627 |
| SEUR 24 Retorno + Recogida (Pick&Return) 6-7kg | 7628 |
| SEUR 24 Retorno + Recogida (Pick&Return) 7-8kg | 7629 |
| SEUR 24 Retorno + Recogida (Pick&Return) 8-9kg | 7630 |
| SEUR 24 Retorno + Recogida (Pick&Return) 9-10kg | 7631 |
| SEUR 48 Retorno + Recogida (Pick&Return) 0-1kg | 7636 |
| SEUR 48 Retorno + Recogida (Pick&Return) 10-15kg | 7646 |
| SEUR 48 Retorno + Recogida (Pick&Return) 1-2kg | 7637 |
| SEUR 48 Retorno + Recogida (Pick&Return) 15-20kg | 7647 |
| SEUR 48 Retorno + Recogida (Pick&Return) 20-25kg | 7648 |
| SEUR 48 Retorno + Recogida (Pick&Return) 2-3kg | 7638 |
| SEUR 48 Retorno + Recogida (Pick&Return) 25-30kg | 7649 |
| SEUR 48 Retorno + Recogida (Pick&Return) 3-4kg | 7639 |
| SEUR 48 Retorno + Recogida (Pick&Return) 4-5kg | 7640 |
| SEUR 48 Retorno + Recogida (Pick&Return) 5-6kg | 7641 |
| SEUR 48 Retorno + Recogida (Pick&Return) 6-7kg | 7642 |
| SEUR 48 Retorno + Recogida (Pick&Return) 7-8kg | 7643 |
| SEUR 48 Retorno + Recogida (Pick&Return) 8-9kg | 7644 |
| SEUR 48 Retorno + Recogida (Pick&Return) 9-10kg | 7645 |
| SEUR Predict Crossborder 0-31.5kg | 9056 |
| SEUR Predict Crossborder DAP 0-31.5kg | 9057 |
| SEUR Predict Crossborder DDP 0-31.5kg | 9058 |
| SEUR Shop2Home Internacional 0-1kg | 7555 |
| SEUR Shop2Home Internacional 0-1kg - DAP | 7567 |
| SEUR Shop2Home Internacional 0-20kg - DAP | 7579 |
| SEUR Shop2Home Internacional 0-20kg - DDP | 7580 |
| SEUR Shop2Home Internacional 10-15kg | 7565 |
| SEUR Shop2Home Internacional 10-15kg - DAP | 7577 |
| SEUR Shop2Home Internacional 1-2kg | 7556 |
| SEUR Shop2Home Internacional 1-2kg - DAP | 7568 |
| SEUR Shop2Home Internacional 15-20kg | 7566 |
| SEUR Shop2Home Internacional 15-20kg - DAP | 7578 |
| SEUR Shop2Home Internacional 2-3kg | 7557 |
| SEUR Shop2Home Internacional 2-3kg - DAP | 7569 |
| SEUR Shop2Home Internacional 3-4kg | 7558 |
| SEUR Shop2Home Internacional 3-4kg - DAP | 7570 |
| SEUR Shop2Home Internacional 4-5kg | 7559 |
| SEUR Shop2Home Internacional 4-5kg - DAP | 7571 |
| SEUR Shop2Home Internacional 5-6kg | 7560 |
| SEUR Shop2Home Internacional 5-6kg - DAP | 7572 |
| SEUR Shop2Home Internacional 6-7kg | 7561 |
| SEUR Shop2Home Internacional 6-7kg - DAP | 7573 |
| SEUR Shop2Home Internacional 7-8kg | 7562 |
| SEUR Shop2Home Internacional 7-8kg - DAP | 7574 |
| SEUR Shop2Home Internacional 8-9kg | 7563 |
| SEUR Shop2Home Internacional 8-9kg - DAP | 7575 |
| SEUR Shop2Home Internacional 9-10kg | 7564 |
| SEUR Shop2Home Internacional 9-10kg - DAP | 7576 |
Done! If you have followed the steps described above, your SEUR contract should now be successfully linked to your Sendcloud platform and you can begin shipping at your own SEUR rates. When you create a label with a SEUR shipping method, the label price will now show as 0.00 EUR in your account.