
Purpose: This article explains how to integrate your Gorgias with Sendcloud. By connecting the two platforms, you can automatically create support tickets in Gorgias based on key shipment events tracked in Sendcloud.
What is Gorgias?
Gorgias is a customer service platform for e-commerce. It helps support teams manage all customer interactions in one place and offers automation tools like Rules and Macros to make support processes more efficient. With this integration, Sendcloud can automatically create tickets in Gorgias when key shipment events occur, so your team can notify customers and resolve issues proactively.
How the Sendcloud → Gorgias integration works
After you install the app from the Gorgias App Store, Sendcloud creates tickets automatically whenever certain shipment events are detected.
Shipment events that create tickets
- Shipment lost
- Delivery delayed
- Parcel damaged
- Pickup point changed
- Address error
Advanced: Ticket tags for automations
Sendcloud adds internal tags to these tickets. You can reference these tags in your Gorgias Rules to trigger actions.
| Event | Ticket Tag |
|---|---|
| Shipment lost | sendcloud_exception_lost |
| Delivery delayed | sendcloud_exception_delayed |
| Parcel damaged | sendcloud_exception_damaged |
| Pickup point changed | sendcloud_exception_pickupchange |
| Address error | sendcloud_exception_addresserror |
Install the integration
Watch: 60-second setup
- Open the Gorgias App Store.
- Search for Sendcloud.
- Click Install.
- Authenticate with your Gorgias account if prompted.
- The integration activates immediately. Tickets will start appearing automatically for the events listed above.
What happens after installation
See the workflow in action
Once you’ve installed the Sendcloud app in Gorgias, new tickets will automatically appear when certain shipment events occur; for example, address error, parcel lost, or delivery delayed.
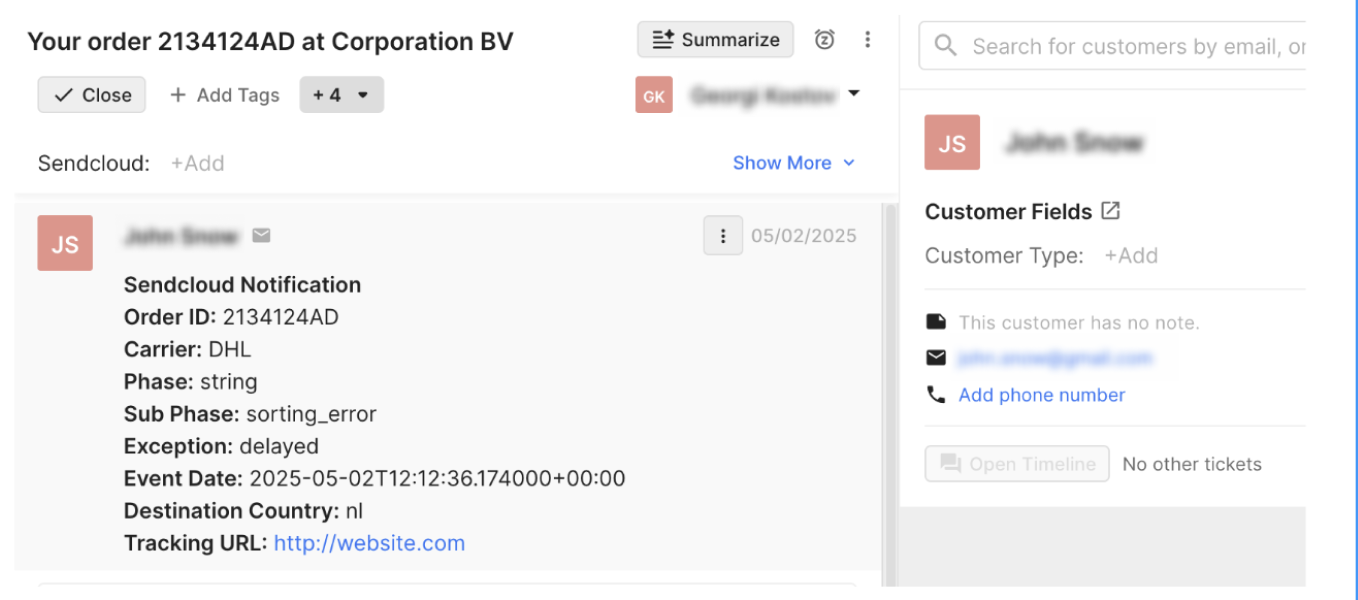
Each ticket created by Sendcloud includes all the key shipment details your support team needs to help the customer right away:
- Customer information (name and email)
- Tracking number, clickable, leading directly to the parcel’s tracking page
- Carrier name (e.g., DHL, DPD, UPS, etc.)
- Type of issue (for example, “Delivery delayed” or “Address error”)
- Shipment phase (so agents know where the problem occurred in the delivery process)
This allows your team to instantly understand what happened and respond to customers faster.
You can also use Gorgias Rules and Macros to automate these replies, for example, automatically notifying a customer when their parcel is delayed or when an address error occurs.
Create automations in Gorgias
Create a Macro
- In Gorgias, go to Settings → Macros → Create macro.
- Name it (e.g., Address Error Email).
-
Add your message, for example:
Hi {{customer.first_name}}, We noticed there’s an address error with your shipment. Please update your address so we can proceed. — Your Support Team - Save the macro.
Create a Rule
- Go to Settings → Rules → Create rule.
- Name it (e.g., Auto-reply: Address Error).
- Trigger: When a ticket is created.
-
Condition: Tag contains
sendcloud_exception_addresserror. - Action: Apply macro →Address Error Email.
- Save and enable the rule.
How to Set Up the Sendcloud HTTP Integration in Gorgias
Watch the HTTP Integration setup steps
Endpoint URL:
https://eu-central-1-0.app.sendcloud.com/api/v3/support-integrations/tickets?ticket_id={{ticket.id}}
Example variables for Macros:
{{ticket.customer.integrations[123456].parcel_id}}
{{ticket.customer.integrations[123456].tracking_number}}
The HTTP Integration is an extra connection between Sendcloud and Gorgias that lets them “talk” to each other. When a new ticket is created in Gorgias, this connection automatically asks Sendcloud for more shipment details, like the tracking number, parcel status, or carrier, and adds them to the ticket.
In simple terms: It doesn’t just create tickets when something goes wrong; it also fills those tickets with live shipping info, so your team has everything they need in one place.
To begin, you’ll need to create the HTTP integration in Gorgias. This will allow the system to automatically fetch shipping data from Sendcloud for each new ticket.
Step 1: Create the HTTP Integration in Gorgias
- In Gorgias, go to Settings → HTTP Integrations.
- Click Add HTTP Integration.
- Give it a name (e.g., Sendcloud Integration or S2).
- Under Triggers, check Ticket Created to trigger on new tickets.
-
In the URL field, paste this link:
https://eu-central-1-0.app.sendcloud.com/api/v3/support-integrations/tickets?ticket_id={{ticket.id}}
Step 2: Add the Authorization Header
- Click + Add Header.
-
In the Key field, type:
Authorization. - Leave the Value field empty for now — you’ll paste the token in Step 4.
Step 3: Generate API Keys in Sendcloud
- Log in to Sendcloud.
- Go to Settings → Integrations → Sendcloud API.
- Click Connect, name the API integration (e.g., Gorgias Integration), and click Save.
- Copy your Public key and Secret key immediately (they won’t be shown again once you close the window).
💡 Tip: Store these keys securely.
Step 4: Create the Authorization Token
- Use an online Basic Auth Generator (or generate programmatically).
- Enter your Public key as the Username and your Secret key as the Password.
-
Copy the generated header value (it starts with
Basic). -
Return to Gorgias and paste it into the Value
field for the
Authorizationheader. - Click Add Integration to finish setup.
From now on, new Gorgias tickets will automatically pull Sendcloud shipment data.
Use Sendcloud Data in Macros and Automations
Once your HTTP integration is active, Gorgias automatically pulls shipment data from Sendcloud whenever a new ticket is created.
You can use this data to personalize your macros and automations; for example, to show tracking numbers, parcel IDs, or shipping statuses directly in your customer replies.
Step 1: Find Your Integration ID
- Go to Settings → HTTP Integrations → Manage in Gorgias.
- Open the Sendcloud integration you just created.
- Look at the URL at the top of the page; copy the numbers at the end. This is your Integration ID.
Step 2: Add the Data to a Macro
- In Gorgias, go to Settings → Macros.
- Open or create the macro you want to edit.
- In the message body, paste the code snippet provided below this article or video.
-
After
integrations, add your Integration ID and the data you want to display — for example,tracking_number.
Example:
{{ticket.customer.integrations.[123456].tracking_number}}Step 3: Display parcel details like the Tracking URL (Optional)
If you’d like to include any parcel details, like the tracking link, for example, instead of just the word "tracking_url", use the following variable:
{{ticket.customer.integrations.[123456].parcel_details.tracking_url}}Remember: all variables should be lowercase and use underscores instead of spaces.
Step 4: Test Your Macro
- Open a ticket that already includes Sendcloud data.
- Apply the macro you just edited.
- Check that the tracking number or URL appears automatically in the message body.
✅ Your Sendcloud data is now ready to be used dynamically in Gorgias macros and automations!
FAQ
Can I customize which shipment events create tickets?
Not yet. The initial version includes a fixed set of shipment events. We’re working on adding customization options in a future update.