Creating a brand
Creating a brand in the Sendcloud platform allows you to apply your unique logo, brand colours and URL to shipping labels, the return portal, and Tracking emails.
If you are on our Lite plan or higher, you can use your brand to create a personalised Tracking page which replaces the carrier website tracking page with your own delivery status portal. This is a great solution for marketing new products or promoting campaigns to your customers, while offering timely delivery updates.
How to create a brand
Go to Brands via Settings in your Sendcloud panel and click on Create new brand. You can now begin to enter the information needed to customise your brand.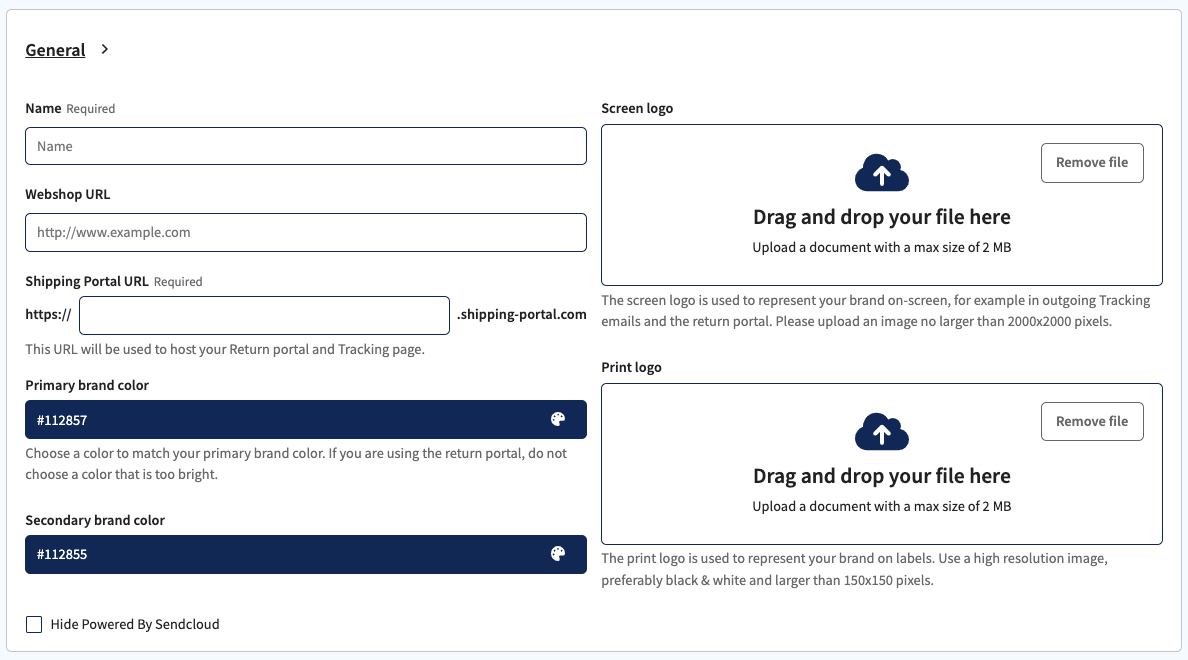
- At Webshop URL enter the link that leads to your webshop. When clicking on your brand logo in the return portal header, your customers will be sent to your shop homepage
- At Shipping Portal URL, enter the name of your shop. Based on this, a personal return link for your portal is created. You can share this link with your customers to open up the return portal. The Shipping Portal URL is also used to generate the Tracking pages. Learn how to set up your branded Tracking pages.
- Upload in .png or .jpg format your logo in Screen logo, which will be used in the header of the return portal. It's advised to use a landscape format.
- Upload a Print logo which will appear on your shipping labels.
Important: DPD shipping labels do not support custom logos. This is a limitation set by DPD and cannot be adjusted from within Sendcloud. - Set a primary and secondary colour for your brand. This colour will be used in the return portal to fill the main buttons. You can either directly paste the HEX code of your brand colour or use the colour picker. If the secondary colour is too light to be viewed correctly on some screens, you will see a warning message.
- Remember to save when you are happy with your changes.
Tracking page/Return portal header and footer
In Settings > Brands, you can also setup a header and footer to be displayed on your Tracking page and Return portal.
Header setup:
- Your screen logo will appear on the left side of the header
- Enter the URLs for your homepage, shop, FAQ & contact page and it will be displayed on your header for your customers to click on
- You can change the colour of your header and the display text to match your brand colours
Footer setup:
- Enter your business or sender address
- Select a background and text colour for your footer
Add your social media profiles to your footer
- TikTok
- Youtube
- WhatsApp Business: Add the phone number in an international format. Omit any starting zeroes, brackets or dashes. E.g.: Write 31123456677, and not +31123456677, 0031123456677 or 311-234-567.
- Go to Brand settings and select the brand you want to edit
- Scroll to the bottom and add the username for each of your social media profiles under the footer section and click Save
- The social links will now appear in the Footer's preview
Note: You have to enable branded header and footers in the Tracking page and Return portal settings before they will be applied to your page.
How do I add multiple brands if I have more than one webshop?
You can add multiple brands by going to Settings > Brands and clicking on Add new brand. When a brand is created, it can be assigned to a sender address. Once assigned to a specific address, the brand will be applied to the shipping labels (excluding DPD labels), return portal and Tracking emails/page for that sender address.
- To assign a brand to a sender address, go to Settings > Addresses.
- Either create a new sender address by clicking on Create new or click the pen icon to edit an already existing address.
- Then, scroll down to the bottom of the page and, under Brands, select the correct brand to assign to this address from the dropdown menu.
Google Analytics
You can link your Google Analytics account to your Tracking page. You can fill in in your Google Analytics Tracking ID via Settings > Brands > Google Analytics. Make sure you enable enhanced measurement in Google Analytics.
![]()
How to get your tracking stream ID:
- Create a new Google Analytics account or use an existing one
- Create a new Google Analytics 4 property (recommended) or use an existing one
- Under the property, click on Data Streams
- Click on Add stream and select Web
- Fill in the required information and be sure to select Enhanced Measurements. Then click on Create stream
- Once the above is complete you can view your Measurement ID by clicking on the new data stream
Once successfully added you'll be able to track the following things:
-
Page view
-
Users who scrolled more than 90% of the page
-
Expanded order history
-
Instagram clicked
-
Banner link clicked
-
Tracking number clicked
-
Footer email clicked
-
Footer number clicked
-
Footer social media links clicked
For more information on the usage of Google Analytics, we'd like to refer you to their Analytics Help Center.