
To learn more about Sendcloud watch our explainer video or visit our website.
Create an account and select your plan
To start shipping with Sendcloud you need to create an account first. To create a free account, visit our website and click Sign up for free. Enter your e-mail address and password and click Start shipping.
Once you have created your account, you can either stay on our Free plan or choose one of our three paid plans, which will give you access to more features. Check the comparison of the different plans to see which one suits best your needs. To update your plan, in your Sendcloud panel go to Account > Subscriptions and switch to your preferred plan.
Complete the basic setup
Step 1: Enter your addresses
Sender and invoice
- Go to Settings > Addresses
- Click Sender and then Create new to enter the address from which you will be shipping your parcels. You can add multiple sender addresses, including ones from different countries, provided those countries are supported in Sendcloud.
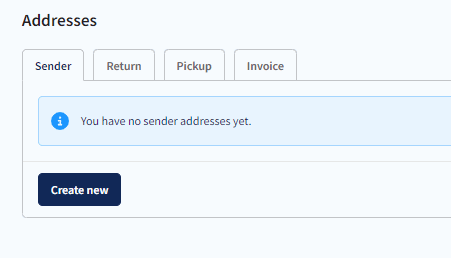
- Enter all the necessary details and click Save
- If your sender address is the same as the invoice address, toggle that option on

- If you have a different invoice address, then click the Invoice tab, enter all business details and click Save. Here it is particularly important to add your financial information, including VAT number.
Pickup and returns
If your pickup and return addresses are the same as your sender address, toggle those options on when creating a new sender address. If not, do as follows:
- If you plan to organize carrier pickups, click the Pickup tab within the Addresses menu and follow the steps described above.
- If you want to allow returns, click the Return tab within the Addresses menu and follow the steps described above.
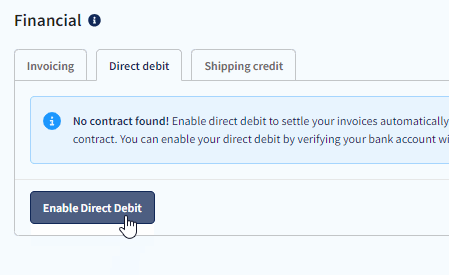
Step 2: Enable direct debit as payment method
To create labels, you first need a payment method. At Sendcloud, we use direct debit. To set up your direct debit contract, follow these steps:
- Go to Account > Financial and invoices
- Open the Direct debit tab and click Enable direct debit
- You will be redirected to the page of your payment provider
- Make a payment of 0.02 EUR to authenticate your bank details and activate a recurring payment contract.
To learn more about billing, read our article How do we charge and invoice your shipments?
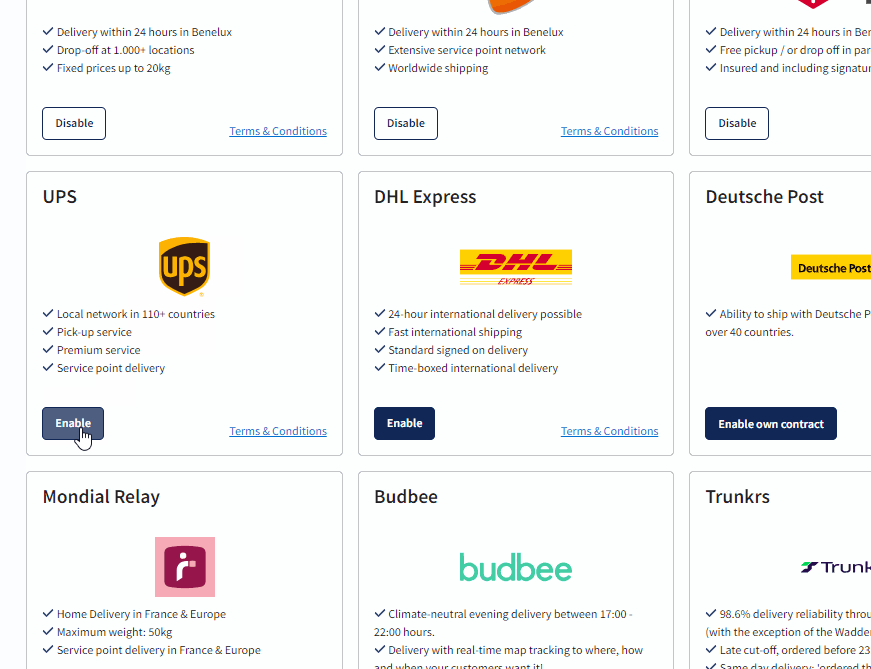
Step 3: Choose and activate carriers
You can either ship with Sendcloud's pre-negotiated rates or choose to integrate your own carrier contract to ship with your prices.
Ship with Sendcloud rates
With Sendcloud, you have access to multiple carriers. Select the carriers you want to ship with. By default we've already activated several carriers for you. If you don't want to use those, you can always deactivate them.
Follow these steps to choose your carriers:
- Go to Shipping > Carriers
- Click Enable to activate a carrier
- Click Disable to deactivate a carrier.
You can use our price list to compare shipping and return rates, and choose the carrier that best suits your needs.
Ship with your own rates
If you have your own contract with a carrier that is supported by Sendcloud, you can add it and ship with your own rates. To do this, go to Shipping > Carriers > My contracts > Add my own contract > Find your carrier > Click Add contract. You will find instructions on how to add a contract on our Carrier page. Look for the relevant carrier and then open the article on contract activation. Read more on how to add your own contract.
You can also add multiple carrier contracts. Read our article on How to add multiple contracts with the same carrier and create labels.
Step 4: Connect your online store
To have all your orders imported into your Sendcloud panel, you have to connect to your online store. To do this, in your Sendcloud panel go to Settings > Integrations > Find your integration on the list (or use the search bar) > Click Connect. To learn how to make the integration, go to the Integrations page in our Help Center and select your integration.
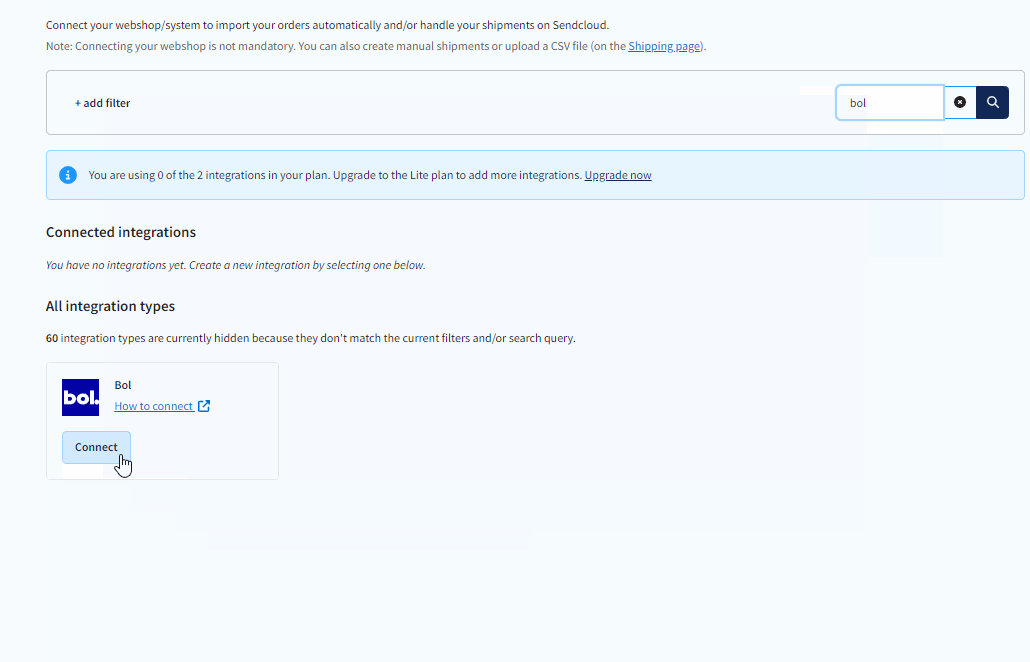
You can connect different e-commerce systems.
Once the connection is made, Sendcloud will import the orders from the last 30 days.
Next steps
Once you have finished the basic setup of your Sendcloud account, it's time to further optimize your shipping processes and get the most out of your Sendcloud experience. You will find below a list of articles that explain some of our most useful and popular features. Click the relevant article to learn more.
- Activate service point delivery
- Create your brand within Sendcloud
- Personalize your tracking page
- Enable personalized tracking e-mails
- Process your returns: Learn how to process returns manually
- Create your return portal to automate returns
- Set up shipping rules
- Analytics: Track your shipping and returns data
Get support from Sendcloud
If you are struggling with setting up your account, contact us so that we can help you get the most out of your experience with Sendcloud. Read our article on How to get support from Sendcloud to learn about the different ways to contact us.