
Purpose: learn the basics about webhooks and how you can configure them in your Sendcloud panel.
For more information on Sendcloud webhooks, please see the Webhooks sections in our API documentation.
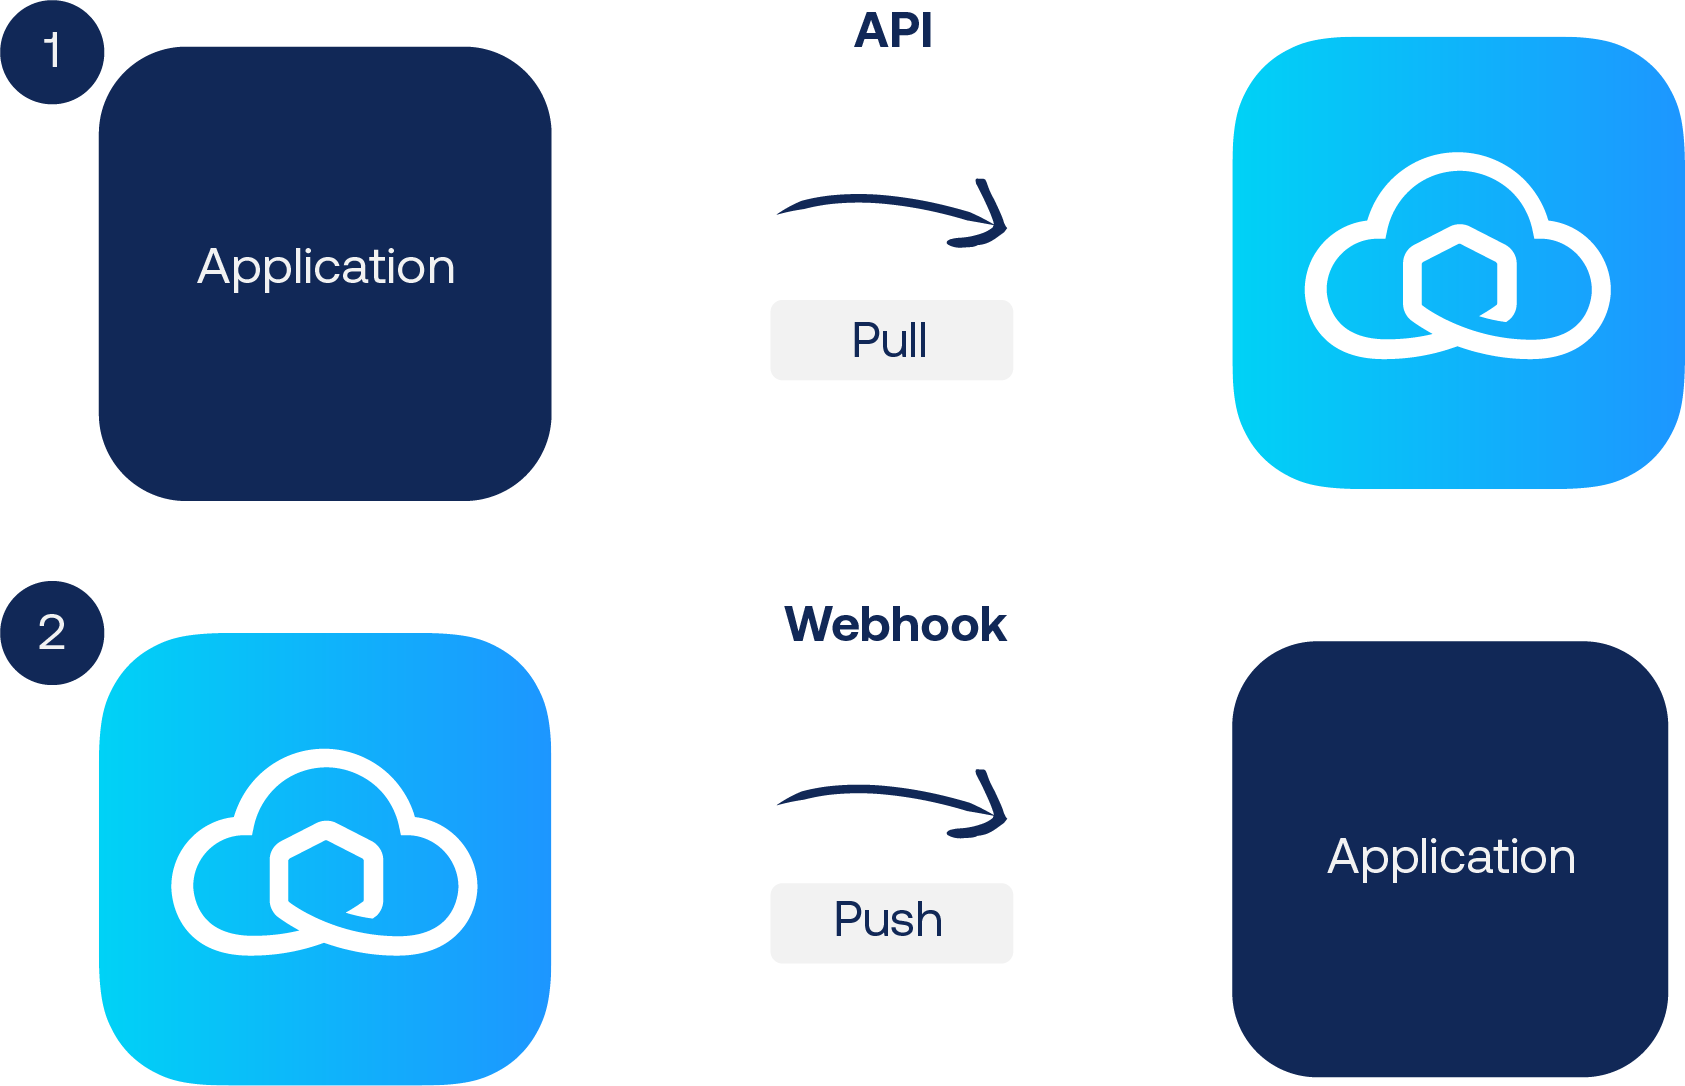
What are webhooks?
Webhooks make it possible for applications to communicate with each other in 'real time'. Another way for applications to communicate is via an API. As opposed to an API that works with polling, a webhook receives data as soon as the application handles it. No request needs to be made as it's an automatic process. Therefore you don't have to worry about a delay in communication.
API: an API periodically pulls data from the application by making a request.
Webhook: a webhook doesn't pull data but is getting data pushed from the application as soon as it occurs.
Example: receiving tracking updates from Sendcloud
(See images below for reference)
-
When you receive tracking update via the API it goes as followed:
Your application tries pulling tracking data from Sendcloud through interval. It will do so even when no new data is available. -
When you want to receive tracking updates via a webhook it goes as followed:
Sendcloud pushes the tracking updates to your application as soon as it's available in Sendcloud.
Sendcloud webhooks
Webhook Integration Object: this webhook comes into play when a new API integration is added to Sendcloud. It gets triggered when an API integration is connected, deleted, or updated. Click here to see what's in the payload of this webhook.
Webhook Parcel Status Changed Object: this webhook comes into play when a parcel status changes; no matter what the change in status is. Click here to see what's in the payload of this webhook.
Webhook Return Created Object: This webhook is triggered whenever a return is created via API or the Return Portal. Click here to view the payload details.
How to setup webhooks in Sendcloud?
In order to have Sendcloud actively communicate parcel updates (such as tracking updates), you need to create an API endpoint. Whenever an update occurs, Sendcloud will make a request through that endpoint. For more information, see the Webhooks section in our API documentation.
- Copy the webhook url from your application to your clipboard
- Go to your Sendcloud panel and open your integration settings by going to Settings > Integrations > Configure
- Select the box at Webhook feedback enabled
- Find the Webhook url field (see image below) and paste you webhook url in there

- Test your webhook by clicking on the
Test API webhookbutton - Click on
Save
Done! Your webhook is now set up and the payload should start coming in at your application. You can use this to set up triggers that lead to certain actions. An example would be to connect your tracking emails to the incoming tracking updates. This way you'll be able to give instant updates to your customers.
For return parcels, you will receive webhook updates only if the outgoing shipment was created through the API Shop.
FAQ
If I set up a webhook, what parcels does it apply to?
Webhooks are configured per integration. This means the webhook will only apply to parcels that are created via the integration for which the webhook was set up. Parcels created through other integrations or methods will not trigger this webhook.
Why is my webhook URL returning 404 or unreachable?
Issue: The webhook URL is incorrect (typo, wrong domain, missing HTTPS) or the endpoint is not publicly accessible.
Examples:
404 Not FoundDNS resolution failedFix: Double-check the URL syntax and domain. Ensure the endpoint is publicly reachable and uses HTTPS with a valid SSL/TLS certificate.
Why am I seeing SSL/TLS certificate errors with my webhook?
Issue: The endpoint uses an expired, self-signed, or misconfigured certificate.
Examples:
SSL Handshake failed Unable to verify certificateFix: Install a valid SSL certificate from a trusted CA, renew expired certificates, and ensure intermediate certificates are correctly installed.
Why are webhook requests timing out or not responding?
Issue: The webhook receiver is too slow or not responding at all.
Examples:
Request timed out Connection resetFix: Ensure the server responds within the timeout limit, optimize code for faster processing, or move heavy tasks to background jobs. Check firewalls or rate limiting.
Why does my webhook return HTTP errors like 405 or 500?
Issue: The endpoint expects a specific HTTP method or fails to return proper responses.
Examples:
405 Method Not Allowed500 Internal Server ErrorFix: Ensure the endpoint accepts POST requests, return 2xx status codes for successful receipt, and log/handle errors properly.
Why is my webhook failing authentication or signature verification?
Issue: The webhook provider signs requests, but the endpoint doesn’t verify them properly or uses wrong keys.
Examples:
401 Unauthorized 403 ForbiddenFix: Implement HMAC/signature verification with the correct secret key, ensure headers and payload are parsed exactly as sent.
Why is my webhook payload invalid or malformed?
Issue: The webhook sends JSON or other data formats, but the receiver can’t parse them.
Examples:
400 Bad RequestUnexpected token in logsFix: Confirm Content-Type is supported (usually application/json), validate and log the payload, and update endpoint code for new fields or formats.
Why are some webhook requests being rate-limited or dropped?
Issue: The endpoint is overwhelmed and starts dropping requests.
Examples:
429 Too Many Requests Requests delayed or silently failingFix: Add queuing or throttling to handle bursts, implement retries with exponential backoff, and monitor/scale server resources as needed.
Click here to go to our Sendcloud API reference and see the payload of the webhook.