Purpose: Once you've configured Dynamic Checkout, it's time to add standard delivery methods to your configuration. In this article, we explain why and how to offer deliveries through your checkout.
 Standard deliveries through Dynamic Checkout
Dynamic Checkout allows you to create delivery destinations for any country in the world, regardless of whether you have a sender address active in that country or not (currently only applicable to standard delivery through your checkout).
If you create a delivery destination for a specific country, e.g. UK, customers who enter a UK address on your checkout page will only be able to select from shipping options that you configure for that specific zone. They won't be able to see delivery methods that don't apply to them (e.g., shipping methods that only apply to the Netherlands).
Step 1 Create or open a Dynamic Checkout configuration
To offer Standard Delivery, first create a new Dynamic Checkout configuration or open an existing one.
- Go to Settings > Dynamic Checkout.
- If you are setting up Dynamic Checkout for the first time, if this is your first time, click Get started. Otherwise, click Create new configuration.
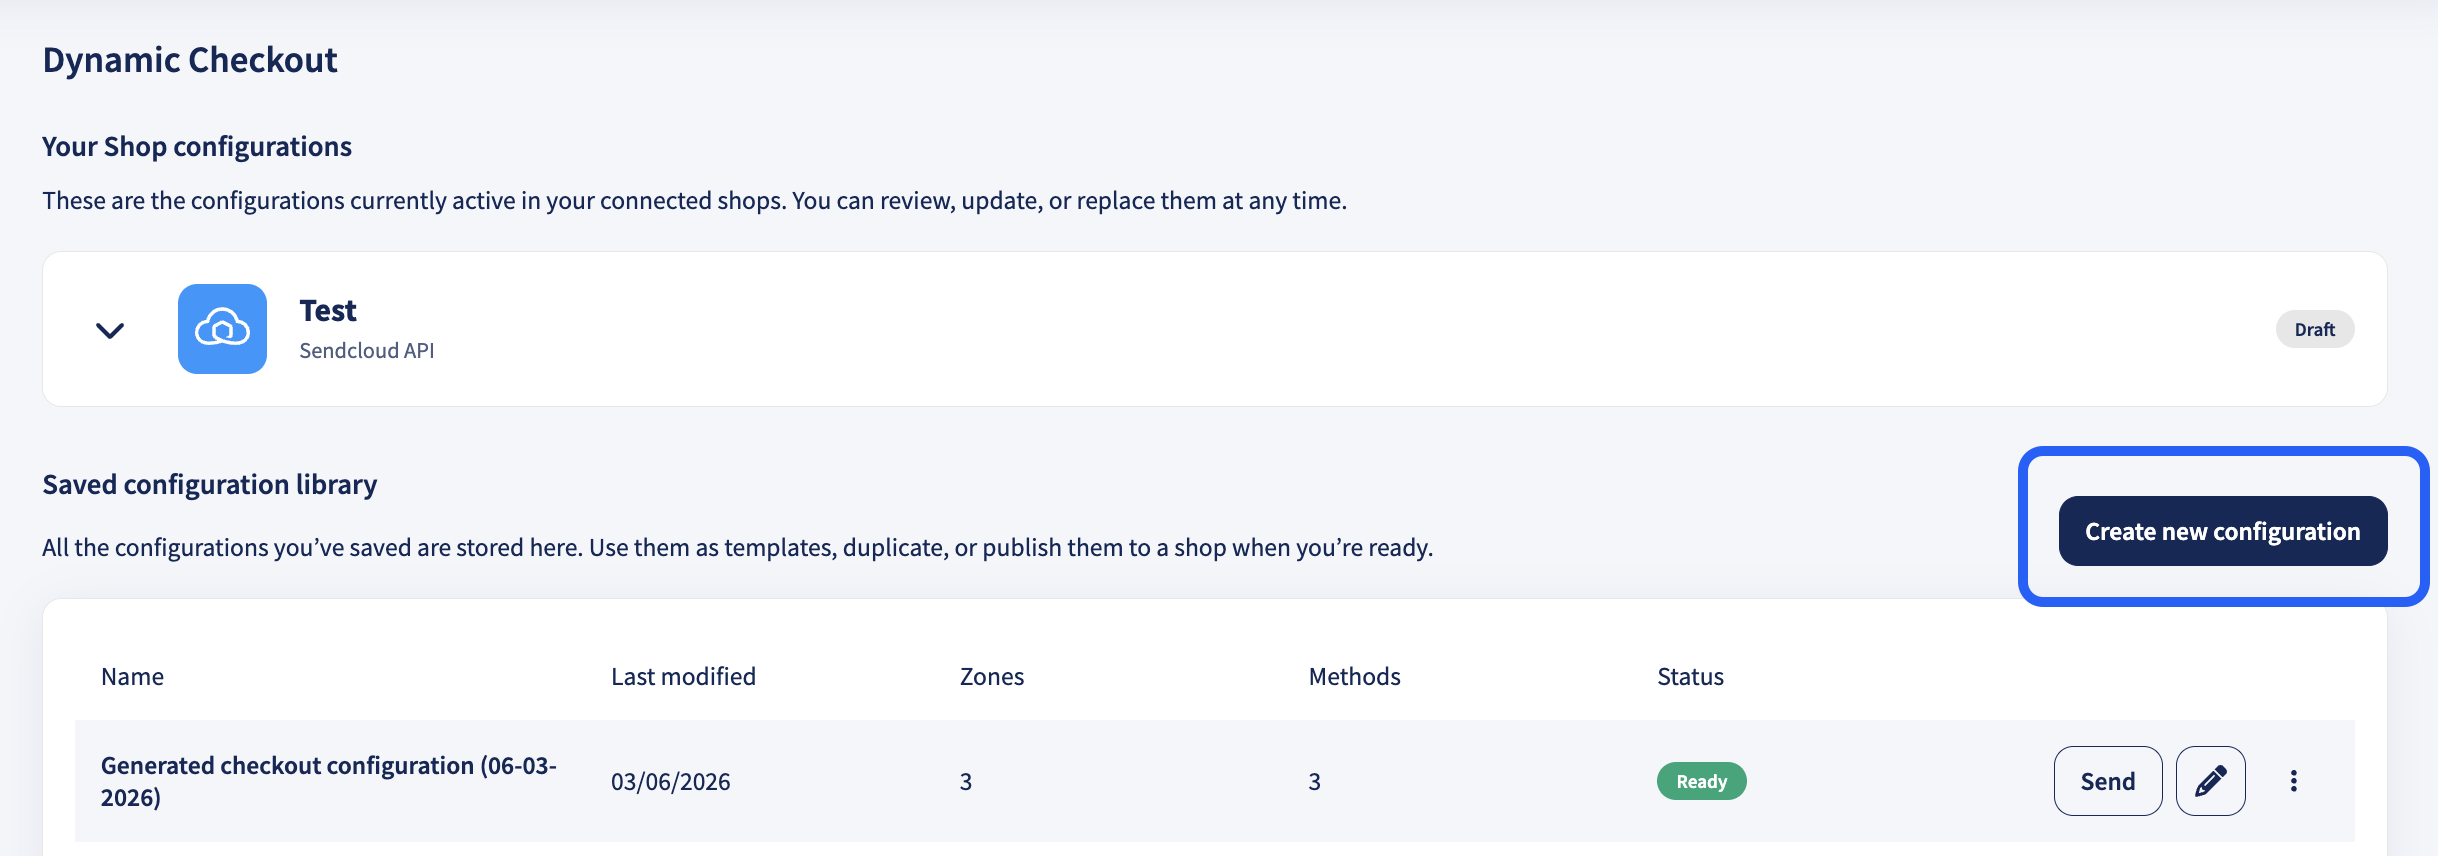
- During the setup, you will complete: Shipping destination → Delivery methods → Carriers → Configuration.
Step 2 Select shipping destination (sender address, time zone, destination)
In Shipping destination, select:
-
Sender address (the warehouse/location you ship from).
Make sure the correct sender address is selected in your configuration. You can change it using the dropdown menu.
The sender address determines which carriers and shipping services are available for Standard Delivery. Selecting the correct warehouse location ensures accurate delivery options and transit times. -
Time zone (should match the sender address location so cut-off and handover times behave as expected).
The time zone is based on your account settings by default. Make sure it matches the location of the sender address you use to fulfill these orders.
For example, if you ship from the UK, set the time zone to UTC+00:00 GMT. If you ship from the Netherlands, set the time zone to UTC+01:00. -
Destination country or countries you want to offer this configuration for.
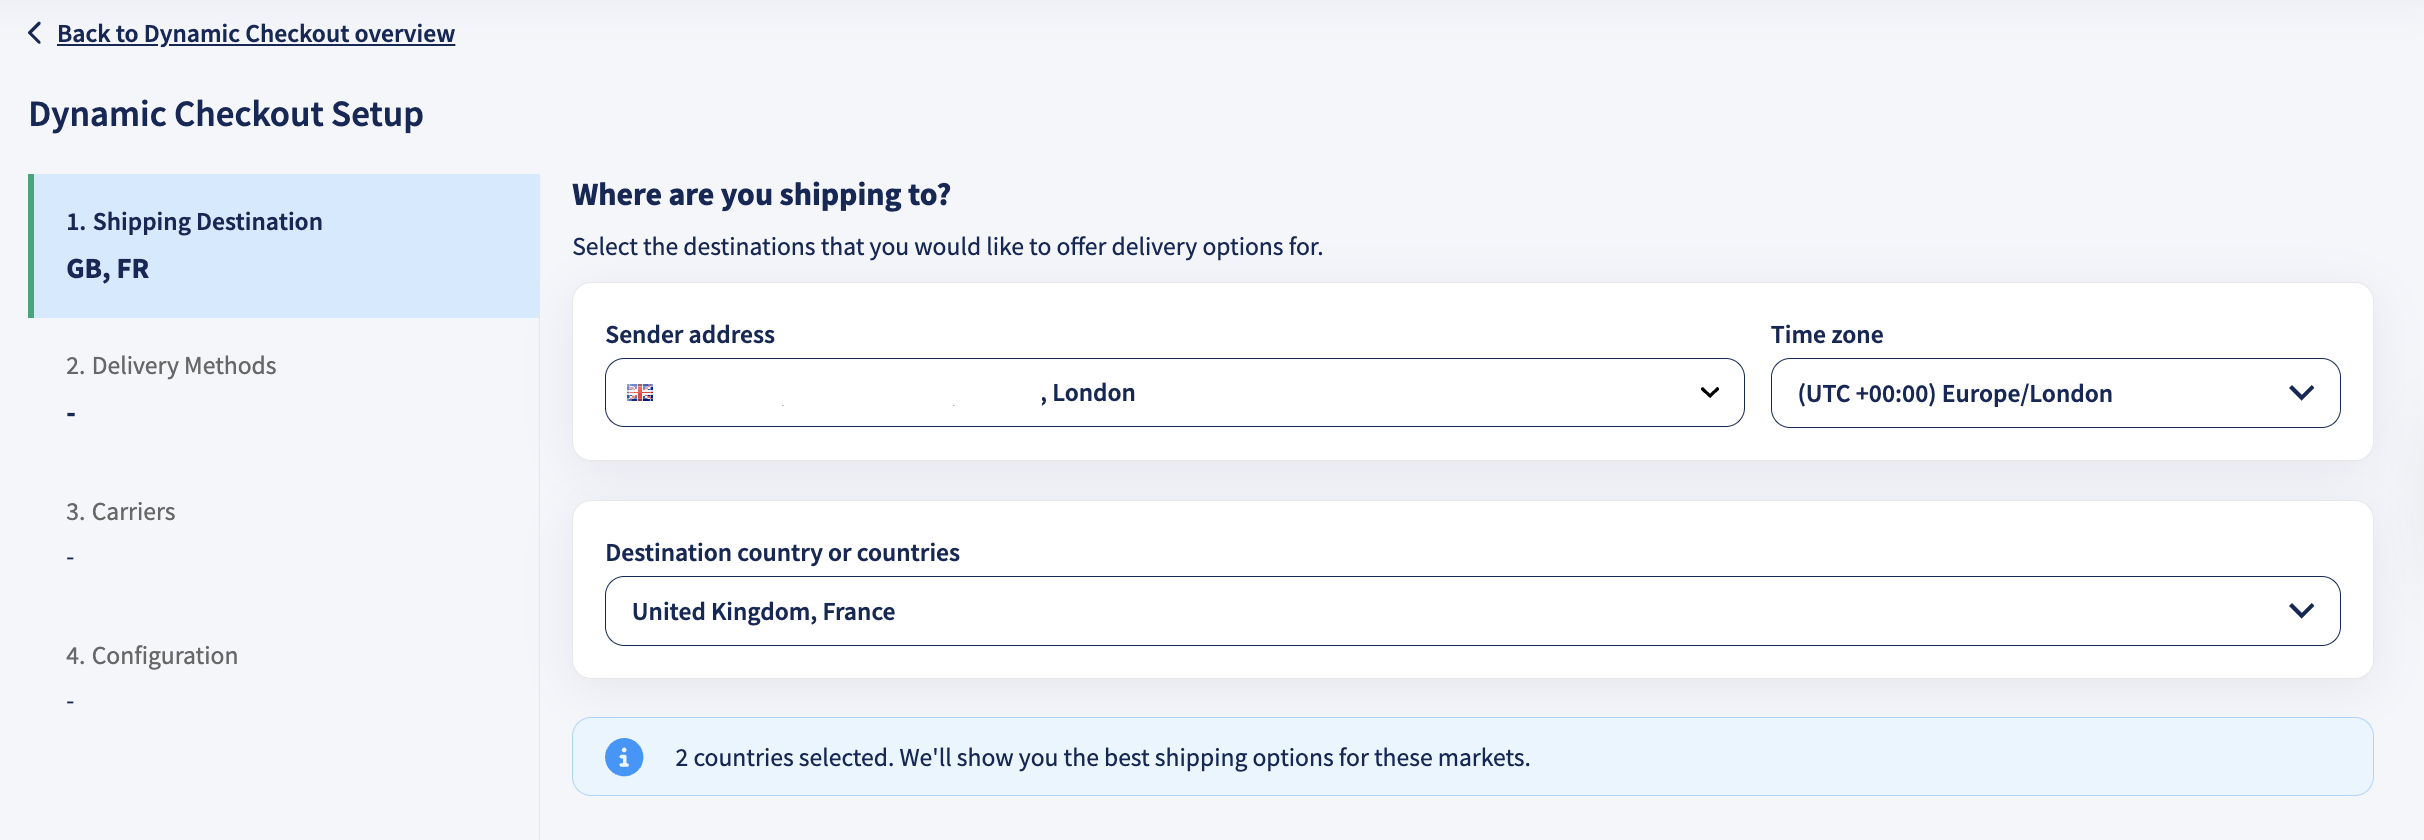
When you’re done, continue to Delivery methods.
Step 3 Choose delivery methods (enable Standard delivery)
In Delivery methods, select which delivery methods you want to offer. For Standard delivery, enable Standard delivery.
You can enable additional methods (e.g., Service point, Nominated day, Same day) now or add them later from the configuration overview.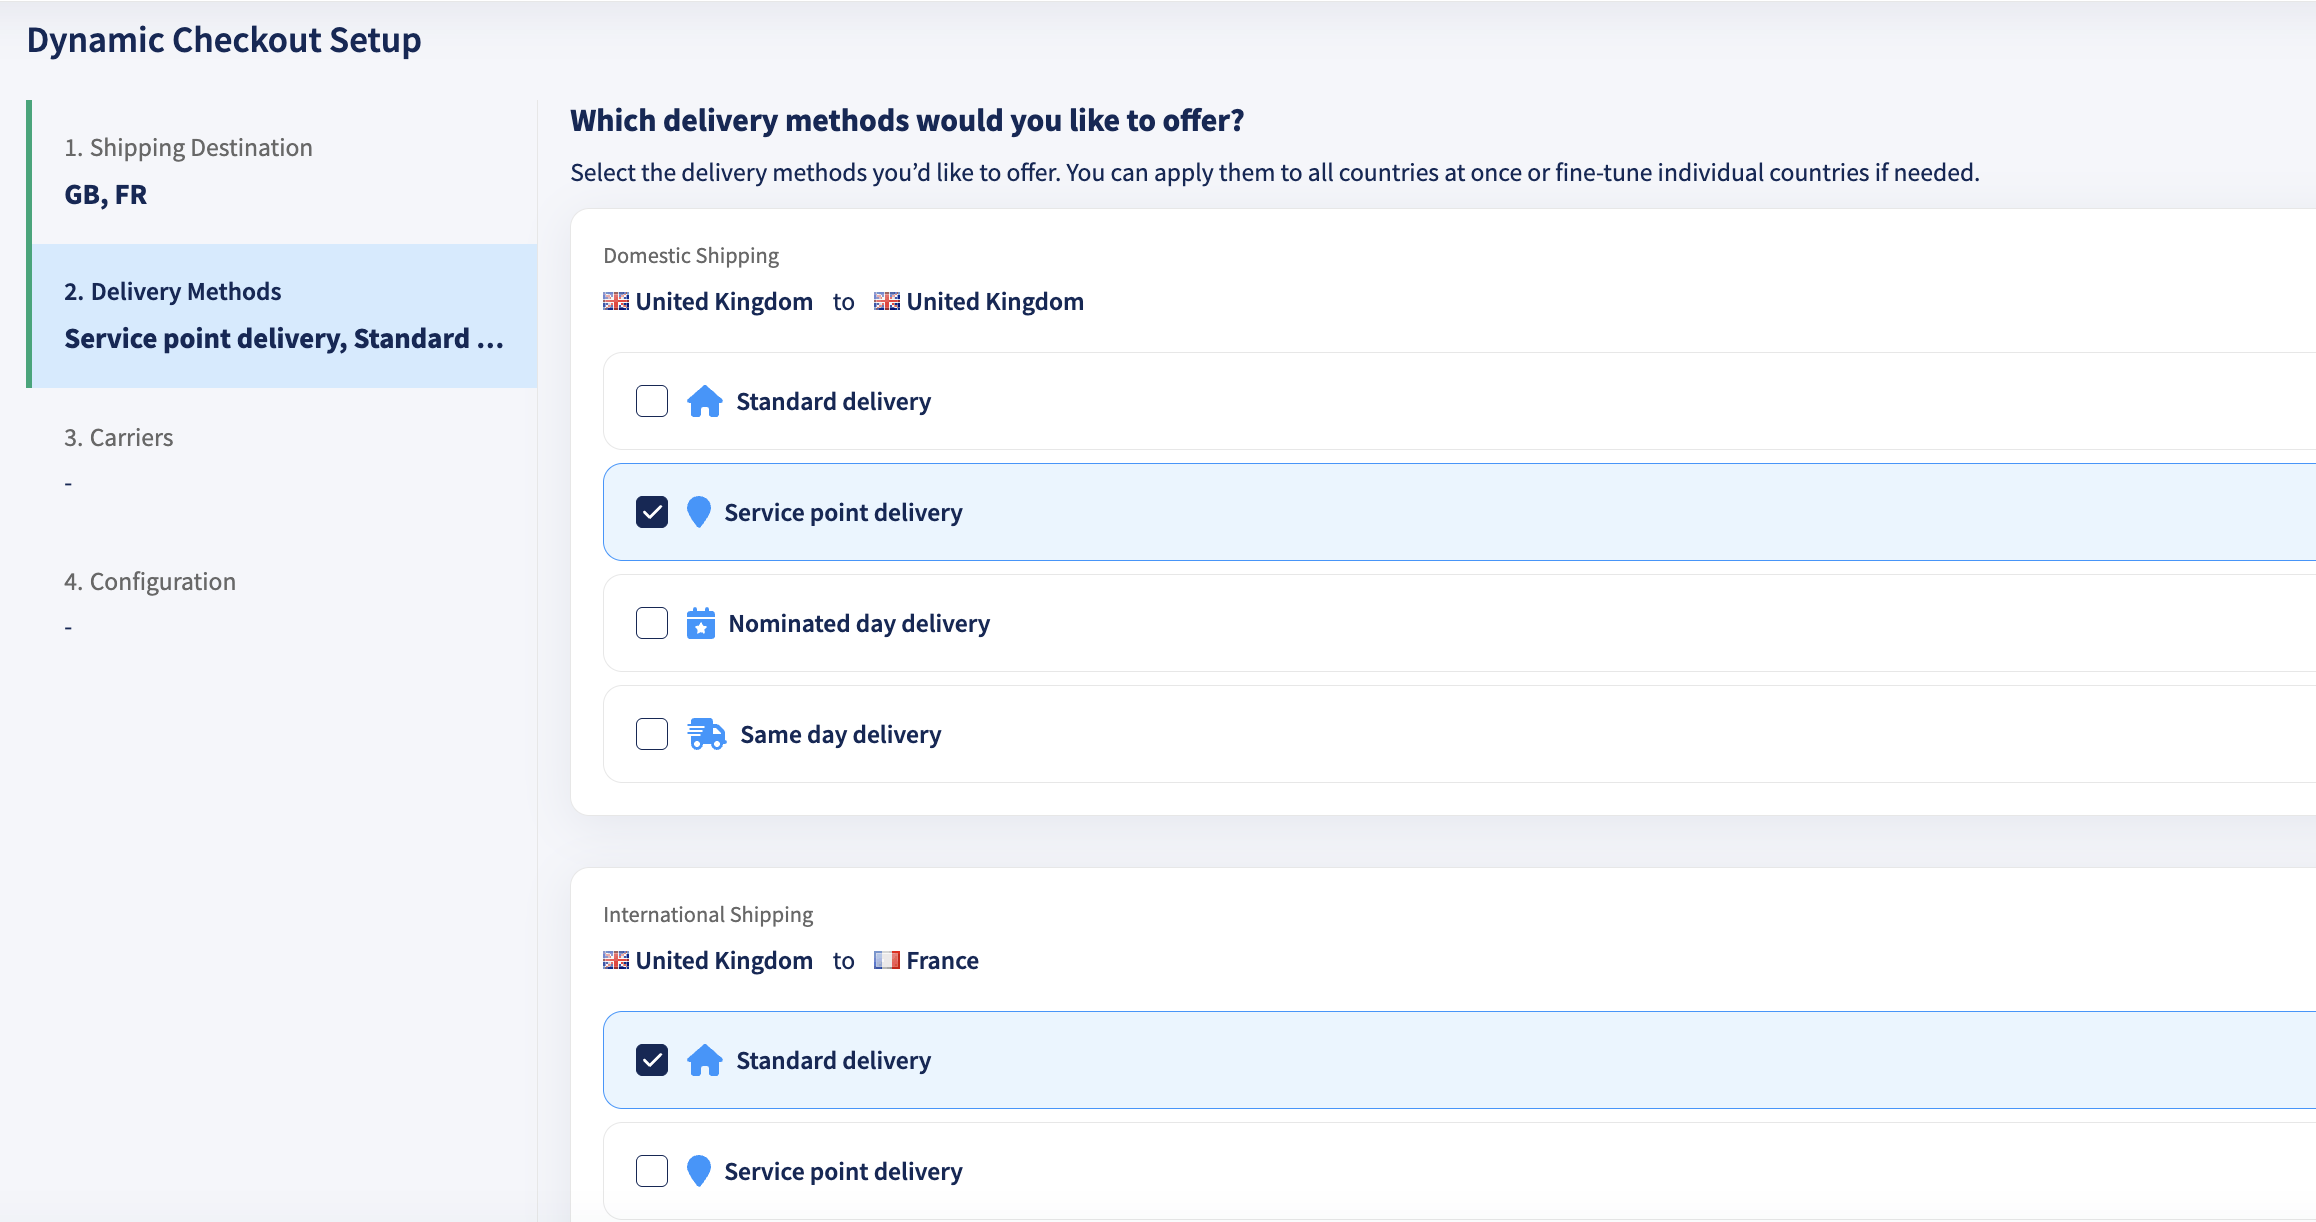
Step 4 Select your carrier(s)
After enabling Standard Delivery, in Carriers, choose the carrier(s) you want to offer at checkout for the selected destination(s).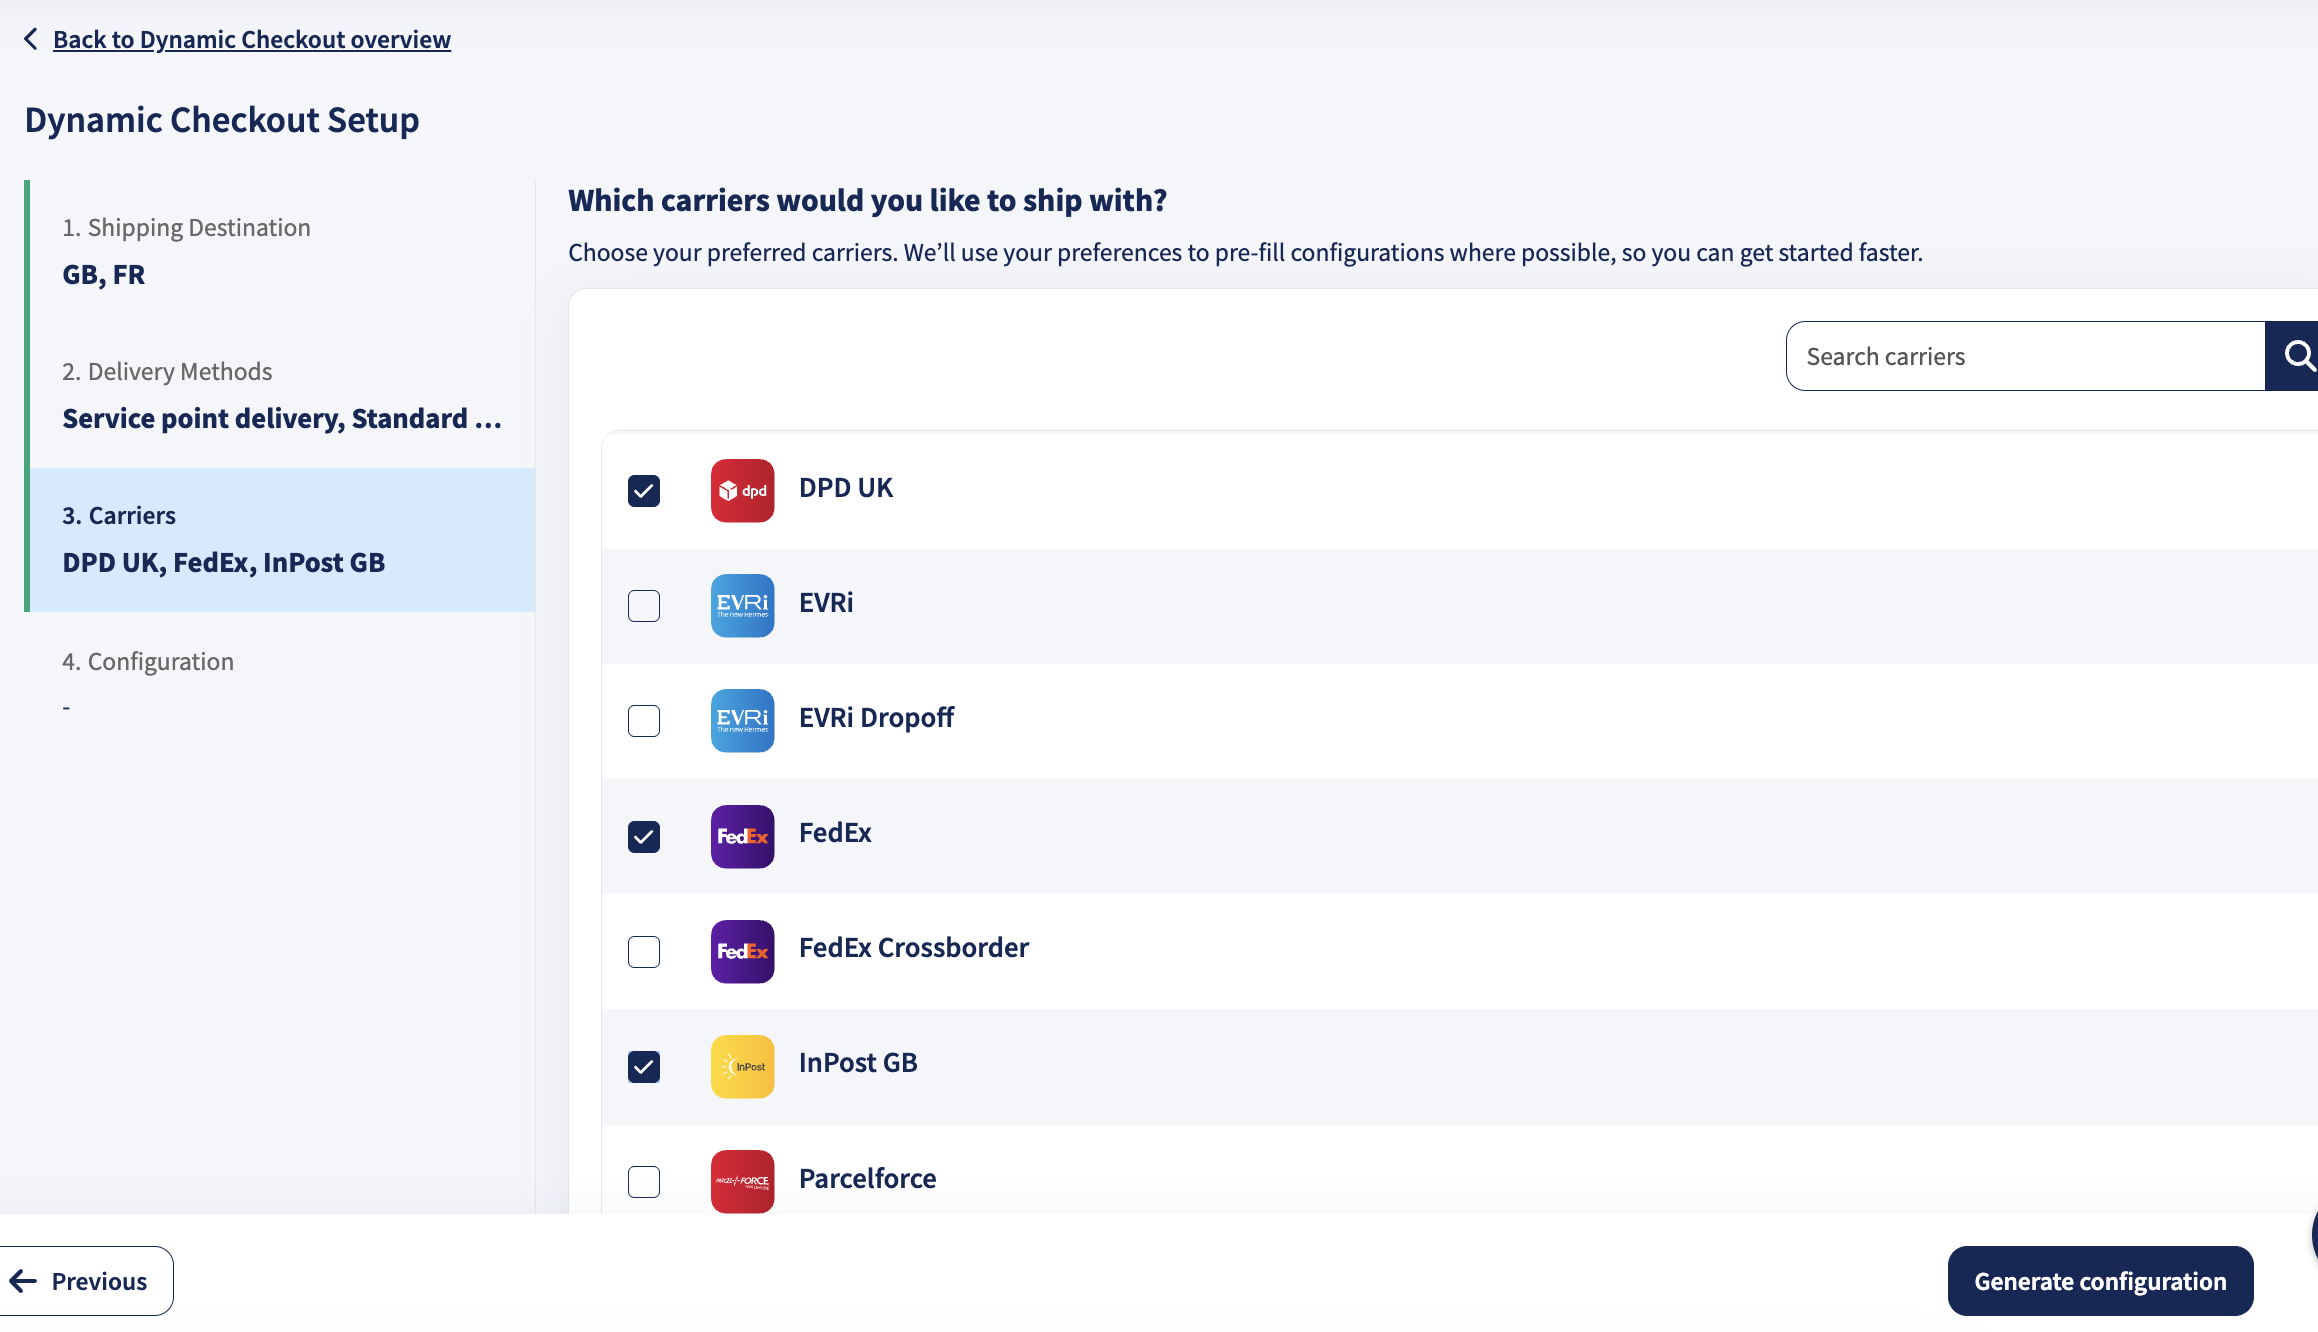
Use the carrier search if needed, then continue to Configuration.
Note: Service Point and Same Day shipping methods are configured separately and will not appear in the Standard Delivery shipping service list.
Step 5 Review the generated configuration
In Configuration, Dynamic Checkout generates a configuration based on your selections. From here you can:
- Edit excluded postal codes for a destination.
- Add a new destination to extend the configuration.
- Add a new delivery method.
- Use the pen icon to open the delivery method editor and fine-tune the method.
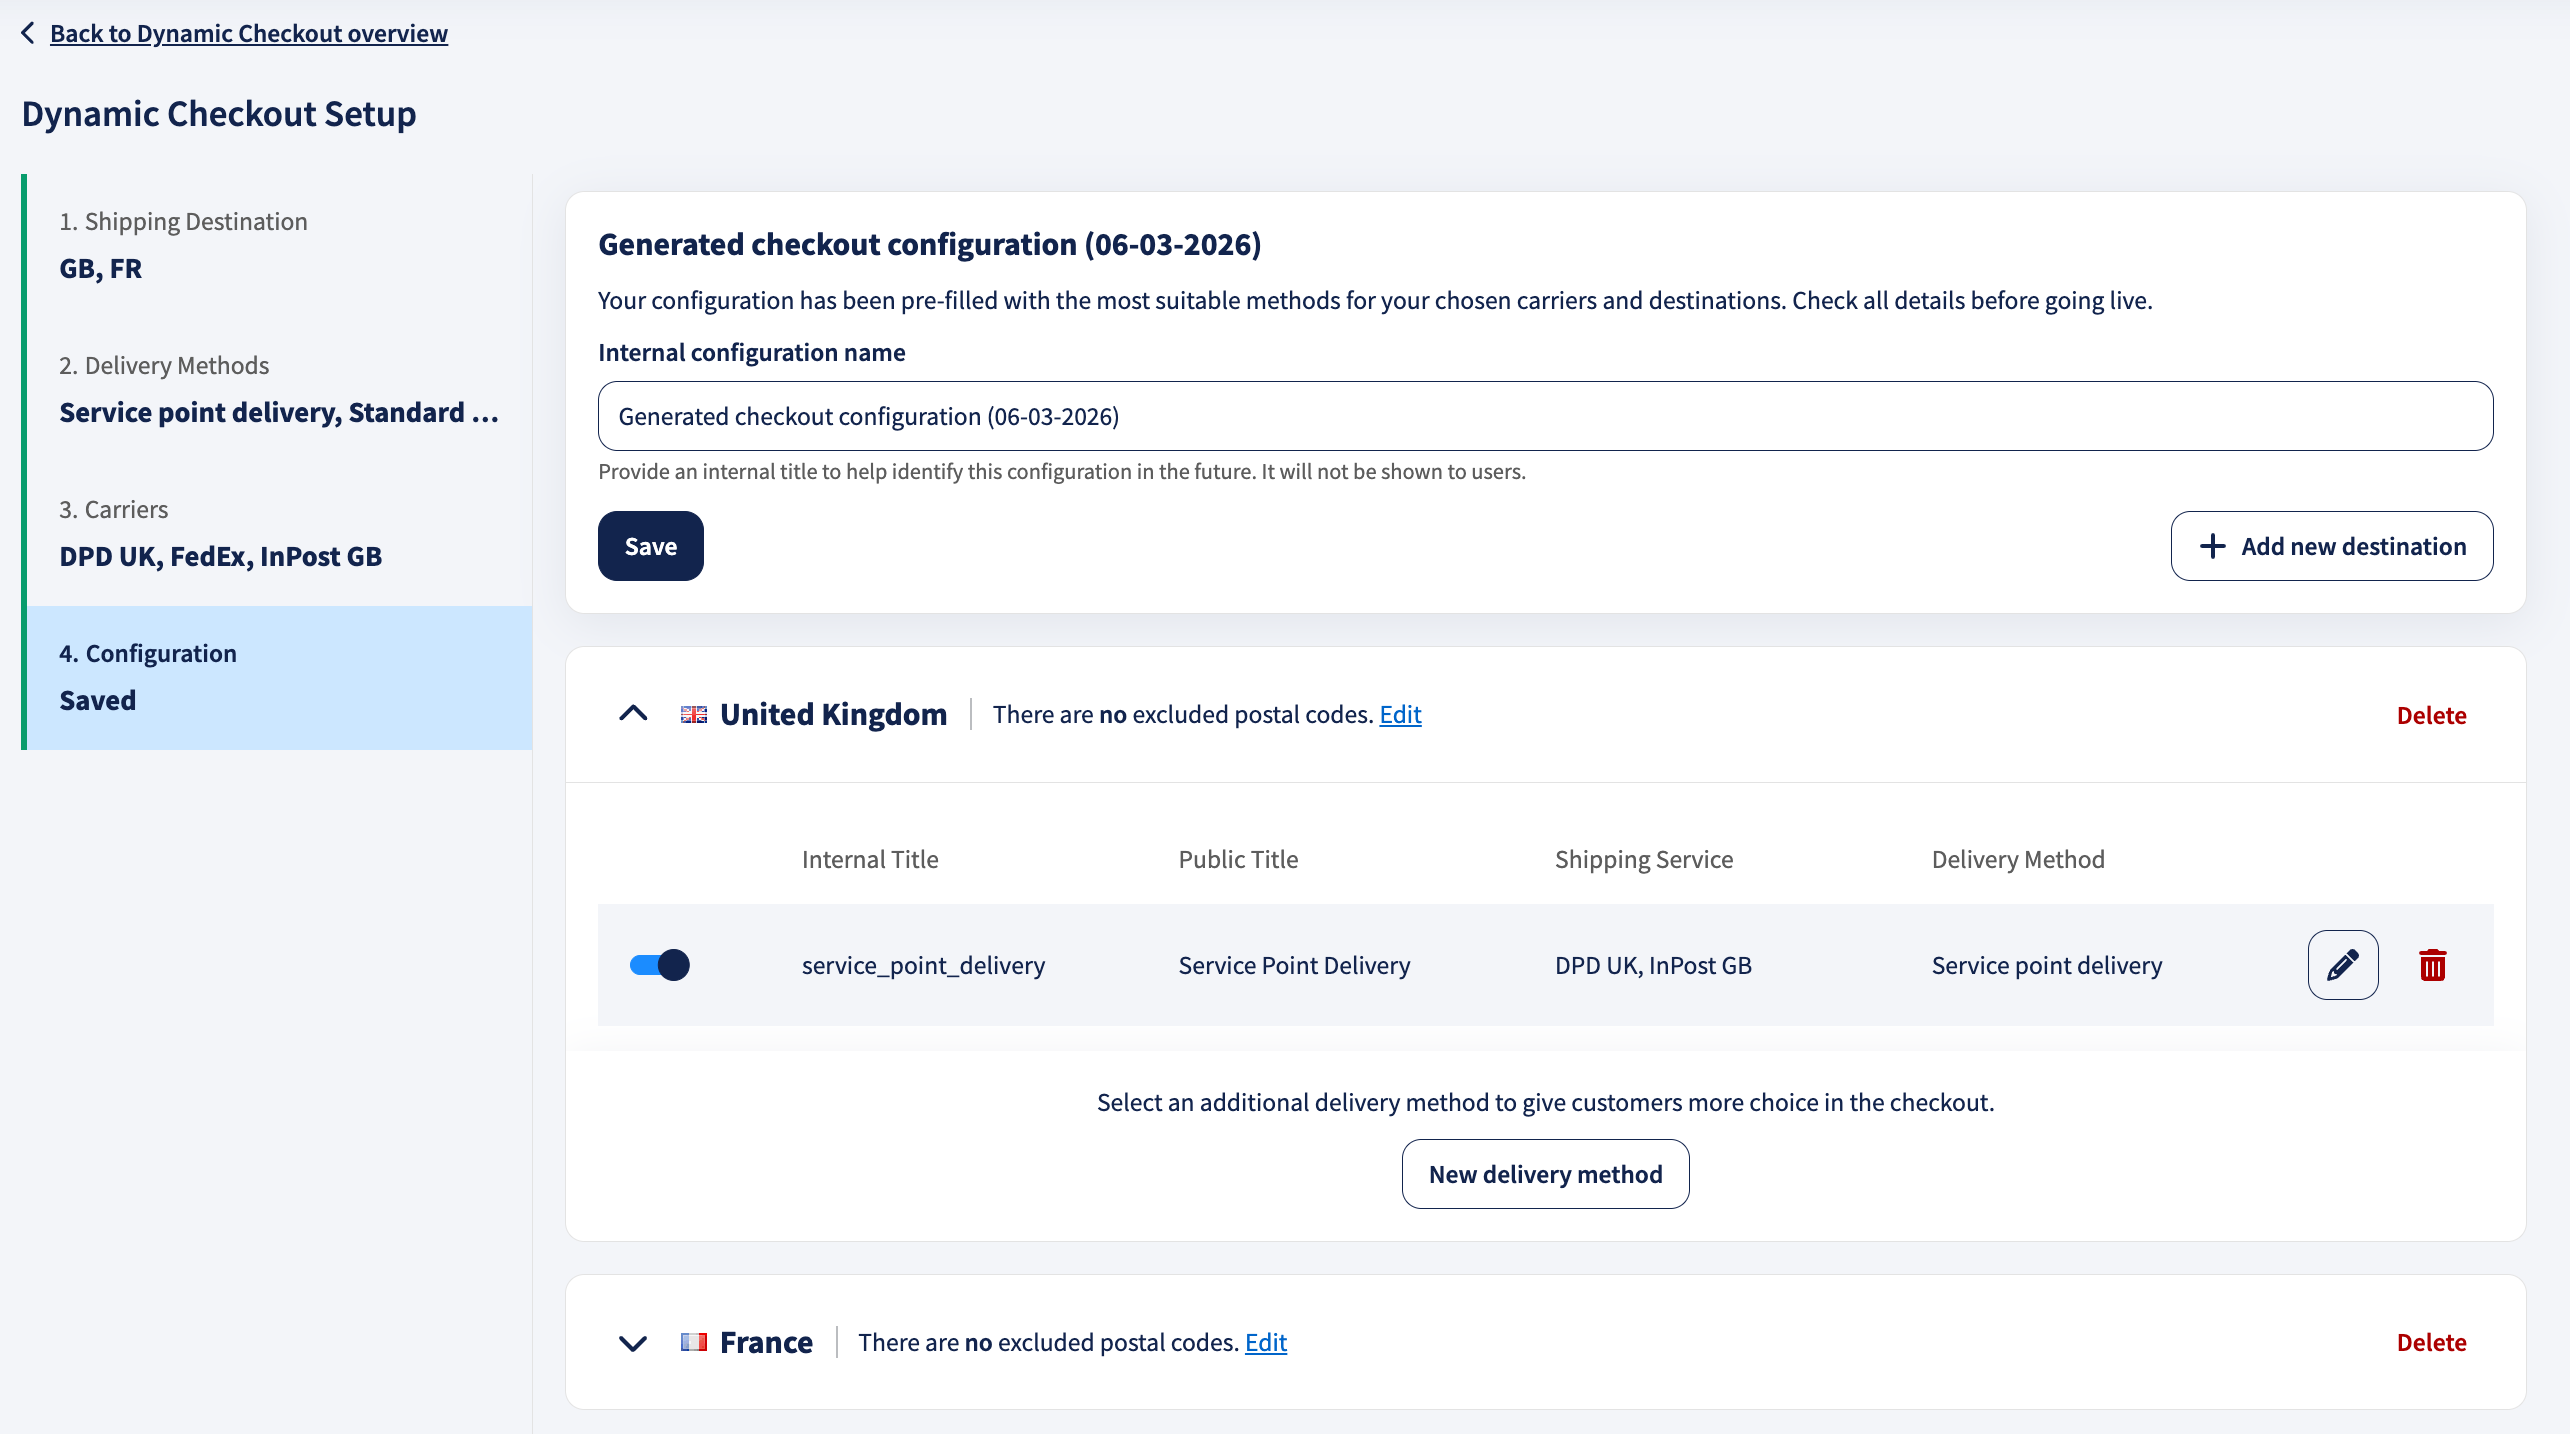
Step 6 Edit the Standard delivery method in the delivery method editor
Click the pen icon to open the editor. Inside the editor, you’ll see these sections:
6.1 Shipping service
Choose the shipping service you want to use for this delivery method. A shipping service is a group of carrier methods; Sendcloud maps the best-matching carrier method automatically based on your selections (such as weight classes and delivery deadline).
Shipping service in depth
A shipping service is a group of similar shipping methods offered by a carrier. The specific shipping method is selected automatically when the order is imported, based on:
- The weight of the order
- The selected delivery options (e.g., signature required, age check)
- The configured shipping settings
For example, the shipping service PostNL Standard includes:
- PostNL Standard 0–23 kg
- PostNL Standard 23–31.5 kg
- PostNL Standard with signature 0–23 kg
- PostNL evening delivery 0–23 kg
- ...and more
Sendcloud automatically applies the correct shipping method based on your configuration and the order details.
Use + add filter to filter services by available options if needed.
6.2 Shipping method options
Configure the options that define how the shipment should be handled. Depending on the carrier/service, you may see options such as:
- Delivery before (time-of-day commitment, if available)
- Delivery deadline (e.g., Best effort / Next day / Within 24h / etc., depending on service)
- Weekend delivery (Saturday/Sunday/weekends, if supported)
The right-side panel shows Shipping methods used to process orders, so you can verify the mapping.
If the selected shipping service contains only one shipping method, and that method does not offer additional functionalities (such as Age Check or Signature Required), no extra options will be available.
Alternatively, if a shipping method always includes a specific functionality (for example, UPS Express Saver always requires a signature), the option will already be applied automatically.
You can click View applied functionalities to check which options are included.
Available functionalities in Standard Delivery
The availability of functionalities depends on the selected carrier and shipping service. Common functionalities include:
- Signature required – The recipient must sign for the parcel.
- Age check (18+) – The recipient must verify their age upon delivery.
- Delivery to a neighbour – Allows delivery to a neighbour if the recipient is unavailable.
- Letterbox parcel – Indicates the parcel fits through a mailbox.
- Insurance or transport protection – Adds extra shipment coverage.
- Weekend delivery – Enables delivery on weekends (if supported).
- Specific transit time – Applies delivery within a defined timeframe (if supported).
When do you need to select functionalities?
In Standard Delivery, functionalities are selectable only when a shipping service contains multiple shipping methods with different characteristics.
✅ Selection required: When shipping methods within the same service offer different functionalities, you must choose which options should apply.
❌ No selection required: If all shipping methods include the same functionalities, Sendcloud applies them automatically.
Why are some functionalities unavailable?
The availability of functionalities depends on:
- Carrier support – The carrier must offer the functionality.
- Shipping service compatibility – Some options are tied to specific services.
- Subscription plan – Certain functionalities may depend on your Sendcloud plan.
- Integration type – Availability may vary depending on your integration setup.
Filtering shipping services by functionality
- Click +Add filter when selecting a shipping service.
- Select the required functionalities.
- The list updates to show only compatible shipping services.
6.3 Shipping rates
In Shipping rates, enable Set shipping rates to add pricing for this delivery method.
You can choose between default weight classes or create custom weight classes:
- Default weight classes set the predefined weight ranges associated with the selected shipping service.
-
Custom weight classes allow you to define your own ranges by clicking
+New weight class.
Select the option that best fits your pricing strategy.
Optional: configure free shipping from a specific order amount if available in your account.
6.4 Handover & cut-off times
If you enable Handover & Cutoff Times, you can define when this Standard Delivery option is available at checkout and until what time customers can select it.
It allows you to control when customers can place orders based on your fulfillment schedule.
- Handover days: the days you can hand parcels over to the carrier. Select every day or choose specific weekdays.
- Start time: the earliest time this delivery method is visible in checkout.
- Cut-off time: the latest time customers can still select this method (after this time it won’t appear).
For example, if you stop processing parcels at 15:00, set your cut-off time to 15:00. After that time, this delivery option will no longer appear at checkout.
Tip: Set these based on your fulfillment capacity and the carrier’s collection schedule.
Properly configuring order placement days and cut-off times helps ensure customers only see delivery options that you can operationally support.
6.5 Checkout rules
In Checkout rules, enable and configure rules if you want to automatically show or hide this delivery method based on conditions (for example, destination area, basket value, parcel characteristics, etc., depending on what your rules support).
With Checkout Rules, you can:
- Display only relevant delivery options based on location, order value, parcel size, or other conditions.
- Create a smoother checkout experience for your customers.
- Improve accuracy in shipping availability and pricing.
To configure Checkout Rules:
- Go to Settings > Checkout Rules.
- Click Create new rule.
- Define your conditions and actions.
- Click Save.
You can find more details about Checkout Rules here.
6.6 General details
In General details, set:
- Public title (what the shopper sees at checkout)
- Public description (optional helper text under the title)
- Internal title (for internal identification in Sendcloud)
Click Save in the editor when finished. (Optional: use Copy method ID if you need the identifier for API/debugging flows.)
Step 7 Save the configuration and send it to your shop
Once you complete the setup, click on save then Complete setup and your configuration will be available in your Saved configuration library.
From there, you can set it live to your shop by clicking Send and selecting the integration you want to send this configuration to.
- Select your integration
- Click "send."
Click on the pen icon to edit a configuration or the 3 dots to rename, duplicate, or delete one.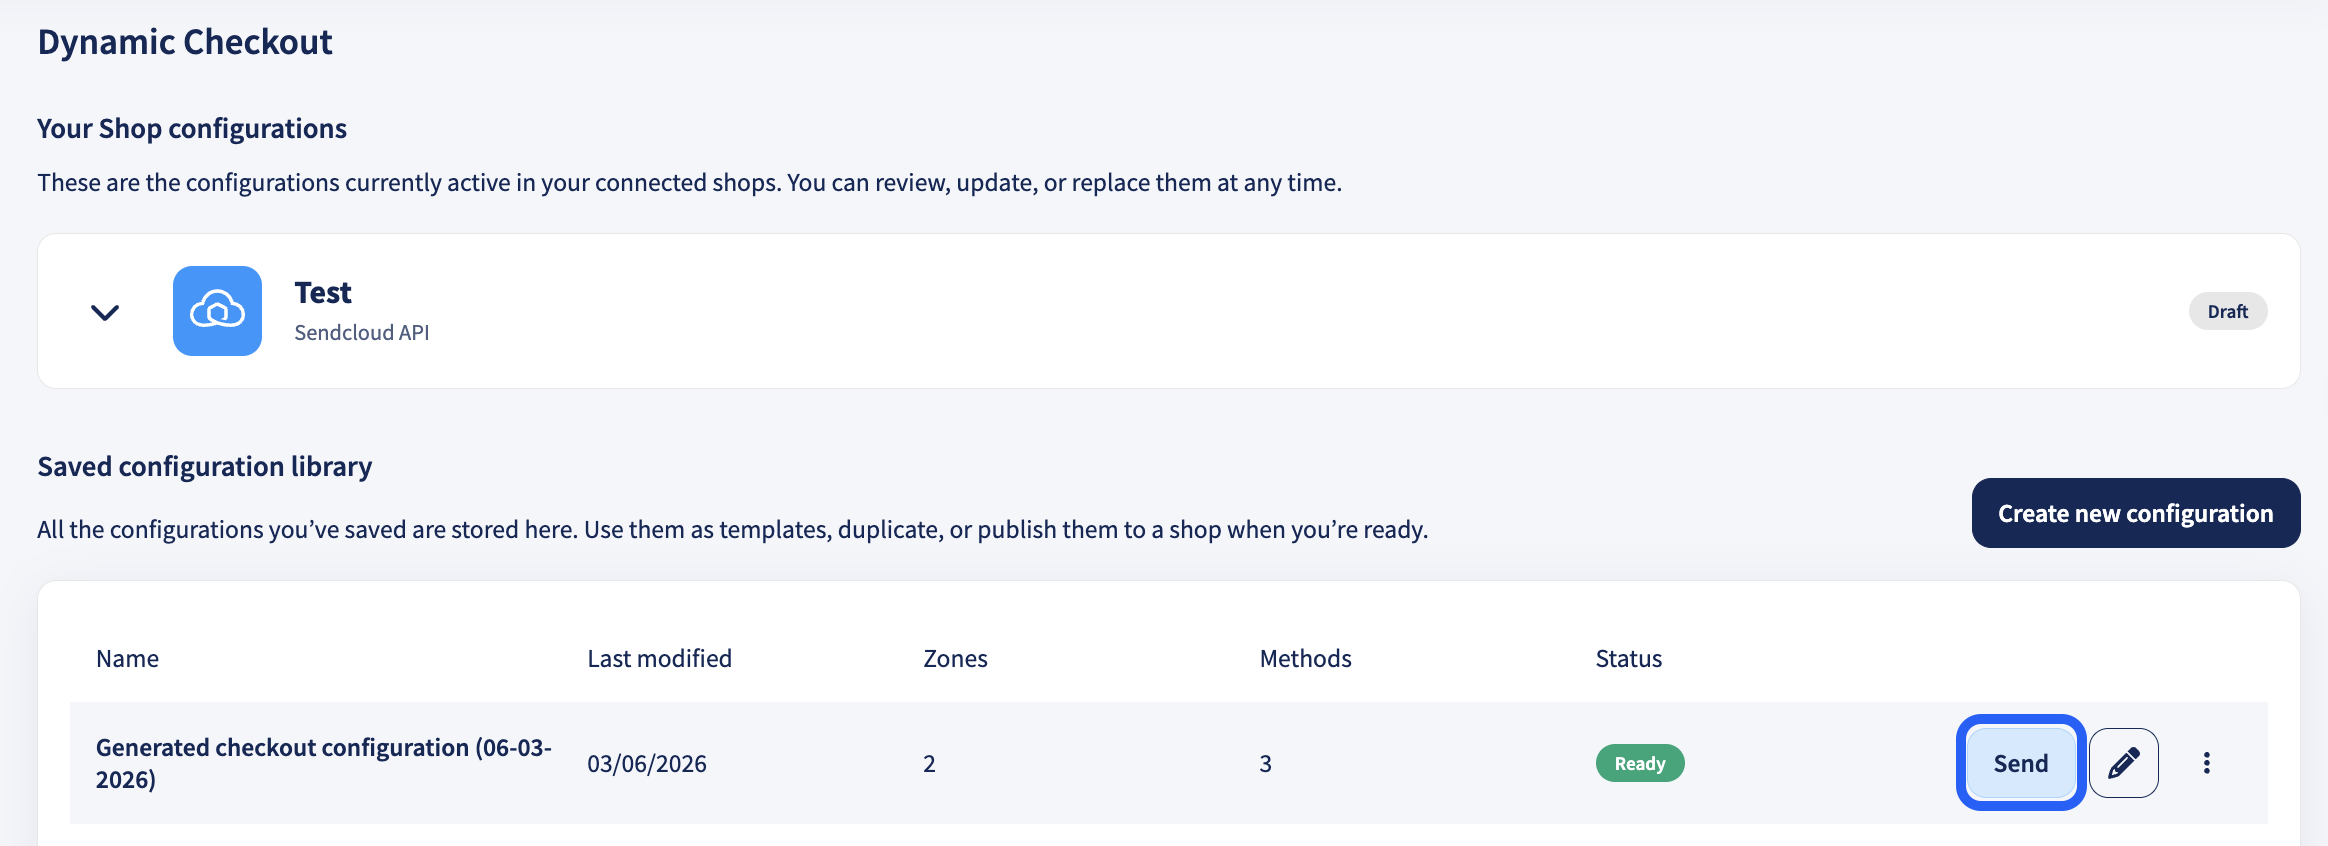
Step 8 Processing orders (Parcel handover date column)
Orders will appear in Shipping > Orders > Incoming order overview.
For Standard delivery, orders typically show anytime because the shopper didn’t select a specific delivery date.
If you don’t want to show that column, customize your column view via the column selector (≡).
- Orders that must be processed today will show this icon:
- Overdue orders will show this icon:
Filter by Parcel Handover Date
-
Filtering Standard Delivery orders
You can filter your orders using the+Add filterbutton.
For example, select: Parcel handover date: Anytime. -
Filtering other Dynamic Checkout orders
If you have configured additional delivery options (such as Next Day or Nominated Day), you can combine filters such as:- Parcel Handover Date: Anytime + Country
- Parcel Handover Date: Anytime + Carrier
Q: I don’t want to see the Parcel Handover Date column. What can I do?
You can customise your column view in the Incoming order overview by clicking the column selector button ≡ next to the search bar.
For more information about filtering and adjusting your order overview, see: How to use the +Add filter function .
Q: Can I change the shipping method for a Dynamic Checkout order using shipping rules?
Yes. Shipping rules can also be applied to Dynamic Checkout orders.
The sender address and shipping service defined in your Dynamic Checkout configuration are automatically applied when the order is imported. However, you can:
- Manually change the shipping method or sender address in the order view.
- Use shipping rules to override the automatically assigned shipping method.
To specifically target checkout orders, use the rule condition: Is Dynamic Checkout order.
Please note: When changing shipping methods for Nominated Day or Same Day delivery options, always verify the transit time. Switching to a method with a longer transit time may affect the delivery date shown to your customer.