
Purpose: This guide provides step-by-step instructions for installing and setting up the Sendcloud WooCommerce V2 plugin, configuring integration settings, and managing order synchronization, product data, tracking notifications, and service point delivery.
Related articles
→ Self-hosted Shop Systems: Troubleshooting Integration Issues
→ WooCommerce V2 Troubleshooter
Connect your WooCommerce V2 online store to Sendcloud
- In the Sendcloud panel, go to Settings > Integrations, find WooCommerce V2, and click Connect.
- You will be redirected to WordPress. Click Download to download the Sendcloud plugin.
Installing the Sendcloud Plugin
To install the plugin from the WordPress Marketplace:
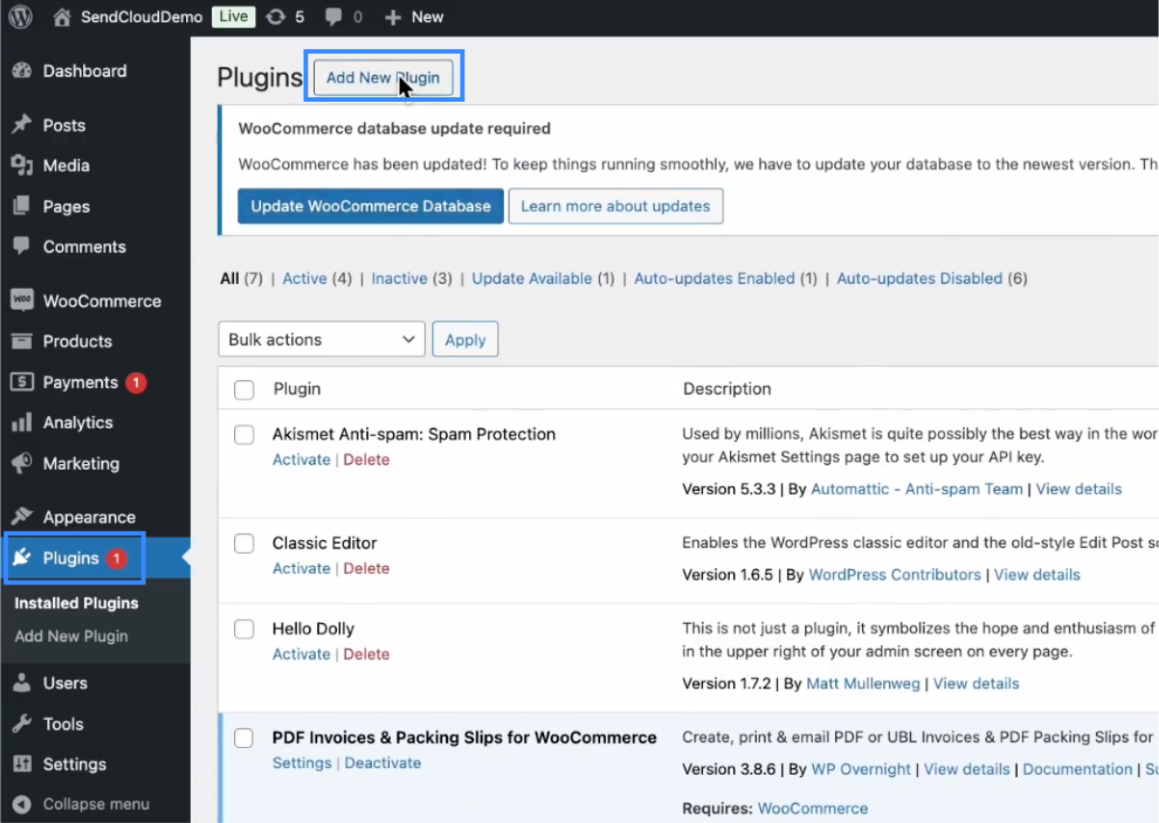
- Go to the WooCommerce admin panel and navigate to Plugins > Add Plugin (or Add New Plugin in older versions).
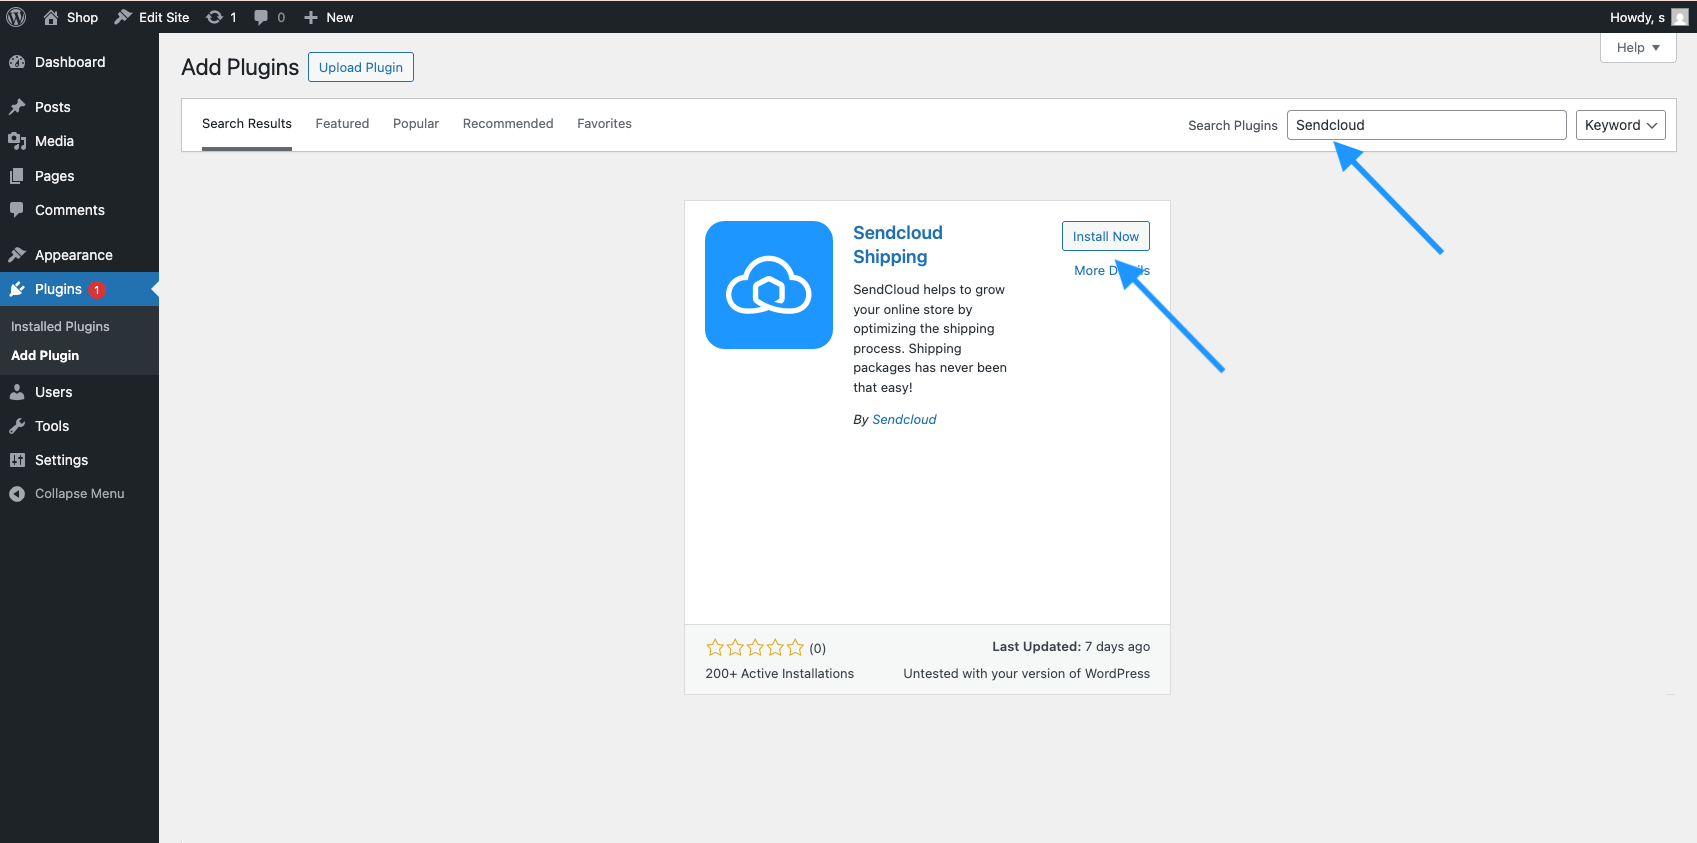
- Search for Sendcloud, then click Install Now.
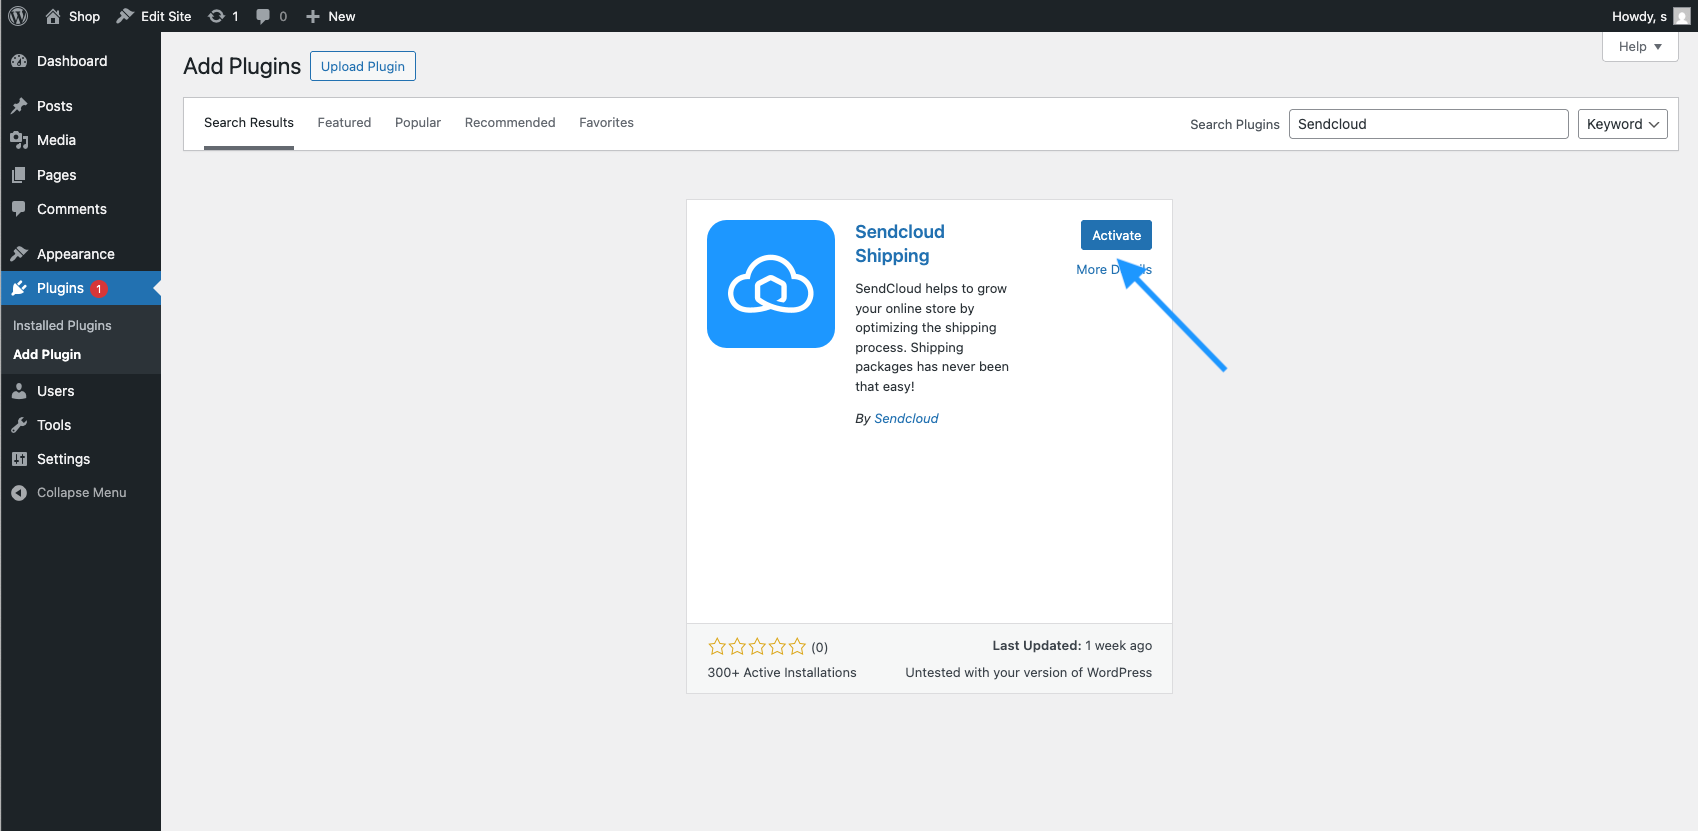
- Once installed, click Activate.
Connecting with Sendcloud
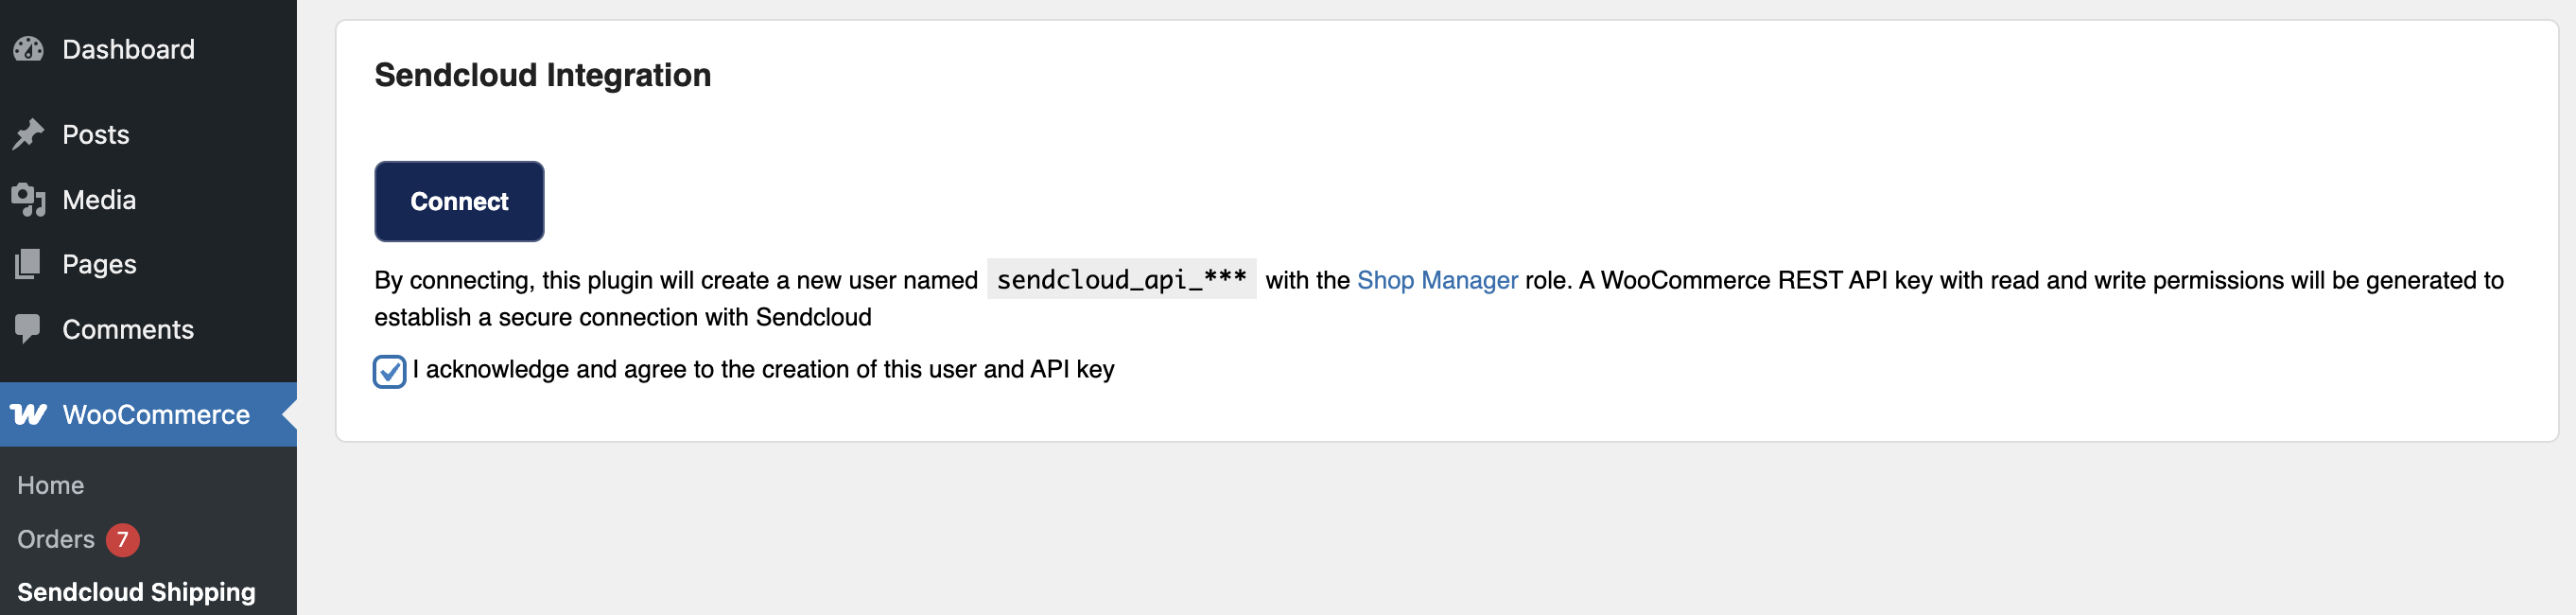
- After installation, go to WooCommerce > Sendcloud Shipping. Select the checkbox to enable the Connect button, then click Connect to start the integration.
- You'll be redirected to a new tab to enter your Sendcloud credentials.
- Once entered, the integration will be created and you'll be redirected back to the Sendcloud panel. To confirm the connection, go to Settings > Integrations.
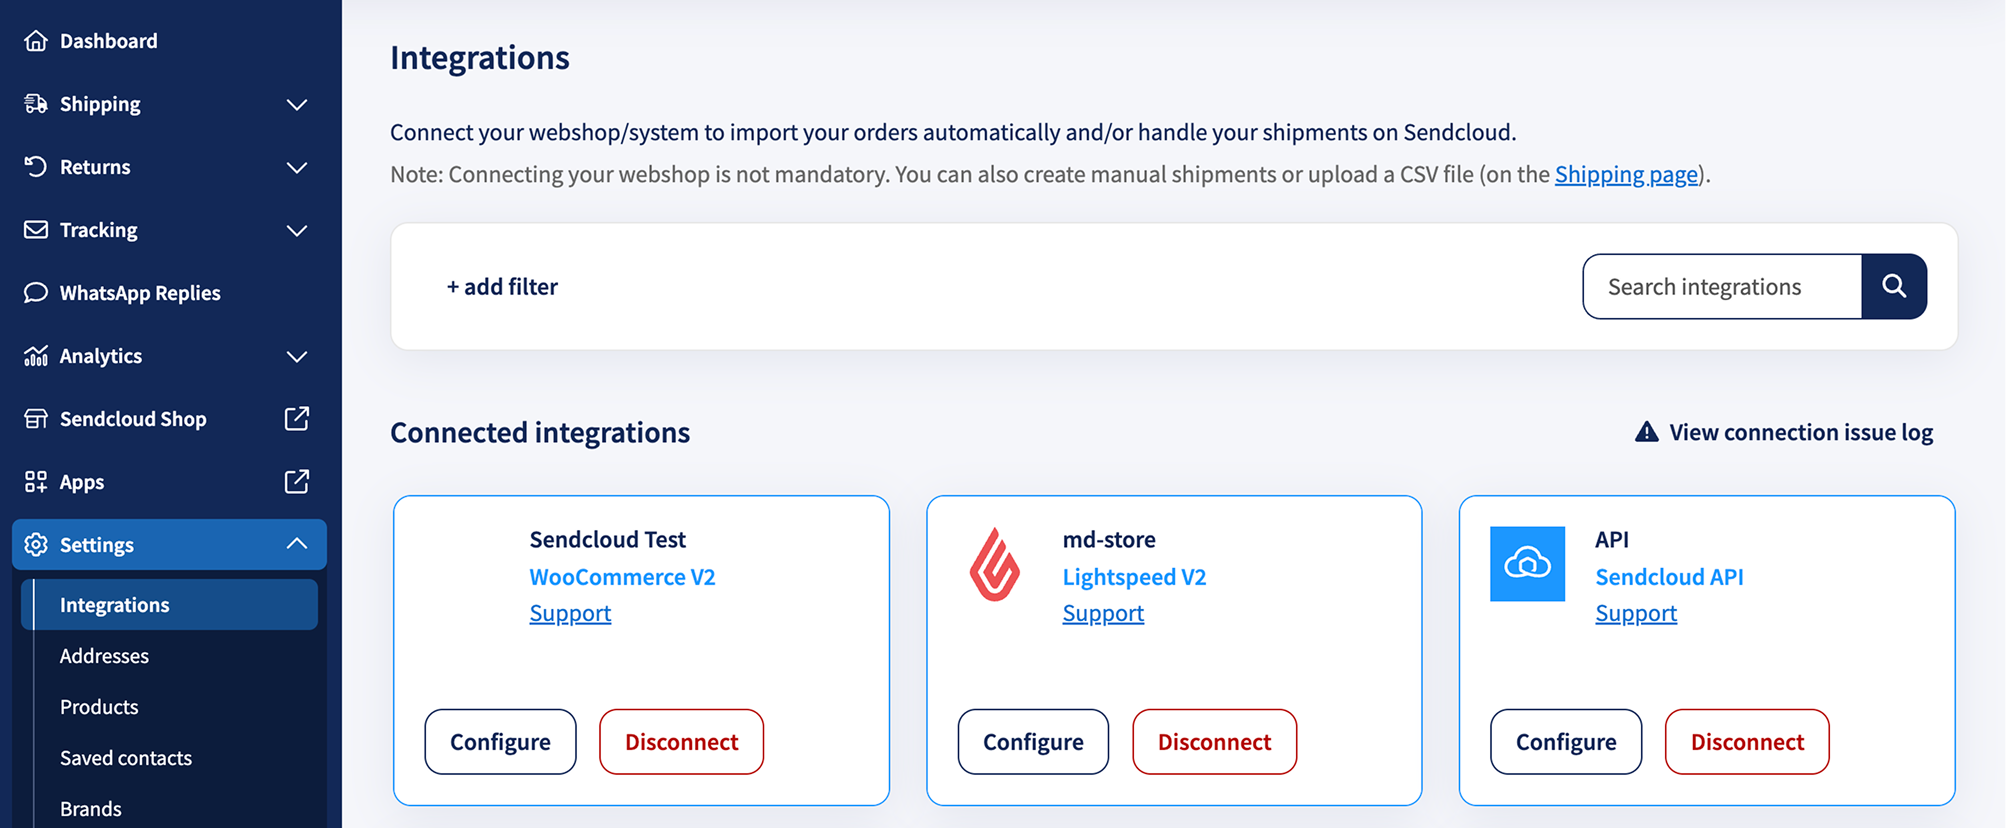
Once your store is connected, open your WooCommerce integration settings in Sendcloud to configure order imports, shipment updates, tracking notifications, and service point delivery.
Important to know:
After successfully connecting your WooCommerce store to Sendcloud, the following resources are automatically created in your WooCommerce admin:
- A user named sendcloud_api with the role Shop manager.
- A webhook named Sendcloud Update Order that listens to the topic
order.updated. It uses the following delivery URL format:https://woocommerce.eu-central-1-0.sendcloud.com/v1/webhooks/fetch_order/<6 digit integration ID>
This webhook is triggered when an order is updated in WooCommerce, for example when its address, order status, or items change. It notifies Sendcloud's middleware, which retrieves the updated order data and synchronizes it with the Sendcloud panel.
This automatically created WooCommerce webhook is separate from the optional webhook events available in your Sendcloud integration settings.
Configure your WooCommerce integration settings
After connecting your store, you can configure how WooCommerce and Sendcloud exchange order and shipment information.
To access your integration settings:
- In your Sendcloud panel, go to Settings > Integrations.
- Open your WooCommerce integration.
- Configure the relevant settings.
- Click Save changes to apply your changes.
The integration settings are organized into four sections:
- General: Manage your integration name and webshop domain.
- Data sync: Configure shipment updates and order imports.
- Tracking notifications: Manage tracking updates sent through Sendcloud.
- Service point delivery: Enable service point delivery for your webshop.
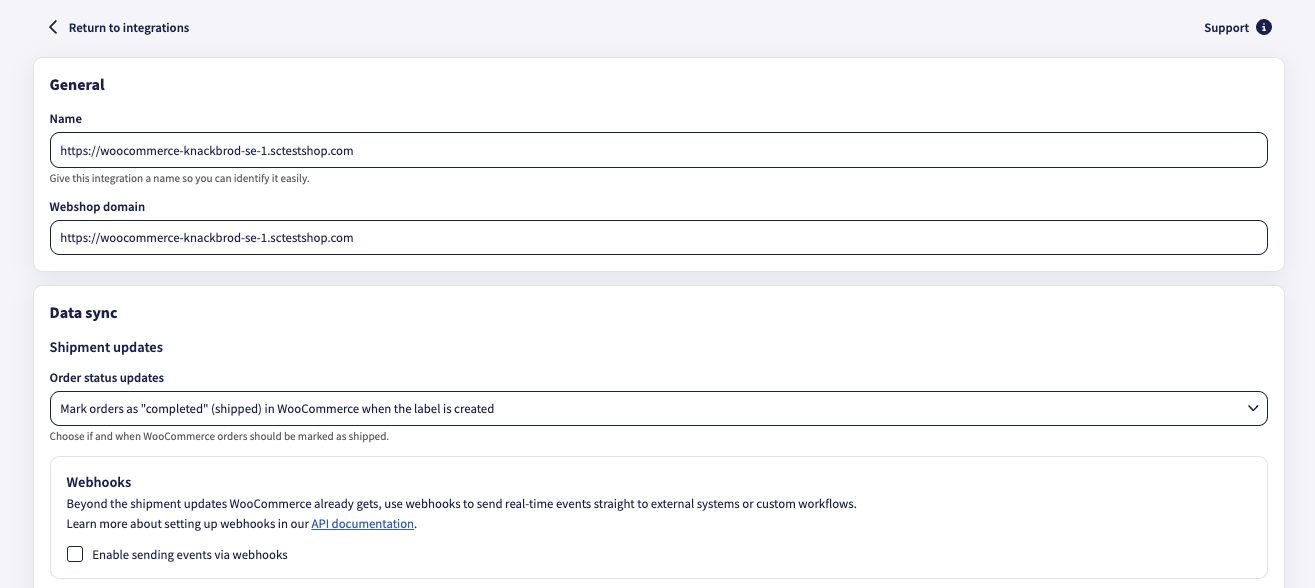
General
Under General, you can view and manage the basic information associated with your integration.
- Name: Give your integration a recognizable name so you can easily identify it in Sendcloud.
- Webshop domain: Displays the domain associated with your WooCommerce store.
Data sync
The Data sync section contains settings that control how shipment information and orders are synchronized between WooCommerce and Sendcloud.
Shipment updates
Order status updates
Under Data sync > Shipment updates > Order status updates, you can choose if and when WooCommerce orders should be marked as shipped.
For example, the option Mark orders as "completed" (shipped) in WooCommerce when the label is created marks orders as completed in WooCommerce when their shipping labels are created in Sendcloud.
Choose the option that best matches your order processing workflow and click Save changes.
Webhooks
Beyond the shipment updates WooCommerce already receives, you can use webhooks to send real-time events to external systems or custom workflows.
To enable webhook events:
- Under Data sync > Shipment updates, locate Webhooks.
- Select Enable sending events via webhooks.
- Click Save changes.
Additional configuration may be required to receive and process webhook events in your external system. For more information, see our API documentation.
Order import
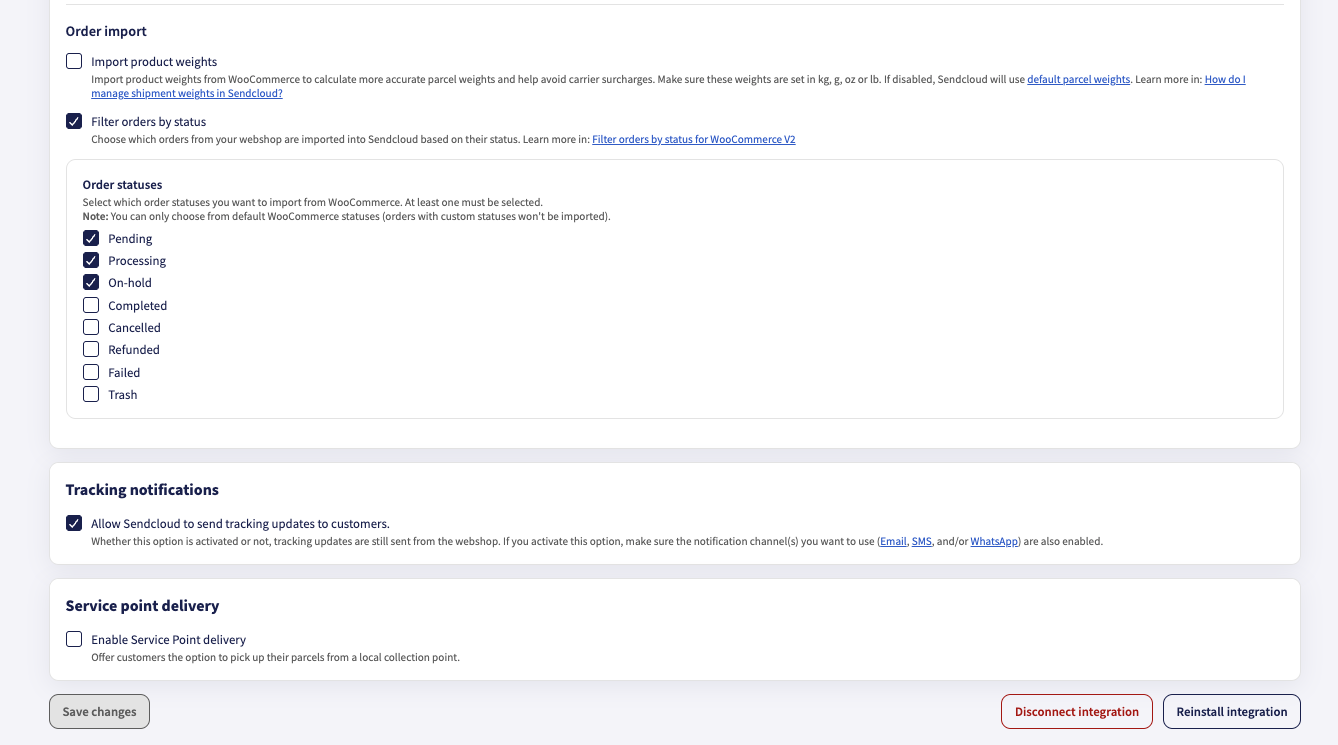
Under Data sync > Order import, you can configure how product weights and WooCommerce orders are imported into Sendcloud.
Import product weights
Enable Import product weights to import product weights from WooCommerce into Sendcloud. These weights help calculate more accurate parcel weights and avoid carrier surcharges.
To enable this option:
- Open your WooCommerce integration settings.
- Under Data sync > Order import, select Import product weights.
- Make sure your product weights are correctly configured in WooCommerce, using the weight unit selected in your WooCommerce store settings.
- Click Save changes.
If this option is disabled, Sendcloud uses your default parcel weights.
Filter orders by status
You can choose which WooCommerce orders are imported into Sendcloud based on their order status.
By default, the following statuses are selected:
- Pending
- Processing
- On-hold
To configure order status filtering:
- Under Data sync > Order import, select Filter orders by status.
- Under Order statuses, select the statuses you want to import from WooCommerce.
- Click Save changes.
You must select at least one status when order status filtering is enabled.
For detailed instructions, see our article Filter orders by status for WooCommerce V2.
Tracking notifications
Under Tracking notifications, you can enable Allow Sendcloud to send tracking updates to customers.
When this option is enabled, Sendcloud can send tracking notifications through your configured notification channels.
Important to know:
Service point delivery
Under Service point delivery, you can enable Service Point delivery to offer customers the option to collect their parcels from a local collection point.
To enable this option:
- Open your WooCommerce integration settings.
- Scroll to Service point delivery.
- Select Enable Service Point delivery.
- Click Save changes.
Manage your WooCommerce integration
Under your WooCommerce integration settings, you can use the Disconnect and Reinstall buttons to manage your connection.
Disconnect your integration
Click Disconnect to remove the connection between your WooCommerce store and Sendcloud.
Important: Disconnecting your integration has permanent consequences:
- Shipping rules linked to the integration are deleted.
- Unprocessed incoming orders associated with the integration are removed from Sendcloud.
- Tracking updates for shipments in transit will no longer be sent back to WooCommerce.
- When reconnecting, only orders from the last 30 days are re-imported.
Shipping labels and shipped order history in Sendcloud remain available.
Reinstall your integration
The Reinstall button is available in your WooCommerce integration settings.
If you're experiencing connection or synchronization issues, consult our WooCommerce V2 Troubleshooter before reinstalling your integration.
Adding shipping zones & rates
Shipping zones allow you to offer different rates and shipping methods on your checkout page, based on the customer's location. You can also use shipping zones to differentiate between domestic and international shipments, so you can apply a different pricing policy per zone.
You can manually add rates and shipping zones via WooCommerce by following the steps below:
- From the sidebar menu in your WooCommerce dashboard, go to WooCommerce > Settings > Shipping and then click Add shipping zone.
- Give your shipping zone a name, select the regions you want to include, and add your shipping methods.
- When you add a shipping method, you'll have the option to choose from the following pricing methods:
- Fixed rate: Set a specific delivery fee.
- Free delivery: Offer free shipping to your customers.
- Local pickup: Customers collect the order themselves.
- Once the shipping method is added, click Edit to add rates for this method.
- For more information about adding rates and shipping classes in WooCommerce, see Product Shipping Classes - WooCommerce.
Order Synchronization
WooCommerce V2 supports automatic and manual order synchronization:
- Live Synchronization: Orders synchronize automatically when they're created or updated in WooCommerce.
- Manual Synchronization: You can manually synchronize orders using the order fetching button in the Sendcloud panel.
If order status filtering is enabled, only orders with selected, supported WooCommerce statuses are imported into Sendcloud.
If orders are missing, check your order status filter under Settings > Integrations > WooCommerce > Data sync > Order import.
Product Data Configuration
-
Set EAN Codes: Go to Products > All Products, select a product, and under Product Data > Inventory, enter the EAN:
- Use the EAN by Sendcloud field for WooCommerce versions below 9.2.
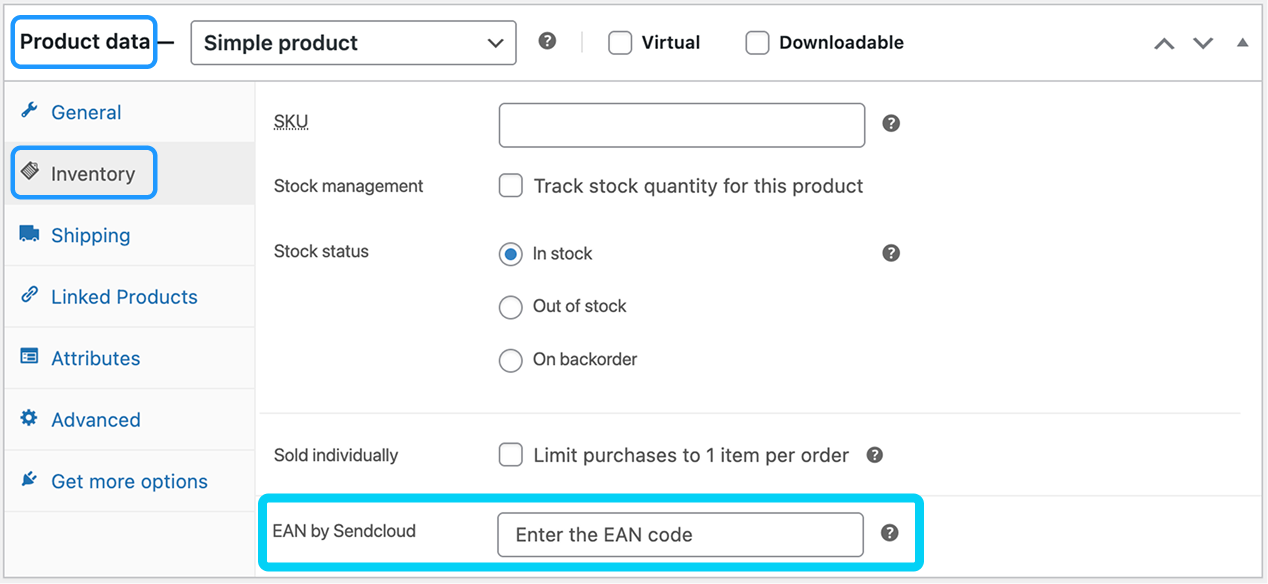
- Use WooCommerce's native EAN field for versions 9.2 and above.
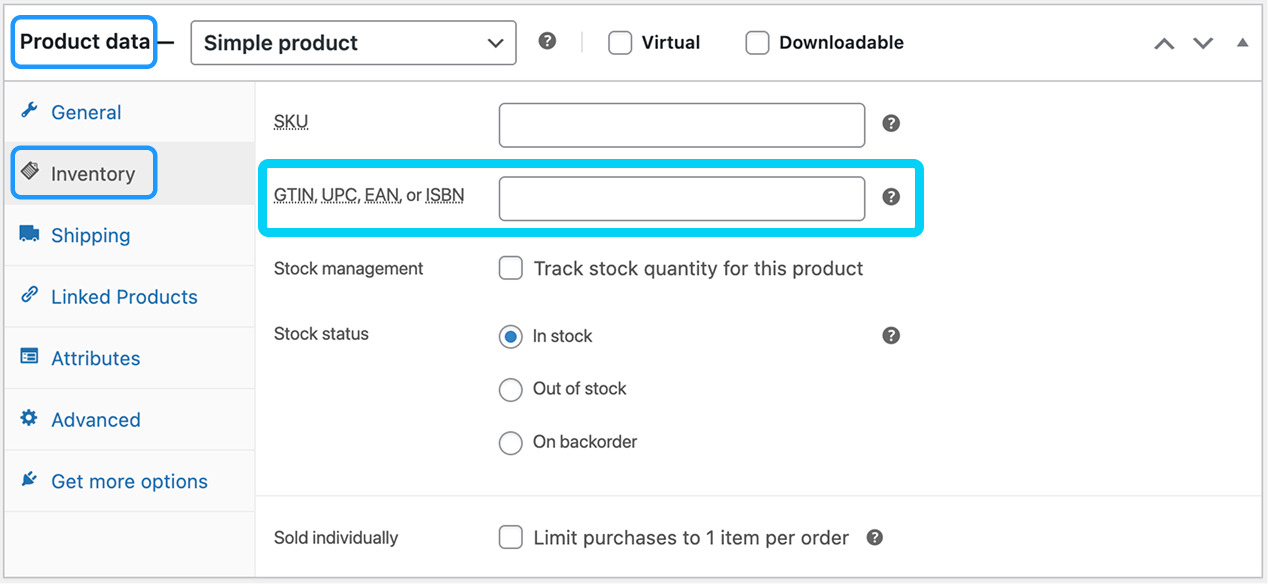
- Use the EAN by Sendcloud field for WooCommerce versions below 9.2.
-
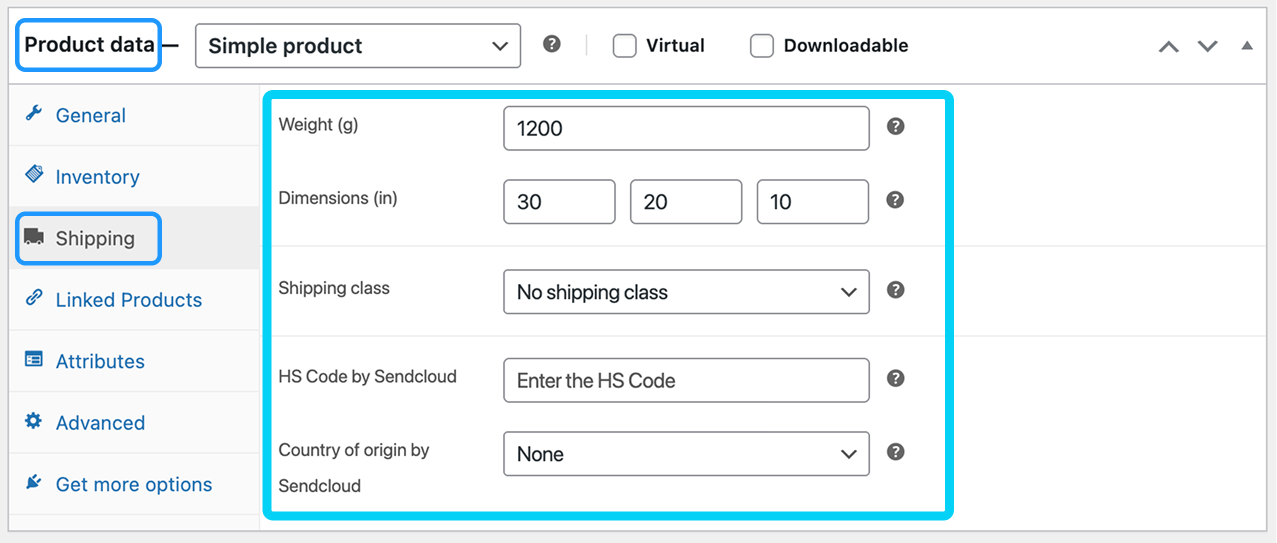
International Shipping Fields: Enter the HS Code and Country of Origin under the Shipping tab in the product data.
Using third-party plugins and custom themes
If you're using WooCommerce, Magento, or PrestaShop with third-party plugins or custom themes, there's a chance they might interfere with the Sendcloud plugin.
To ensure long-term stability and fast updates, Sendcloud limits support for third-party plugins and themes.
Potential issues
Conflicts with external plugins can cause issues like:
- Shipping labels not generating correctly
- Orders not syncing between your shop and Sendcloud
- Missing service point selectors
Troubleshooting
If you run into issues:
- Disable other plugins or custom themes and test the integration again.
- If the problem disappears, contact the relevant plugin or theme provider.
If you'd like Sendcloud to support a specific plugin, you can submit a request through the Support section in your account.